


")
The material itself is having such a great quality, like translucent pearly sheen has always attracted craftsmen of ornamental art. If you manage to pick him beads, not inferior in its characteristics, you will get excellent decoration.
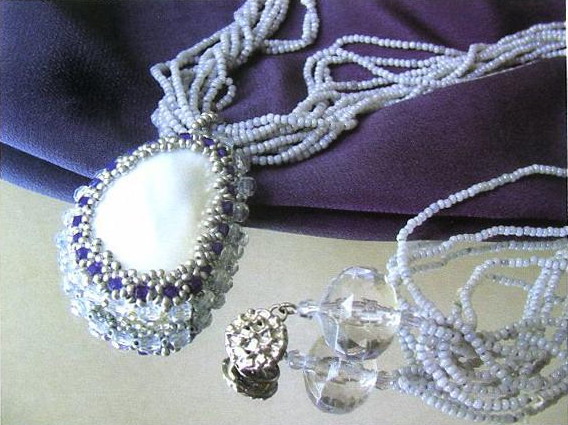
We picked up for the manufacture of braiding beads silver color. In addition to the used glass beads blue with fused edges and faceted blue beads. The base is made from beads of gray. Ready clasp in silver metal set with large transparent faceted beads. The whole composition is decoration painted in shades of silver pearl and is perfect for clothes of any colors in the blue-green spectrum and black and white.
The basis of necklaces are made according to the same scheme that was used in the previous bracelet. Only here everything is much simpler: beads of the same color, no additions of beads. Is a concise basis is called all the attention to focus on the Central element. A description of its implementation, we now turn.
The main difficulty in twining is that the plane of the shell is curved. In other words, the front part is convex and the reverse is concave. This leads to the fact that tightening the ranks of the wrong side do not adhere to the surface of the shell, as it were, hanging in the air. But don't be fooled by this fact — their fixing function this part performs.
Thus, the initial weaving of the chains does not differ from that described above for the oval rhinestone. We emphasize here that only used fishing line, because it is transparent and unobtrusive, and twining turns solid. In addition, in the case of sink must be especially careful to determine the size of the starting chain.
Now about the features of the contraction. Because of these features of the shell, there need some changes, namely: to comply with tightening the ranks will turn on the front, then on the wrong parts. In addition, on the front part of the tightening in the second row set of blue beads of glass beads. They set a certain rhythm in the alternation of the compression of the cells, breaking the monotony of the front part.
Features of this work consist in the fact that several broken oval shell shape. In one part it is more pointed, and in the opposite — more rounded, almost close to the circumference. This dictates the need to set every time the number of beads in constricting cells, which specifies the amount of space between the beads of the previous rows. You may have to change this number or go again a few beads of the previous rows. In any case, we must act based on the situation, trying to maintain symmetry in the arrangement of tightening ranks.
As mentioned above, to pull will turn both sides of the braiding. First, it performs the first compression rows, one in front and behind. Now you need to put the workpiece on the sink and hold the left hand until, until the end of the contraction. Needle with fishing line when it is transferred on one and on the other side.
In this embodiment, for tightening of ranks of the reverse side, we chose clear beads with large holes, as they allow some time to pass the final ranks for their hardening. In this case, the number of beads in tightening the cells will be different from the front side. Always try to follow the rule: "Act according to circumstances!". Work on the contraction may end after when a sink takes a strong position inside the braiding. This will happen a little later if the initial ranks of the free "sat" PA the sink. However, at first, suggest you to adhere to this freedom, undeterred by the large number of coupling rows, as needed the following from this freedom. If the sink is large enough, the extra tightening it will not spoil. Try to only make twining the front side is symmetrical, as it will turn out. After tightening, you can also install additional beads for symmetry and they will not perform a tightening function.
The wrong side is not necessary to tightly close the beaded — because this side is concave. In addition, when a complex form, we must strive to balance the load on both sides of the braiding. If you run one side much wider than the other, sink can move your seat or completely slip out. Try to include all of the above features and experience will help you with this.
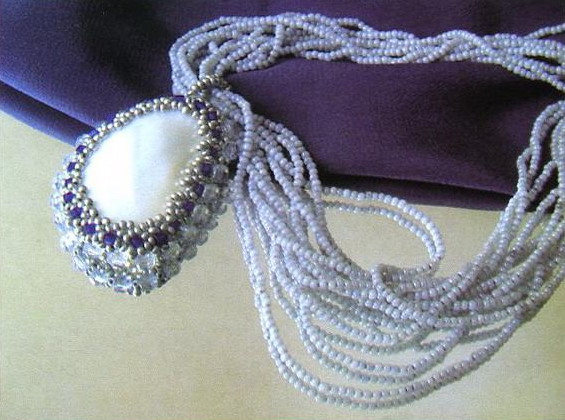
After performing the braiding you need to go to basis. You weave to the end with the installation fasteners, as indicated in the previous decoration. The length of the foundations is not as critical as for the bracelet. After all, there is the product is simply not usable, if the basis is small or too large. For a necklace you need to determine roughly the position of the Central element on the chest. Moreover, the shell has sufficiently large dimensions in comparison with crystals or stone.
The thickness of the bundle of bead strands of the basis that you determine, based on the size of the shell also affects its location. The shell is lightweight and does not cause strong sagging in the middle, so fairly large the beam will have almost an oval shape on the neck front. When the Foundation is ready, you can proceed to the installation of a Central element in the progress of mounting eyelets.
In the course of mounting the shell of the PA framework, there are several options. First, at what point in the side of the sink will mount. This will depend on what position it is vertical or horizontal. Second, if the retaining loop is fixed on the same point of braiding, then it will be visible, and in the space of the shell and are slightly spaced from each other a Vertical length of the entire decoration, in this case, there will be several more. If fastener loop is recorded in the opposite parts of the edge of the braiding and will not be visible, as in the bracelet "dawn", a form of necklaces will change. From under the lower edge of the shell will go directly to beaded strands. In this case, if the sink pin is tight enough, it can be worn in an asymmetrical position, gently moving the base. This decoration looks holistically composite, though more heavy.
The hinge mount at the opposite places, we have already described above. Here are a few words about the mount at one point. As mentioned, this loop is visible, so it is best to perform a string of single beads, not the cells. To harden these threads need two. In a prospective place of fastening on the needle with fishing line put on the right amount of beads and clasps beam foundations. Anchoring the resulting loop to the next bead edge braiding and coming back, go through the loop again to secure. The same loop is performed a number of more times, taking 2-3 beads. Both loops must cross each other to avoid symmetry. It is better to keep the unity with the drawing basics. Now, as always, we need to fix the line. After that refill all the work and cut. Before you the finished jewelry with shell bead twining.