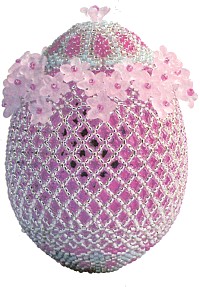
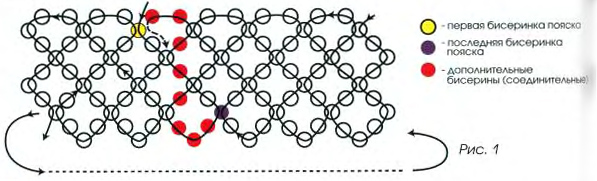
Belt on Easter eggs - a grid of beads, should take about 1/3 of the workpiece. Thus, they welcome the closure of a larger area. For regular eggs, it is necessary to choose the scheme with 4-6 denticles. For convenience, before starting, measure the Central part of the egg with a paper strip. The belt must weave 5-7 mm shorter than the strips because you need a snug fit the belt to the egg harvesting. After completion of weaving of the belt, connect it (Fig. 1) stringing the next beads (shown in red).
The fastest lap of eggs to make Easter eggs with openwork mesh, the key in which the beads and intermediate - cutting or glass beads. It looks like uncontrolled, but it is based on the belt.
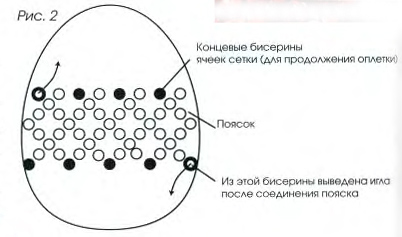
Describe the principle of this operation when a grid of beads. Begin twining the bottom. Figure 2 provides an illustration of the workpiece while wearing a belt. Print a string from any Central beads of the grid cell. Further, if the workpiece at this point, still expanding, Propietate a row, gaining three beads for podpitii regular mesh, and withdraw the needle, as shown in figure 2.
Now bend your workpiece is likely to have subsided, mesh bead will move gradually in peyote stitch. Therefore gain not on three new beads, and two, and this can be done in two ways (Fig. 3). Typically 5 or 6 rows, you can safely recruit to 2 beads. Due to the fact that the weave is a spiral pattern, each next row is reduced, the number of beads that provides a snug fit braid to the workpiece.
As soon as you feel that braid begins to lag behind the workpiece, move on to regular peyote stitch, that is, gaining 1 new bead, then enter the next, etc. At the lowest point of the workpiece you will need to gain 2-3 beads that you successfully connect by closing the hemisphere. Similarly appetite the top of the eggs. Do not forget about color. The key is to use podmlatka the colors that were used in the belt.
In the process, it may happen that a series I will be the one one series II and then series III a few (e.g. three or four); a number of single IV and series V is two or three; a number of VI - one, and the series VII - a again several. It depends on the curvature of the workpiece. As soon as the bead mesh is no longer tightly fit the blank - change the rhythm of weaving, that is, decrease the number of beads in each row, the shape of the workpiece. After the belt is put on the workpiece, zaplatite the lower part of the egg.
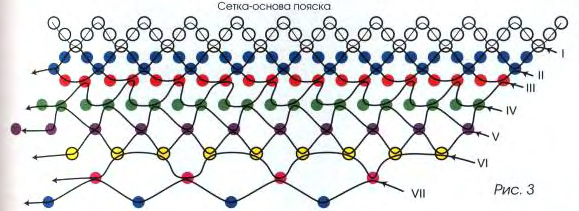
Figure 3 shows an example of the alternation of the number of beads in each subsequent row. This process will examine to understand its essence. After the grid-basis, withdraw the needle, as shown in figure 2 from one of the lower beads of the cell. Proplatit a row, picking up 3 beads (first row in figure 3). Will the needle from the first bead where you started to weave this series. If the braid separates from the workpiece, switch to set II series - recruit to 2 beads. This series can be repeated 3-4 times, inserting needle into every first of the 2 beads. Then I dial in the bead, entering in each of the first 2 of the previous row. Given the shape of the workpiece, and repeat this 3-4 times. If necessary, change the rhythm of work: go through 2 beads, type 1, pass again through 2 and type 1, etc., Well tighten the thread. Then dial 1 after 1, until the closure of makoshika of the workpiece. For this scheme, appetite the workpiece on the other side of the belt. Vary the number of rows of each type depending on the bending of the workpiece.


")