


")
One of the particular cases decoration in the form of a wire mesh grid is the bracelet that we called "mother of Pearl", although it has no materials, done with the use of the elements of the shells. It's all in the color beads and beads that are in Alliance with each other, giving a shade, like a bracelet made of mother of pearl.
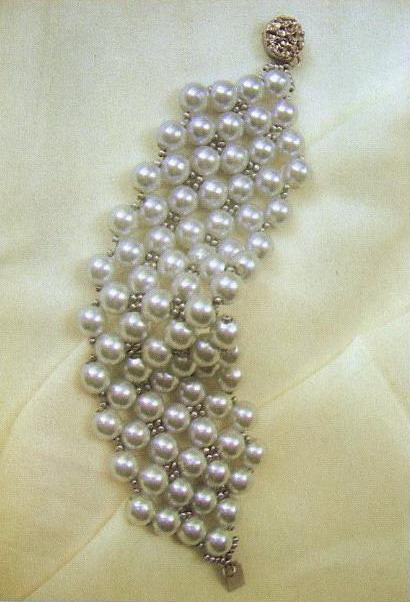
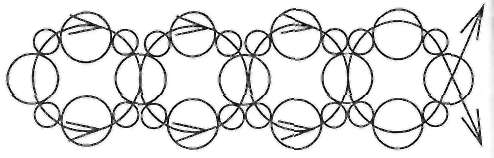
The composition of the bracelet is very simple — a mesh grid of large beads with pearl finish complemented by gray beaded metallic edge. By themselves, the beads really large, the grid consists of three rows, giving a fairly wide rectangle. The secret here is that every two neighboring beads in the cell alternate with the bead. All cells in the side wall have one busine and executed under the scheme. On the needle with fishing line for the first cell, put on beads, alternating with the beads in the last busine needle cross. For the second cell to one of the needles (for the first row they are equivalent), put on a bead, then a bead. It will be the side walls. Then again bead and a bead that will become a hub. On second needle, we are the same as on the first, put on bead and bead to the opposite side wall. Now, again, put on the bead, and the second busine on the other end of the line needle cross.
In the course of work after the first two or three cells measure the length of one of them. Knowing this value, you can calculate the size of the rectangle we need to weave for the bracelet. The total length of the jewelry should fit: clasp, fastening the transition from 3-4 beads, closing sections, left and right, consisting of one cell, three-row grid of beads, and, in fact, a rectangle of beads. When you carried out these calculations, it is possible to perform the first row of the grid to the required size. Here you can recommend to give a small gap along the length of the jewelry on their own the thickness of the beads, recall that they are quite large. The last cell in the running several you need to do a little differently. To prepare for the transition to the next row on one of the needles put one over the other bead, then a bead for the side walls; bead, beads; again bead and bead to move to the next row. Another needle need to wear only a bead, which is between the beads. Now in the third busine needle cross and be prepared to move to the next row. On the new row, the entire operation must be repeated only with the rotate by 90 degrees counterclockwise, namely, in the needle, which now turns out to be external, i.e. coming to the outside from the range, put on bead, bead; again bead and bead to the side wall of the first cell of the new row; bead, glass bead, which will be a hub for this first cell. Put the needle on the inner bead only, and the third Bucine, which is a key, the needles cross. Made now the first cell of the second row.
Weave the next cell in the second row will be implemented. On the outer needle will wear bead and bead to the side wall, then a bead and a bead that will hub. Put the needle on the inner bead, then pass a bead, which lies opposite the running of the cell in the previous row, where she was the side wall. Then again put on the bead, and then in the second busine on the outside of the needle cross. In order to perform before the end of the second row of the grid of beads.
At this stage, the mesh netting can be completed if you consider it is wide enough. Recall that the width of the bracelet is determined by number of rows. We even recommend to be limited to two rows, if you are working with rather large beads. At the end of the grid for attaching the clasp will need to install only one bead between the beads and the hole it will be located horizontally in the direction of the length of the bracelet. Note features of the pattern of weaving using beads. In between the beads, the cells located between the rows, you will see the four beads forming as the core cell. These beaded inclusions are not visible clearly and immediately, as if seen through the pattern of beads, just a little secret hidden inside the grid.
If you decide to continue the netting, extending the rectangle in the progress of the third row, as in our case, the further work does not cause difficulties, as the third row is woven exactly the same as the second. The given us the feature of the pattern three-row grid look more noticeable and interesting.
After the third row it is necessary to Supplement, rectangle closing unit, which will consist of only one cell. To accomplish both of the needle should return to the pattern of weaving in the last cell of the second row, i.e. in the middle of the short side of the rectangle. This end cell is lagging in the same way as the cells of the first row from the second, namely, one of the needles put in turns bead, bead, bead, bead. On the other bead, bead and bead again. In the second busine needle cross. Now with the running side of the bracelet to complete the clasp. Thus one of the needles where you cut the line is shorter, we leave to freeze. In the second section of the line, we set the clasp. To do this, put on the needle so many beads to fill in the plot hole to the middle of the edge beads, in our case it is four beads. Then another bead will directly link up with the ring clasp. As you know, it must have a large hole. Her needle goes in ring clasp and comes back up again. Here you need to put more beads in the same amount as before the middle of the beads, i.e., four. Now go through the hole of the beads from the other side. For strength all the way need to be done again, and then finally to link both ends of the fishing line four to five knots. Here the work is finished, pass the picture the remaining line of 3-4 cm and cut it.
On the other short side of the rectangle need to do the same operation, the only difference is that you need a new cut line. It can be attached directly on the last cell of the middle row. Ie, having a nodal bead of the specified cell and put on the missing beads and beads, fixed on 2-3 knot the fishing line so it will not slip out. Then install the fastener in the sequence specified in the previous paragraph. Don't forget to follow here to the two parts of the clasp had the same direction and was not deployed relative to each other. After the completion of the whole structure anchoring the line and, after drawing some segment of the cropping. Now, again, before you the finished product.
You can specify here that this is quite an interesting and simple figure allows for a small cost of time and materials to create products of large dimensions. It is important to choose the right combination of beads and beads. Try the set just described the bracelet to carry a necklace in the form of barocci. The maximum objective here can be to weave the belt in this technique. Only need to take the line with a thicker cross-section, and instead of beading the best fit small beads. Maybe someone of the readers will decide to implement this idea.