


")
A beaded or rhinestone cabochon has two sides — front and back. The front side should cover the convex part and should not be too broad. Because it is intended only to record the twining on the front part, while also highlighting all of its dignity. The bottom side is, basically, a fastening feature, although it will be visible and therefore must also be beautiful. The lower side of the entanglement can be solid, completely closing this part of the stone or rhinestone. Make it easy, it is flat. In the case of sink conditions change, you'll see it below.
Each side starts with chain, woven on two needles and closed into a ring. These chains merge its external sides, forming a rib that will form later at the edge of the stone or rhinestone. Netting will be carried out alternately with one and with the other hand. After the initial chain is the contraction of the front and back sides of the braiding, which is already one needle. In the end, depending on the model, can be the finishing beads, and fasteners that connect the element to the substrate. This is the General sequence of braiding cabochon or rhinestone beads.
Let's start with the chains. They run on two needles, as mentioned above — on the line, and in this embodiment have two types. The first one is done using just small beads and applied to a paste with a square in the base. The second type consists of beads and other materials and more suitable for oval stone. First, we will focus on the first option.
So, we turn to the scheme of the bracelet "Pearl". Look at her, weaving will be carried out by the same principle. Only in this case the side does not include the beads (scheme 1).
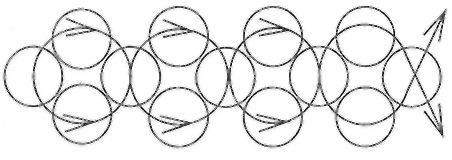
Scheme 1
For this simple scheme, you need to weave a chain of such length as to fit around the perimeter of rhinestone and slightly per bead. Now, if the length is sufficient, we close the chain into a ring. To do this, when processing the last cell put on the needle one bead, then go through the middle bead of the first cell, put on another bead and connect both ends of the line into three burl (scheme 2).
Scheme 2
So we just complete the last cell and fasten the starting chain, so it would not decay. The fact that the fishing line is slippery and has a rigid form, causing every time the unfortunate destruction of the pattern of the weave, of Course, to fix the chain must in that case made the necessary adjustments. In addition, we remind you that you have to strictly follow that chain before fixing not tangled. Fishing line can cause such a failure and have to redo the last cell. After the initial chain of the front side bring the needle to the nearest external bead on the scheme.
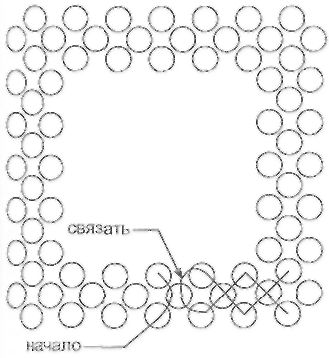
Now we have to complete the initial chain the wrong side, it will use the external beads already woven cells. Is formed, thus, the intersection of both sides of the braiding, which will form later at the edge of the rhinestone. At first it may seem this step is not absolutely clear, but, you understand, you will see that it is easy. Take a look at the scheme 3: it is in grey painted outer beads of the front chain. From them, front and back, and side braiding.
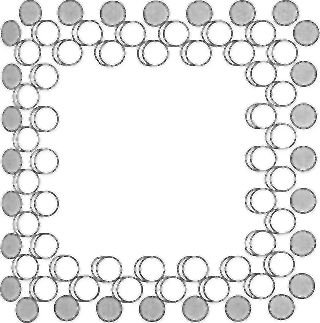
Diagram 3
So, what's the plan? One of the needles need to wear two beads on the second one, in which the needles will be crossed. Now you will be the first cell on the reverse side, the needle crossed into the junction busine this current thread. On that needle, which is guided to the outside from the center of the whole structure must go through the external bead of the cell front side, which lies nearby. Another needle is directed inward, put two beads in the second, while the needles cross. Ready for the next cell on the opposite side. The same pattern runs all the initial chain the wrong side, excluding the corner cells. As you can see, they two are external beads — one bead belongs to one side of the square, and the adjacent part of the adjacent side. Based on these features, we pass the outer needle from the two outer beads and the inner needle is put on only one, which crisscross the needle.
Try not to get lost in the sequence of weaving. If you still do not succeed the first time, do not be lazy to remake the wrong side — then you can better make out the pattern. Although in the case of secondary failures do not despair — the wrong side is not so critical, minor violations, it's less noticeable.
After completion of both primary chains again need to tie three knot the ends of the line. One of the needles translate to the nearest side bead of the wrong side, and leave the edge of the fishing line to weave the reverse of edge braiding. The second needle of the transfer pattern on the front side in the lateral bead for tightening the front of the braiding. Now we are going to carry out retraction of the parties.
During retraction, the challenge is to set in between the inner beads of the starting chain beads of the new row. Thus, the dimensions of the beads, and the size and shape of the protruding part of crystals will dictate the number of newly established species and the frequency of their establishment.
You can perform a contraction of the wrong side, because here the challenge is to weave a flat area, and it is much easier. Up to this point by paired chain was performed separate from the crystals and, being flexible, did not have any particular shape. Now you need to put the resulting workpiece to a paste. It is desirable at this stage to the size of the workpiece was such that the bead detail was worn on the rhinestones with some effort and didn't off him with ease. It will be easier to work if will be respected this condition. Lay these dimensions at the beginning, when calculating the number of cells in the primary chains on both sides. If the workpiece is too large or Воо6ще not worn on the belt, unfortunately, will have to redo it again. In this case we recommend you not to get upset, because again you do not need to spend time understanding all of the details, and the work will go much faster.
So, put the workpiece on the rhinestone and begin tightening the wrong part of the braiding. Here, the weaving can be done on any picture that you want to do, in compliance with the conditions of the symmetry each side of a tightening of ranks. In the intervals between the cells you need extra beads converging to the center of the rows (diagram 4).
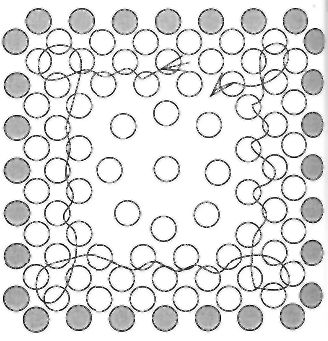 Diagram 4
The ranks every time you need to pull quite tightly. Throughout the course of retraction of the workpiece will have to hold that it will not slide with rhinestone. When the free space on the inside is completed, should be two to three times to pass the Central part of the seal. Then translate the drawing the line closer to the outer edge of braiding and leaving for the final fixation.
You can now navigate to the contraction of the front side braiding. The position of the crystals inside the workpiece is still not reliable — at any moment he could move or even slip out, and therefore, it is necessary to hold. The contraction of the front side is slightly different from the previous one — because the front part is convex, but still have rectangular rhinestone has the edge. Although consolation may be that the front part of the braiding is very narrow — only a few rows.
We have done the following. To cement the design on the faces of the convex face of the rhinestone, walked once by the internal beads of all cells in the initial row of the front part of braiding. While the faces have installed one additional busine. This was followed by additional tightening of the range in which between the cell sides with one new busine, and on the faces of the two. After that, we pulled two or three times the last row, and that was enough. The rhinestone is firmly secured inside the braiding, and the whole structure retains the possibility of fixing on Foundation and quite beautiful. Can now be pinned between the edge line and, if necessary, to install additional finishing elements.
In the case of using a rhinestone or stone of large dimensions it is expedient to Supplement the larger beaded beads. This is true, in particular, for square crystals, in which the beads are located on the sides and in the corners, dramatically uneven. On this basis, we note that the number and frequency of the establishment of additional beads as in the case of retraction, you regulate yourself. We will give you only the outline of such a setting, which is very simple. Point out also that here the stem should be shorter and stiffer. And beads used in the plexus, the size of the larger beads. Depending on your desires, you can perform additional environment of large beads, with either smooth or scalloped edges. If beads are to be installed only between the outer beads, marked in gray in figure 2, the environment will work with straight edges. If additional beads to set and external bead, and between the inner bead, then the entanglement will take the form of serrated bristles. All this environment is running on one needle using the end of the line, which, after binding remained longer. Try to pull the line tighter on each busine to the environment had a certain freedom, but not slack. If the line ends, you can produce its capacity. Upon completion of this phase of work, re-connect the ends of the line three or four knot. Now you can fill the ends of the fishing line entanglement in and crop them. In this embodiment, jewelry rhinestone square shape attached to the areas of the bases with the help of jumpers from strands of single beads. And fishing line in this case might damage his rigid form. If your model has another connection line is not necessary to fill in the entanglement, as it will be used to perform fastening loops. Finish now with a square rhinestone and proceed to those that have oval or round shape.
Entanglement for round or oval stones and rhinestones has the difference that the position of all the beads is more or less equal importance. On this basis, it can be directly included in the beaded beads of different sizes and does not suffer from the weaving of corner sites. Of course, you are welcome to use the already described entanglement for all materials regardless of square or round shape. But for the sake of completeness, we present further entanglement in which the cells are composed of beads and faceted clear beads. They are really very beautiful and fit perfectly with the Shine of rhinestones or a noble shade of natural stone.
One of the side parts of cells will include the beads, and the beads, the size of which corresponds to the side wall. In other words, in the course of the netting you choose for the side walls of the cell so many beads to it quantity fit along the edge of the beads from one exit to another (diagram 5).
 Scheme 5
According to this scheme, you must perform a chain that would fit around the outer perimeter of stone or rhinestone. Since all cells are more or less equal status, there is no need to count where the rotation of the weaving. If rhinestone oval chain itself will fall on the curve of the outer edge, skirting the steeper the turn. In the case of round stone, and even these changes will not happen.
It is important to note here that the size of the chain will be slightly different from the previous model. After all, before the Union of the faces of the braiding occurred in the external beads that were common to the obverse and reverse sides. Hub and lateral, thus, belonged to different faces. Now the connection will occur at focal beads, i.e., common to both faces and beads, and nodal beads. The beginning of the joined faces, this time forming only the lateral beads of the cells. Based on the foregoing, the initial amount of chains must be a little more than that in the woven preform was possible to insert the crystals. Upon reaching the desired size of the initial chain, the last cell we recommend to fix the following way. Put the needle on the outer bead and go through the base bead in the initial cells. Put the needle on the inner side of the beads and connect the ends of the fishing line between them to secure the chain. Thus, the knot is on the inner part of the starting chain braiding and will not interfere in the further implementation of the adjacent sides.
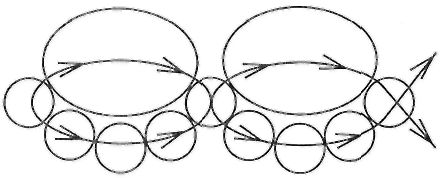
Next, start braiding the other side. As we have said, it will be common nodal beads, and the beads just made chain. The external needle will again pass a bead, and the inner needle will wear the new side beads. Cross needles are in the hub beads of the original chain. If you took the time to understand the diagrams above, it seems that you will not be difficult to produce and these operations too. Pin now adjacent chain required similar to the first so that the knot was on internal parts. In its present form, the blank represents the beads connected to each other through the beads, perpendicular to the centerline (6).
 Scheme 6
Around each of the beads, while the bead located at the two arcs. Such preform can already be worn on the belt, that needs to be done. As you know, on the face of the rhinestone have to get beads and base beads because they represent the intersection of the faces of the braiding. Lateral bead of the arc must lie, thus, on upper and inner sides; of Course, in this position the bead blank needs to hold it on the belt, and slip it will be even easier than in the previous case. It actually beaded on the surface of the crystals is almost there. The contraction we just eliminate such a shortage.
Now you can start the contraction of the faces. In this case, there is no corner sections, so the netting is easier. You need a circle to perform the tightening, concentric circles will converge to the center. The execution order of a tightening of the ranks is absolutely similar to the previous version: all the intervals are symmetrically installed new beads. The wrong side of the contractible to the complete filling of the surface of the beads, reducing her to the center. Anchoring this area, passing a needle with fishing line a few times. In General, recommended for reverse side to choose beads with large holes, because after the retraction will need to install mounting tabs. As in the previous case, after the tightening of the reverse side transfer the line drawing to the edge and leave for the final fixation.
Now you can begin contraction of the front part. At this stage, the crystals still need to hold it inside of the workpiece. As for the reverse part, the operation is carried out similarly to the previous embodiment. The difference may consist only in the fact that you may need more tightening of the ranks, and the more convex the rhinestone or stone, the correspondingly wider than the front part. As a rule, the crystals are less convex, almost flat, that is, a maximum of two rows. In the case of natural stones is not the case. Their front part has a substantially a hemispherical shape. Based on this, you should use your specific version to perform as much tightening of the ranks on the front panel to firmly lock the stone in beaded braiding. This problem, of course, slightly more complicated, the more time it too to close the front surface of the beaded rows. For the selection of the optimal variant immediately stop netting, only the stone will be fixed inside of the workpiece. Even if the unnecessary rows, we can let them and just fix the last row two or three times. Here you have to pull the line tighter in this final series, thereby gradually increasing the width of the front part. Be careful only to fishing line did not break, otherwise you'll have to dissolve the front part, increase the fishing line and execute again.
In fact, the most difficult part completed. Now we need to translate the line on the wrong part and to hang both ends on two or three of the knot in that case, if you need to perform the mounting loops. When the base is attached directly to the entanglement, i.e., additional fastening devices are not needed, a fixation amplified. The final fixing of the line always should include at least 5 knots, as it is quite slippery and easily dissolved. Knots after flipping the ends of the fishing line in work of 2-3 cm, passing through the pattern two needles one after the other, and cut.
Now a few words about the mounting tabs. Their design and dimensions that you define yourself, based on your chosen model. We can give only recommendations. For example, if the stone is small and heavy, as in our version, pink quartz, fastening loop you need to perform a chain of cells is shown in diagram 1. If used crystals, or, say, pearl shell, it is possible to do with simple strands of beads, one or more. The length and width of mounting tabs each time you need to find experimentally, having tried a number of options and choosing the most suitable. It may be appropriate to suspend work on the entanglement and to perform first basis, and then to her size to pick up the mounting tabs, removing the needle and leaving free the ends of the line. Although it is best to bring the ends of the line to the place of the anticipated start of mounting tabs, and then remove the needle. Thus we will be prepared for the next phase of work on the entanglement.