")
NEEDLE WEAVING BEADS
The needle technique of weaving with beads is used to perform thin, pointed petals (chrysanthemum, Daisy), stamens, sprigs of pine, spruce, etc.
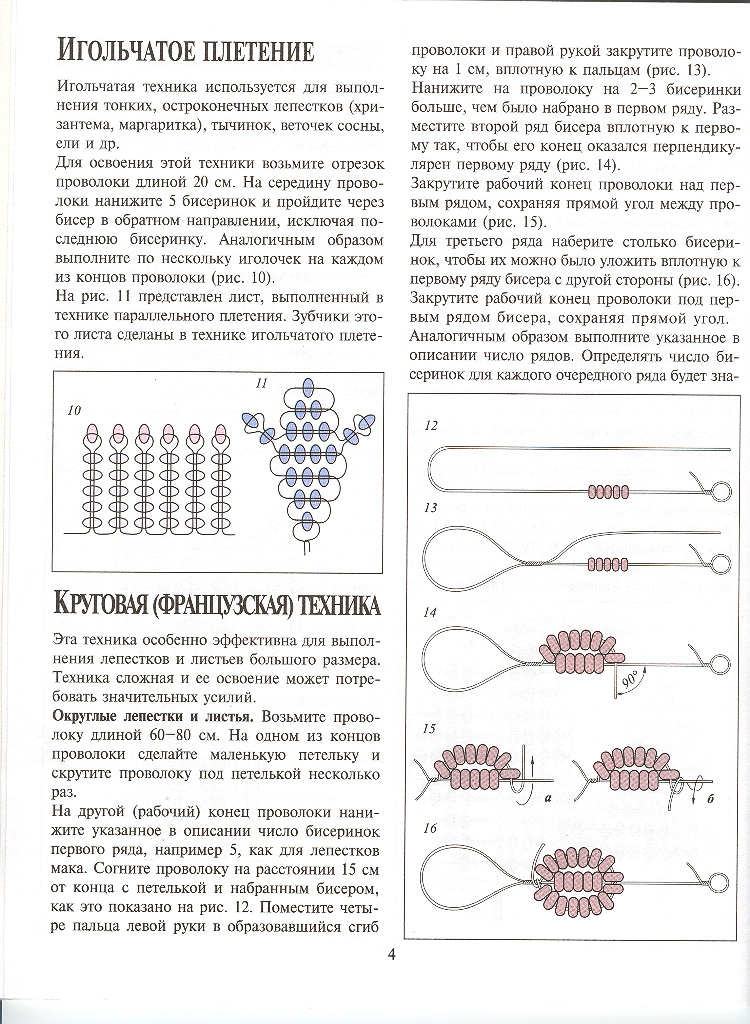
For the development of this technique, take a piece of wire of 20 cm In the middle of the wire, string 5 beads and go through the bead in the opposite direction, except the last bead. Similarly, do a few needles on each end of the wire, as shown in the weave pattern No. 10.
In Fig. 11 shows the sheet made in the technique of parallel weaving. The teeth of this sheet is made in the technique of needle weaving.
CIRCULAR (FRENCH) TECHNIQUE
This technique of weaving with beads is especially effective to execute the petals and leaves of large size. Technique is complex and its development can require significant effort.
Rounded petals and leaves. Take the wire length of 60-80 cm At one end of the wire make a small loop and twist the wire under the loop several times.
On the other (working) end of the wire string specified in the description of the number of the beads of the first row, for example 5 like poppy petals. Bend the wire at a distance of 15 cm from the end with the loop and dialed beads, as shown in figure 12. Place four fingers of the left hand in the resulting bend of the wire and right hand twist wire 1 cm, close to the fingers (Fig. 13). String on the wire for 2-3 more beads than were recruited in the first row. Place the second row of beads close to the first so that its end was perpendicular to the first row (Fig. 14).
Twist the working end of the wire on the first row, keeping a right angle between the wires (Fig. 15).
For the third row, type as much of the beads, so that they can be laid close to the first row of beads on the other hand (Fig. 16). Twist the working end of the wire under the first row of beads, keeping a straight angle. Similarly do the in the description the number of rows. To determine the number of beads for each of the next several will be much easier if you just gain 15-20 cm of beads on the working end of the wire. To the beads rubs off, screw the tip of the wire.
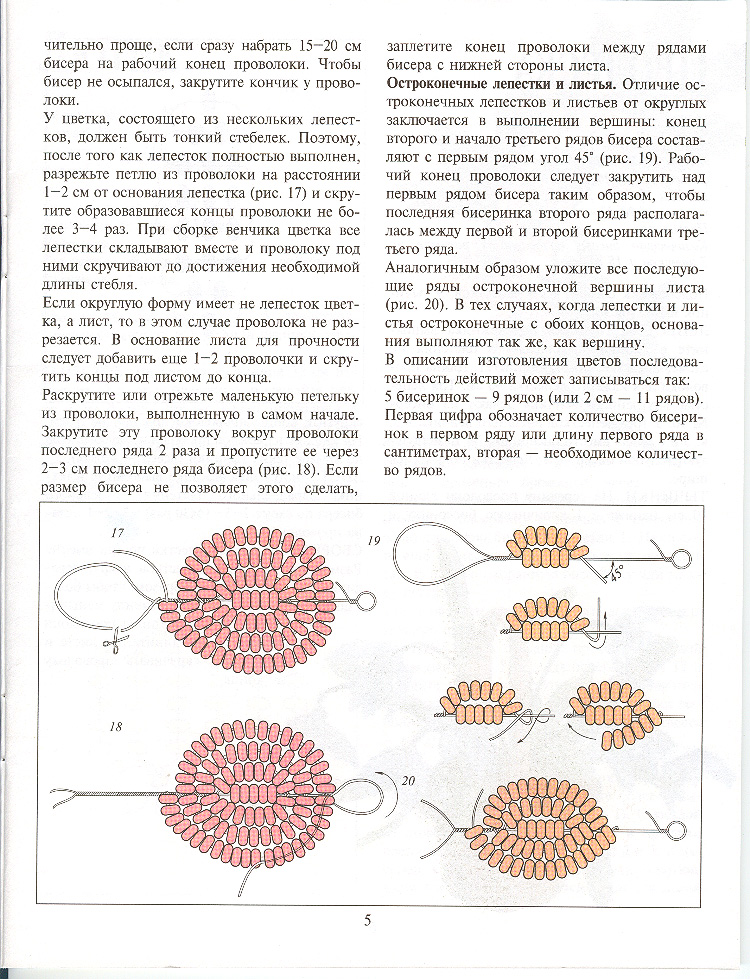
The flower consists of several petals must be thin stem. Therefore, once the petal is fully implemented, cut the loop wire at a distance of 1 - 2 cm from the base of the petal (Fig. 17) and fasten the formed ends of the wire no more than 3-4 times. During Assembly of the Corolla of a flower all the petals together and put the wire under them twist until reaching the required length of the stem.
If the rounded shape is not a flower petal, a leaf, in this case the wire is not cut. In the base sheet for durability, we should add another 1-2 wires and twist the ends under the sheet until the end.
Untwist or cut a small loop of wire made in the beginning. Twist this wire around the wire in the last row 2 times and pass it through 3 cm of the last row of beads (scheme of weaving beads No. 18). If the size of the beads does not allow it, weave the end of the wire between the rows of beads on the lower side of the sheet. Pointed petals and leaves. The difference pointed petals and leaves from the crew is to perform the peak: the end of the second and the third rows of beads are with the first near the angle of 45 (Fig. 19). The working end of the wire should be spun over the first row of beads so that the last bead of the second row located between the first and second beads of the third row.
Similarly, lay the subsequent rows of the pointed peaks of the sheet (Fig. 20). In those cases, when the petals and the leaves are pointed at both ends, base to perform the same as the top.
In the description of the scheme weave beaded flowers in the sequence may be written as:
5 of the beads — 9 series (or 2 cm — 11 series). The first digit indicates the number of the beads in the first row or the length of the first row in centimeters, the second the required number of rows.