


")
Hat. 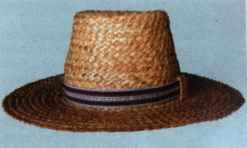
From the 18th to the early 20th century more popular headgear than a straw hat, it was hard to find. Among rural residents the straw hats were worn only by men. The main quality of people's hats was their functionality, low cost. Without changing the styles of people's hats have survived to the present day, becoming the accessory in the main stage of the folk costume.
Quite different was the straw hats that were made for citizens millinery workshops in Western Europe. Varied designs, original netting, the use of lace, feathers, ribbons turned hats into works of art. Particularly beautiful and varied ladies ' hats. Styles of men's hats remained closer to traditional folk forms. The diversity they gave the use of different types of networks, technology stitching and shaping, and changing proportions of such parts of the hat as the crown and the field.
For example, consider the sequence of manufacturing the men's hats, made of flat wicker "catfish" 4 Solomin. All the straw hats have three main parts: the bottom, the middle and the field. Straw hats, made with strips of flat weaves, sewn in a spiral. Each subsequent turn placed under the previous one. Rows of coils diverge in the direction from the bottom to the edges of the fields, forming scaly texture of the hat.
Materials:
8 Solomin from the upper part of the stem with a diameter of 2 mm;
- 8 Solomin from the middle part of the stem with a diameter of 3 mm;
~ 450-500 Solomin from the middle part of the stem 4 mm in diameter;
65 cm hat ribbon a width of 3 cm;
65 cm ribbon for hat binder with a width of 3-4 cm;
needle, thread, scissors, rolling pin for rolling the netting.
Equipment:
flat braid "catfish" 4 Solomin .
Preparation of weaving.
1. For making hats you will need about 25-30 m netting "catfish". To begin braiding, you must Solomin from the upper part of the stem with a diameter of 2 mm. Straw tape for the first 10-12 cm should be rather narrow, up to 1 cm that it is convenient to form the bottom of the hat where the coils bend at a small radius.
Note. Starting weave all of the straw cut to different lengths.
2. Continue weaving straw ribbons straws from the middle part of the stem with a diameter of 3 see This section of the netting will be a transition to the main part.
3. Continue weaving straw ribbons straws from the middle part of the stem diameter 4 mm. Approximately every 3-4 meters prokatyvaja a straw ribbon. Cut off the protruding ends and ended nastavljenih Solomin. Feed for ease of cut netting compactly.
Note. If you don't make the whole network at once, you can interrupt the operation at any time. Storage of unfinished wicker, you can choose 2 options. In the first case, when you know that the next day will continue the work basket can be put in a plastic bag — it will be stored wet. In the second case, if you plan to continue working very soon, the network put to dry. Before again to start to work, soak it, and then continue stitching. Exactly the same goes with unused strips.
The manufacture of hats.
1. Measure with measuring tape the perimeter of the head — it will match the size of the stitch hat.
2. Moisten the braided line. Rewind the tangle of netting from end to beginning. Thin end of the beginning of the weave should be on the surface of the ball. If you are starting netting, tied the ends of the straws, carefully trim it to minimum size.
3. Manufacturer of bottom. Bend the end of the weave a length of 4-5 cm and put it under him, with the overlap of the first round of weaving. The overlap is 1/3 of the width of the braids. As you upload turns shivaite them together with hidden stitches that hide under weave Solomin. The bottom hat has a flat surface. For the convenience of its formation all the coils of braids slightly stretch the outer edge, so they made one from the other horizontally. Make 10-12 turns, this amount would be enough to get the bottom oval of the required size (the largest diameter is 18 cm).
4. Fabrication of the crown. The crown covers the head height and is a slightly expanding cone. The coils in the crown are stitched together in a plane perpendicular to the plane of the bottom. Starting to shape the crown and fold the latter round the bottom from itself at a right angle. Bottom round bent put a new round of netting, sew it to 1/3 width. After the entire perimeter, you will receive a small bent edge — it will be the beginning of the crown of the hat. Making the next turn, you form the surface of the crown in the form of a slightly widening cone. The coils with the outer edges have a little stretch, not allowing the form to shrink in diameter, and Vice versa — reaching light to increase. If you do not pay attention to this, size reduction will occur spontaneously due to the thickness of the straw belt you turn after turn enclose the inner side of the crown. To complete formation of the crown height of 16 cm you need to pave the 12-14 turns of tape. In the lower part of the crown has a diameter of about 20 cm for size 58 hats.
5. Manufacturer fields. For the formation of the fields you have to leave again in the horizontal plane as when knitting bottom. For this last round of braids on the crown bend under a right angle. Braided line needs to greatly expand on the outer edge. Lay underneath and sew a new round of "catfish". The first stage you will begin to form fields, but do not leave entirely on their plane. Sewn the second round of weaving will complete the transition curve. Don't forget to strongly stretch the outer edge of the netting, forming a horizontal plane. Further shivaite the coils, placing them one under the other, forming a horizontal surface fields. Field width of manufactured the hat is 12 cm, you'll need to build about 9-10 turns of braids. Once you have reached the necessary field sizes, trim the excess part of the basket (sometimes you need to doblesti netting). The end of the weave hem under the previous round on the inner side of the fields and firmly secured at the level of the major diagonal of the bottom. This part of the hat when dressing will be back.
6. A piece of netting with a length of 10 cm sew side in the lower part of the crown, near the bending field, a small buckle for the ribbon. Smooth it with the iron, giving a flat shape.
7. Tformula hat. For this it is still wet, pull the disc. The fields give a horizontal position — they can be lightly ironed not very hot iron. If you want to give the fields a curved shape, bend them in a wet condition, clamp and allow to dry. As well shaped and the bottom.
Note. Any change in geometry can be produced, moistened the product or parts of it.
8. Hem on the inner side at the bottom of the crown backing tape. From the outside of the crown through the buckle pull decorative hat ribbon, sew its ends together and hide podrezkoj.
On the basis of the above-described example, you can make hats of various shapes, stitching rounded and concave bottoms, changing the height of the base and size fields using different types of flat weaving, decorating the base compositions.
Very beautiful hat, made of a combination of several types of flat weaves, such as dense and delicate. Before to start performance of such hat, wizard, preparing netting, first sew them together. It turns out a wide band of the complex decorative pattern of the two sewn braided. Then, from the prepared tapes sewn hat.
Wreath. 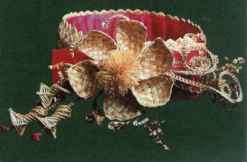
Wreaths and decorative hats, made of straw and decorated with straw flowers and compositions, appeared as part of a woman's folk costume stage relatively recently — in 1970-1980th years and for a very short period of time become very popular. The prototypes of them are popular women's hats of namitki, Scandicci (girlish head-wear), wreaths of natural and artificial grasses and flowers, which decorated themselves girls.
Materials:
for the base of the wreath:
- 60 thin straws with a diameter of 2 mm, dyed onion skin, to the middle of the base;
- 250 fat straws for the top and bottom of the base;
~ 60 cm red satin ribbon with a width of 6 cm;
for the composition:
18 Solomin from the upper part of the stem with a diameter 1-1,5 mm bells;
The straw 24 from the middle part of the stem with a diameter of 3.5—4 mm for the petals of a flower;
6 straw red ribbons with a width of 5-6 mm beads;
22 the straw from the middle part of the stem with a diameter of 2-2,5 mm for decorative elements;
14 Solomin from the middle part of the stem with a diameter of 2-3 mm for the leaves;
8-10 conserved in glycerol inflorescences of grass;
44 cm red satin ribbon for bow;
needle, thread for stitching items, PVA glue, scissors, rolling pin for rolling the netting.
Equipment:
simple braid "herringbone" of the 7 Solomin for the middle part of the framework ;
flat braid "catfish" for the upper and lower bases ;
braid the basket weave 8 Solomin with braided straight edge for the petals of a flower ;
a simple braid of 4 straws for leaves ;
twisted volume network of 6 Solomin for bells ;
twist chain for decorative elements ;
pyramid beads .
Preparation of weaving.
For the base of the wreath:
1. Of prepared to work 60 thin Solomin, dyed onion skin, weave about 60 cm easy braided herringbone 7 Solomin.
2. Of prepared to work 250 Solomin from the middle part of the stalk weave about 2.5 m wicker "catfish" 4 Solomin. For the composition:
3. Of prepared to work 24 Solomin thick weave 6 petals for the center flower, using a simple basket weave of 8 straws with braided rectangle edge. The length of one petal is 6 cm, width 3.5—4 cm (figure 5.92). Straw after netting tie in a tight bundle and don't cut. 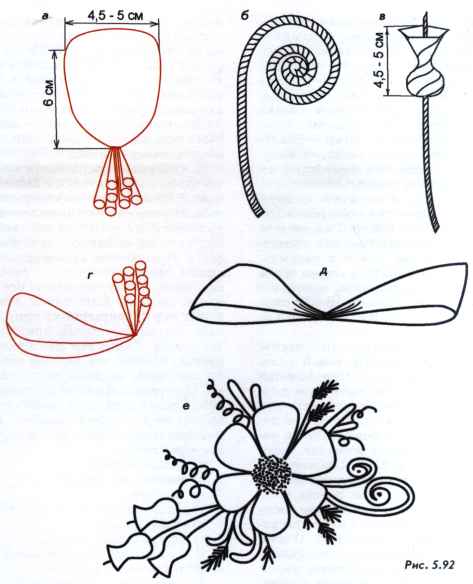
4. Of prepared to work 14 Solomin from the middle part of the stem 7 leaves weave in the art of simple weave 4 Solomin. The length of the leaves is 7-9 see Even damp proof braided helical form, wrapped them around a pencil or pen.
5. Of prepared to work 22 thin Solomin from the middle part of the stem 10 weave braided "chain". For weaving straw communicate in pairs. Prepare the 2 "chain" with a length of 22 cm and 8 "chains" with a length of 15 cm From the "chains" of length 22 cm make decorative elements, twisting the ends of "chains" in the ring (figure 5.92 b). Of 5 "chains" of length 15 cm make helical elements, twisting them arbitrarily, for a pencil or pen. 3 "chains" leave even.
6. Take 3 "chain" Of 15 see prepared to work 18 Solomin from the top of the stalk weave the three bells in the technique of bulk twisted netting from 6 Solomin, using the basics of "chain" (figure 5.92). When vypletenii bells use the techniques of expansion and contraction of the twisted braids. The length of the bell is 4-4,5 cm, diameter at base 1.5—2 cm, the diameter of the Corolla is 3.5 cm End of the "chain" needs to be over the edge of the bell 1-1,5 cm Length of the legs of bells is equal to approximately 9-10 cm
The manufacture of the base of the wreath.
1. Measure with measuring tape the perimeter of the head. On average, this value is 57 see On this size we will perform a wreath.
2. Sew from a simple braided herringbone ring, the perimeter of which a little more girth to the head and is in the range of 57.5—57.8 per see the Stock size is necessary for podchinenija of the braids and ribbons. Overlay the ends of the braids is 1.5 cm.
The ring will be a Central part of the wreath, which will be filed next braids.
3. To one of the inner sides of the ring stitched attach the braid "catfish". A new network is superimposed on 1/3 of its width. Start to sew "catfish" to the ring from its seam. Stitches lay under weave straws so that they were hidden. After you go full circle braid trim. Lift it to the top just tabbed rings and a tab for another tier of "catfish", connect the coils with an overlap of 1/3 the width of the braids. After the second ring catfish trim it with a margin of 1,5— 2 see the end of the slightly bend down the inner side of the ring, and neatly hem. You have made half of the wreath frame.
4. Attach the "catfish" to the inner side of the other edge of the ring. Start to sew from the seam of the ring. The sewing sequence is the same as in the previous step. Get a base wreath in the form of a cylinder, its height is equal to 5-6 cm, height 18-19 cm
The preparation of the composition.
1. Collect Central flower compositions. Moisten with water woven 6 petals. With the help of iron give them a curved shape. Zautyuzhte braided part at right angles to the beam connected to the end of straws. The beam is from the concave side of the petal (figure 5.92 g). Tie all the petals together first in pairs and then join pairs together (communicate the items as closely as possible to the straw in the beam diverged in different directions). Braided part position radially in the same plane concave parts up, in the middle of the circle associated petals are straw bundles. Align all the straw in the Central beam at one length, approx 2.5—3 cm, Take a needle and laminate all of the straw bundle into thin strips, the width of which is 1— 1,2 mm. So it will be decorated the middle of the flower.
2. Hold a piece of satin ribbon designed for bow. Wrap the ends to the middle and hem, in the middle across the belt sew thread stitching with large stitches and make the Assembly (figure 5.92 d). Sew a bow for the middle part to the base of the wreath, covering the place of joints and transitions of the braided Foundation. On the reverse side stitches run along the surface of the foundations, later they will close the backing tape.
3. Assemble bow on top of the composition prepared from the elements(figure 5.92). Composition begin to collect with the lower elements, attaching them with thread to the base in a Central and close to it area of the bow. Sew the elements of the composition with three or four stitches so that they are not dangling. All elements must be of such length that they are not obscured by the Central flower, which is sewn last. Before you sew the flower, delete all unnecessary elements of weaving, cutting them with scissors. Central flower sew small stitches, hiding the stitches under weave Solomin. The sequence of the sewing elements of the composition:
a) bells;
b) curls from chains.
C) leaves;
d) twisted elements of the chain;
d) stems of grass;
e) Central flower.
On the reverse side of the rim all the stitches over the glue.
4. Hem the wrong side of the wreath with satin ribbon. The edge of tuck tape and carefully seal.
5. Stick a straw beads "chains" in the center of the bells on the ends of twisted straw items made of "chains".
Composition of the wreaths can have many variants: asymmetrical, with one side of the rim; symmetrical on both sides of the rim; around the perimeter.
Select your language