


")
In this section you will be given the netting characteristic of the work of Belarusian artists and used by artists in Western Europe and America. Unique netting are the property and pride of the master and of the country, so using them will turn with gratitude towards their talent.
Weaving that are made of a large number of odd straws. The pattern weaves will sometimes repeat the weave, which is made of an even number of straws. You will notice it when you perform tangles with the straight edge. However, one very essential feature that explains some repetition in the schemes and designs of the weaves.
Note. Similar figures have braided lines, performed from even and odd number of straws are formed at different bending working Solomin. Symmetrical pattern "matting" and "pigtail" braids of even numbers Solomin is formed by bending working of straws on the right and left in different directions (from itself and to itself). These drawings weave the braids of the odd number of straws will be formed when the bending work Solomin in one direction (only to itself or only itself).
Knowledge of these differences will need to vypletenii long tangles, when there is a need to extend the ends of the straw, nastavlja them with new straws. To this we shall return in the section "Extension workers Solomin in flat weaves".
Consider the various types of weaving from an odd number of straws ranging from 5. Most of the examples will be considered for weaving, made of 7 Solomin (this number is selected as the optimum for samples). They will be good to read the pattern of the weave, and they are not too bulky. In special cases the number of straws will change.
To start weaving with an odd number of straws you need to link them into a flat beam (Basic concepts and techniques figure 5.1).
From the above examples of networks highlight the main features of flat braided, which we will need in the future:
braids with the straight edge formed by alternately weaving workers Solomin right and left;
braids with a scalloped edge are formed at proletarii couple of working Solomin right and left;
when vypletenii tangles with a smooth edge possible splicing of the regional working Solomin in one direction (towards you or away from you) and in different directions (one straw is woven to itself and from itself).
Braid "braid" (photo 74). This unilateral plaiting straw workers right and left trailing at one side. 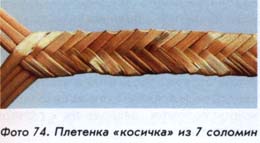
1. Take 7 long straws of equal diameter and length. Tie them in a bundle. The straw was spread in right and left hand. In one hand (right) you will have 4 of the straw, and the second (left) — 3 of the straw. Hold all the straw in the same hand, parallel to each other (figure 5.33 a). 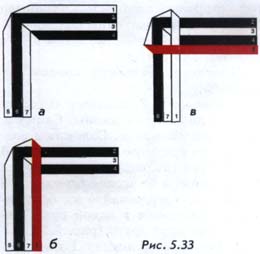
2. Working straw 1 fold under 90°. Lay straw on top of working 1 Solomin 2, 3 and 4 in parallel Solomin 7 (figure 5.33 b).
3. Working fold a straw 5 under a 90° angle. Lay straw on top of working 5 Solomin 6, 7 and 1 parallel Solomin 4 (figure 5.33 b).
To continue braiding, repeat for all other Solomin steps 2 and 3. The techniques of weaving is the same as for similar networks in the previous sections. Workers of the straw are from the outside of the netting, taking alternately the right and left extreme position. Bend the working straw form at braids smooth edge. To weave more dense, slightly pull it over the loose ends of straws, throwing them in different directions from the center.
The pigtail has a symmetric structure is a feature of all such networks from an odd number of straws. Similarly, the pigtail from 7 Solomin run pigtails from a greater number of straws. With the increasing number of straws weaving are more dense and thick.
If, instead of the excesses of workers Solomin apply them curves (Basic concepts and techniques figure 5.1 d), the braid will be wavy with textured edge.
You can change the pattern of this weave, using different rhythms weave Solomin working with one and other braids, such as 2x2 (2 workers in a row of straw braid with one hand, then 2 on the other), 3x3, etc.
Simple braid the basket weave (photo 75). 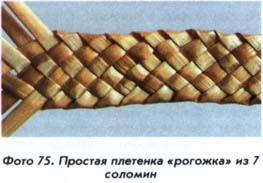
1. Take 7 long straws of equal diameter and length. Tie them in a bundle. The straw was spread in right and left hand. In one hand (right) you will have 4 of the straw, and the second (left) — 3 of the straw. Hold all the straw in the same hand, parallel to each other (figure 5.34 a). 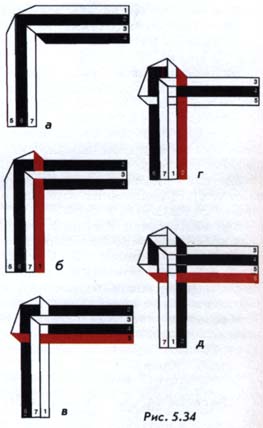
2. Working straw 1 fold under 90°. Twist the working straw straws 1 between 2, 3 and 4 (it lies on top of straws 2 and 4 and will be held under culm 3). Put a straw parallel to a working 1 7 Solomin (figure 5.34 b).
3. Working fold a straw 5 under a 90° angle. Twist working between straw 5 straws 6, 7 and 1 (it lies on top of Solomin 6 and 1 and will be held under culm 7). Put a straw 5 working in parallel Solomin 4 (figure 5.34 b).
4. Working straw 2 fold under 90°. Twist working between the straw 2 straws 3, 4 and 5 (she will fall over Solomin 3 and 5 and will be held under culm 4). Put a straw 2 working in parallel Solomin 1 (figure 5.34 g).
5. Working straw 6 fold under 90°. Twist working a straw 6 straws between 7, 1 and 2 (it lies on top of Solomin 7 and 2 and will be held under culm 1). Put a straw 6 working in parallel Solomin 5 (figure 5.34 d).
To continue braiding, repeat steps 2-5. Workers of the straw are from the outside of the netting, taking alternately the right and left extreme position. Bend the working straw form at braids smooth edge. To weave more dense, slightly pull it over the loose ends of straws, throwing them in different directions from the center.
Please note that the resulting in the middle of the weave has a symmetric structure, in contrast to braids that run on the same scheme of an even number of straws. It is a feature of all such networks from an odd number of straws that are made by weaving the working Solomin in one direction.
Similarly, given the network of seven Solomin executed braids from a larger odd number of straws.
If, instead of the excesses of workers Solomin apply them the bends, the braid will be wavy with textured edge.
After vpleteny braids to the required length of the straw all tie together. The way of extending this Solomin braids will be discussed in the appropriate section. Braid laminate.
Simple braid "herringbone" (photo 76). 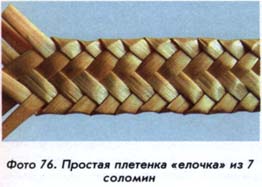
1. Take 7 long straws of equal diameter and length. Tie them in a bundle. The straw was spread in right and left hand. In one hand (right) you will have 4 of the straw, and the second (left) — 3 of the straw. Hold all the straw in the same hand, parallel to each other (figure 5.35 a). 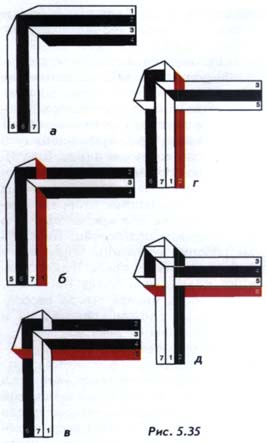
2. Working straw 1 fold under 90°. Twist the working straw straws 1 between 2 and 3 (she will be on top of the straw 2, and will be held under the straws 3 and 4). Put a straw parallel to a working 1 7 Solomin (figure 5.35 b).
3. Working fold a straw 5 under a 90° angle. Twist the working straw 5 straws between 6 and 7 (it will be on top of the straw 6 and will be held under the straws 7 and 1). Put a straw 5 working in parallel Solomin 4 (figure 5.35 b).
4. Working straw 2 fold under 90°. Twist the working straw 2 straws between 3 and 4 (it lies on top of the straw 3 and will be held under the straws 4 and 5). Put a straw 2 working in parallel Solomin 1 (figure 5.35 g).
5. Working straw 6 fold under 90°. Twist working a straw 6 straws between 7 and 1 (it lies on top of the straw 7 and will be held under the straws 1 and 2). Put a straw 6 working in parallel Solomin 5 (figure 5.35 e).
To continue braiding, repeat steps 2-5. Workers of the straw are from the outside of the netting, taking alternately the right and left extreme position. Bend the working straw form at braids smooth edge. To weave more dense, slightly pull it over the loose ends of straws, throwing them in different directions from the center.
Please note that the resulting in the middle of the weave has a pattern symmetrical braids unlike braids that run on the same scheme of an even number of straws. It is a feature of all such networks from an odd number of straws that are made by weaving the working Solomin in one direction.
Similarly, given the network of 7 Solomin executed braids from a larger odd number of straws.
If, instead of the excesses of workers Solomin apply them curves (Basic concepts and techniques figure 5.1 d), the braid will be wavy with textured edge.
After vpleteny braids to the required length of the straw all tie together. The way of extending this Solomin braids will be discussed in the appropriate section. Braid laminate.
Next, consider netting, which work the straw from the right and left sides will trudge in different directions: right — to himself, and left.
Simple twist (photo 77). 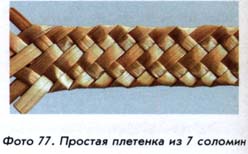
1. Take 7 long straws of equal diameter and length. Tie them in a bundle. The straw was spread in right and left hand. In one hand (right) you will have 4 of the straw, and the second (left) — three of the straw. Hold all the straw in the same hand, parallel to each other (figure 5.36 a). 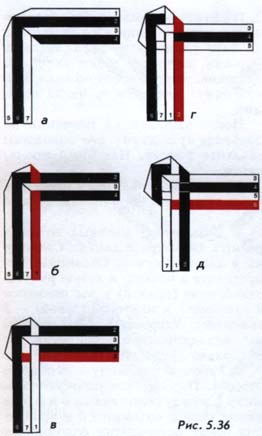
2. Working straw 1 fold under 90°. Twist the working straw straws 1 between 2, 3 and 4 (it lies on top of straws 2 and 4 and will be held under culm 3). Put a straw parallel to a working 1 7 Solomin (figure 5.36 b).
3. Working from a straw 5 fold under 90° angle. Twist working between straw 5 straws 6, 7 and 1 (it will go under 6 straws and 1 and lie on top of the straw 7). Put a straw 5 working in parallel Solomin 4 (figure 5.36 b).
4. Working straw 2 fold under 90°. Twist working between the straw 2 straws 3, 4 and 5 (she will fall over Solomin 3 and 5 and will be held under culm 4). Put a straw 2 working in parallel Solomin 7 (figure 5.36 d).
5. Working from a straw 6 fold itself at an angle of 90°. Twist working a straw 6 straws between 7, 1 and 2 (it will be held under Solomin 7 and 2 and lie on top of the straw 1). Put a straw 6 working in parallel Solomin 5 (figure 5.36 d).
To continue braiding, repeat all the steps 2-5. Workers of the straw are from the outside of the netting, taking alternately the right and left extreme position. Bend the working straw form at braids smooth edge. To weave more dense, slightly pull it over the loose ends of straws, throwing them in different directions from the center.
Please note that the resulting in the middle of the weave has an asymmetric structure in contrast to weaving, which was performed according to the similar scheme for an even number of straws. It is a feature of all such networks from an odd number of straws that are made by weaving the working Solomin in different directions.
Similarly, given the network of seven Solomin run a braided line from the great number of odd Solomin.
After vpleteny braids to the required length of the straw all tie together. Braid laminate.
Braid "flooring" (photo 78). 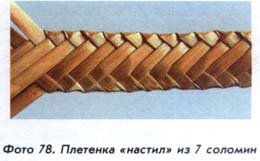
1. Take 7 long straws of equal diameter and length. Tie them in a bundle. The straw was spread in right and left hand. In one hand (right) you will have 4 of the straw, and the second (left) — 3 of the straw. Hold all the straw in the same hand, parallel to each other (figure 5.37 a). 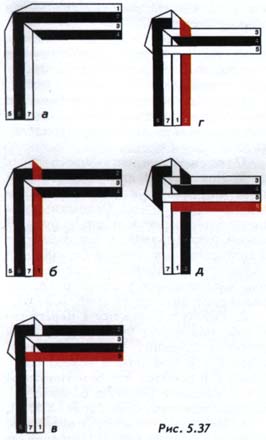
2. Working straw 1 fold under 90°. Twist the working straw straws 1 between 2 and 3 (she will be on top of the straw 2, and will be held under the straws 3 and 4). Put a straw parallel to a working 1 7 Solomin (figure 5.37 b).
3. Working from a straw 5 fold under 90° angle. Twist the working straw 5 straws between 6 and 7 (it will be held under culm 6 and lie on top of Solomin 7 and 1). Put a straw 5 working in parallel Solomin 4 (figure 5.37).
4. Working straw 2 fold under 90°. Twist the working straw 2 straws between 3 and 4 (it lies on top of the straw 3 and will be held under the straws 4 and 5). Put a straw 2 working in parallel Solomin 1 (figure 5.37 d).
5. Working from a straw 6 fold itself at an angle of 90°. Twist working a straw 6 straws between 7 and 1 (it will be held under culm 7 and lie on top of the straws 1 and 2). Put a straw 6 working in parallel Solomin 5 (figure 5.37 d).
To continue braiding, repeat all the steps 2-5. Workers of the straw are from the outside of the netting, taking alternately the right and left extreme position. Bend the working straw form at braids smooth edge. To weave more dense, slightly pull it over the loose ends of straws, throwing them in different directions from the center.
Please note that the resulting interweaving of flooring of obliquely stacked parallel Solomin repeats its pattern weaving, performed on a similar scheme for an even number of straws.
After vpleteny braids to the required length of the straw all tie together. Braid laminate.
Braid "catfish" with a simple weave (bilateral, photo 79). 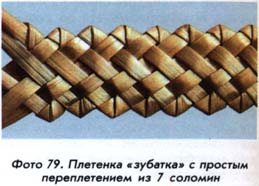
1. Take 7 long straws of equal diameter and length. Tie them in a bundle. The straw was spread in right and left hand. In one hand (right) you will have 4 of the straw, and the second (left) — 3 of the straw. Hold all the straw in the same hand, parallel to each other (figure 5.38 a). 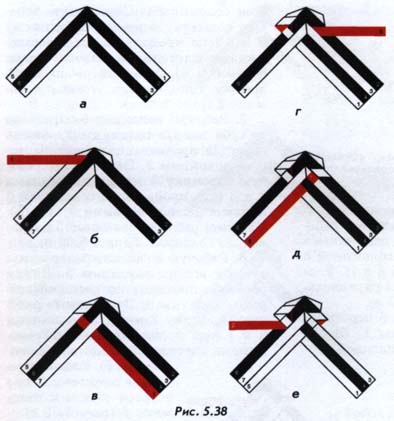
2. Working straw 1 fold myself. Twist the working straw straws 1 between 6 and 5 (it will be on top of the straw 5 and will be held under all the other straws weaving) (figure 5.38 b).
3. Working straw 1 fold myself around the straw 5. The crest line is on the outside of the straw 5. Twist the working straw straws 1 between 5, 6 and 7 (it will go under the straws 5 and 7 and lie on top of the straw 6). Put a straw 1 working in parallel Solomin 4 (figure 5.38).
4. Working stubble 5 fold myself around the straw 1. The crest line is on the outside of the straw 1. Twist working between straw 5 straws of 3 and 2 (it will go under all the straws netting and lay down on top of the straw 2). Put a straw working 5 at an acute angle to Solomin 2 (figure 5.38 d).
5. Working stubble 5 fold myself around the straw 2. The crest line is on the outside of the straw 2. Twist working between straw 5 straws 2, 3, 4 and 1 (it will go under the 2 straws and 4 and lie on top of Solomin 3 and 1). Put a straw 5 working in parallel Solomin 7 (figure 5.38 d).
6. Working from a straw 2 fold itself around the straw 5. The crest line is on the outside of the straw 5. Twist the working straw 2 straws between 6 and 7 (it will go under all the straws of the weave and lies on top of the straw 6). Put a straw working 2 at an acute angle to Solomin 6 (figure 5.38 e).
To continue braiding, repeat steps 2-6 with the straw 2, and then follow the diagram.
The feature of braiding is the interweaving of the working culm, which forms the second part of the clove braids, all guides Solomin.
Braid features a scalloped edge, the middle part has an asymmetrical weave. Braid has a different texture weave on the front side and purl.
Using this scheme, you can make this braid of any number of straws.
Braid "catfish" with an asymmetrical herringbone pattern (bilateral, photo 80). 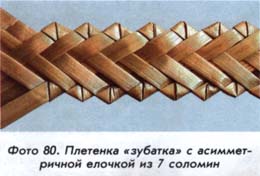
1. Take 7 long straws of equal diameter and length. Tie them in a bundle. The straw was spread in right and left hand. In one hand (right) you will have 4 of the straw, and the second (left) — 3 of the straw. Hold all the straw in the same hand, parallel to each other (figure 5.39 a). 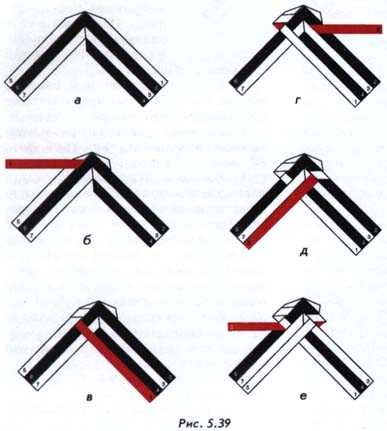
2. Working straw 1 fold myself. Twist the working straw straws 1 between 6 and 5 (it will be on top of the straw 5 and will be held under all the other straws weaving) (figure 5.39 b).
3. Working straw 1 fold myself around the straw 5. The crest line is on the outside of the straw 5. Twist the working straw straws 1 between 5 and 6 (it will go under culm 5 and lie on top of Solomin 6 and 7). Put a straw 1 working in parallel Solomin 4 (figure 5.39).
4. Working stubble 5 fold myself around the straw 1. The crest line is on the outside of the straw 1. Twist working between straw 5 straws of 3 and 2 (it will go under all the straws netting and lay down on top of the straw 2). Put a straw working 5 at an acute angle to Solomin 2 (figure 5.39 d).
5. Working stubble 5 fold myself around the straw 2. The crest line is on the outside of the straw 2. Twist the working straw 5 straws between 2 and 3 (it will be held under culm 2 and lie on top of straws 3, 4 and 1). Put a straw 5 working in parallel Solomin 7 (figure 5.39 d).
6. Working from a straw 2 fold itself around the straw 5. The crest line is on the outside of the straw 5. Twist the working straw 2 straws between 6 and 7 (it will go under all the straws of the weave and lies on top of the straw 6). Put a straw working 2 at an acute angle to Solomin 6 (figure 5.39).
To continue braiding, repeat steps 2-6 with the straw 2, and then follow the diagram.
The feature of braiding is the interweaving of the working culm, which forms the second part of the clove braids, only one extreme of the straw guide.
Braid features a scalloped edge, middle part asymmetrical twisted "pigtail". Braid has a different texture weave on the front side and on the reverse.
Using this scheme, you can make this braid on any number of straws.
Braid "diamond" (photo 81). Netting is widespread in Western Europe, America and Australia. 
The netting can be any even and odd number of straws starting with 5.
1. Take 7 long straws of equal diameter and length. Tie them in a bundle. The straw spread in the right and left hand on 2 bunches, one will be 5 straws and 2 straw. Hold all the straw in the same hand, parallel to each other (figure 5.40 a). 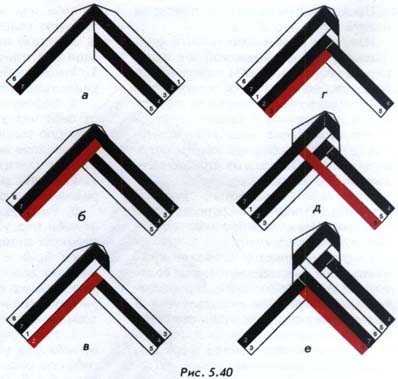
2. Working from a straw 1 fold itself at an angle of 90°. Proplatit working under 1 straw culm 2 and print on top of straws 3, 4 and 5. Put a straw parallel to a working 1 7 Solomin (figure 5.40 b).
3. Working from a straw 2 fold under 90° angle. Proplatit working under 2 straw culm 3 and print on top of the straws 4 and 5. Put a straw 2 working in parallel Solomin 1 (figure 5.40).
4. Working from a straw 3 fold under 90° angle. Proplatit working under 3 straw culm 4 and output 5 on top of the straw. Put a straw 3 parallel working Solomin 2 (figure 5.40 d).
5. Working from a straw 6 fold itself at an angle of 90°. Proplatit working straw culm 6 under 7 and over 7, print Solomin, 1, 2 and 3. Put a straw 6 working in parallel Solomin 5 (figure 5.40 d).
6-7. Workers of the straw 7 and 1 sequentially from the fold itself at an angle of 90°. Propitate them under the straws immediately following them (a straw culm 7 under 1 and under 1 straw culm 2). Lay workers of the straw parallel to the straws held in the right hand (figure 5.40 e).
Continue weaving by repeating steps 2-7.
Braided line has the same textured pattern on the obverse and on the reverse side. To weave more dense, slightly pull it over the loose ends of straws, throwing them in different directions from the center. After netting tie the loose ends of straws together. Weave laminate with a rolling pin.
Braid "convex diamond" (photo 82). Netting is common in the countries of Western Europe, America and Australia. 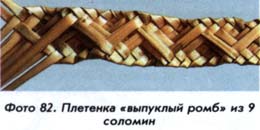
The pattern of weaving is most clearly revealed when using a large number of straws. In this example we use 9 straws from the first knee of the stem.
1. Take 9 long, thin straws of equal diameter and length. Tie them in a bundle. The straw was spread in right and left hand for 2 of the beam: one is 7 straws and 2 straw. Hold all the straw in the same hand, parallel to each other (figure 5.41 a). 
2. Working from a straw 1 fold itself at an angle of 90°. Proplatit working under 1 straw culm 2 and print on top of straws 3, 4, 5, 6 and 7. Put a straw 1 working in parallel Solomin 9 (figure 5.41 b).
3. Working from a straw 2 fold under 90° angle. Proplatit working under 2 straw culm 3, print on top of straws 4, 5 and 6. Again proplatit under culm 1. Put a straw 2 working in parallel Solomin 1 (figure 5.41).
4. Working from a straw 3 fold under 90° angle. Proplatit working under 3 straw culm 4, print on top of the straw 5. Again proplatit under Solomin 6 and 7. Put a straw 3 parallel working Solomin 2 (figure 5.41 g).
5. Working from a straw 4 fold itself at an angle of 90°. Twist the working straw 4 straws 5, 6 and 7. Working Solomin will be held under the straws 5 and 7 and lie on top of the straw 6. Put a straw 4 working in parallel Solomin 3 (figure 5.41 d).
6. Working from a straw 5 fold under 90° angle. Twist the working straw 5 straws between 6 and 7. Working Solomin will be held under culm 6 and lie on top of the straw 7. Put a straw 5 working in parallel Solomin 4 (figure 5.41 e).
7. Working stubble 8 fold from itself at an angle of 90°. Proplatit working under 8 straw culm 9 and print on top of the straws 1, 2, 3, 4 and 5. Put a straw working 8 parallel Solomin 1 (figure 5.41 g). Please note that step 7 repeats in a mirror image step 2.
For the formation of the second part of the picture repeat steps 3 to 6 in a mirror image.
Repeating the above description many times, you will get a long braid with a convex rhombic pattern.
Continue weaving by repeating steps 2-7.
Braided line has the same textured pattern on the obverse and on the reverse side. To weave more dense, slightly pull it over the loose ends of straws, throwing them in different directions from the center.
Braid "braid with scalloped" (photo 83). Wicker refers to the weaving fishnet. 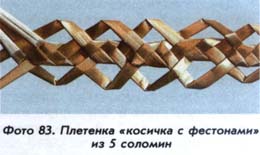
1. Take 5 long, not very thick Solomin from the 1st or 2nd knee straw stem of equal diameter and length. Tie them in a bundle. Spread straw in the hands of 2 of the beam. One will be 3 straw, 2 straw. The straw in each of the hold beams parallel to each other (figure 5.42 a). 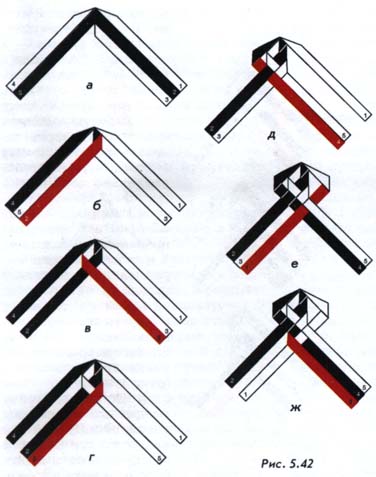
2. Working 2 fold the straw guide straw 1 to itself and lay parallel Solomin 5 (figure 5.42 b).
3. Working 5 fold using a straw guide straw 2 to himself and lay parallel Solomin 3 (figure 5.42).
4. Working 3 fold through a straw guide straw 5 to him and lay parallel Solomin 2 (figure 5.42 d).
5. Working from a straw 4 fold itself at an angle of 90°. Proplatit working straw 4 straws 2 and 3. Put a straw parallel to the working 4 5 Solomin (figure 5.42 d).
6. Working from a straw 1 fold itself at an angle of 90°. Proplatit working straw straws 1 between 5 and 4. Put a straw parallel to a working 1 3 Solomin (figure 5.42).
7. Working through a straw 3 fold 1 guide stubble to him and lay parallel Solomin 4 (figure 5.42 g).
To continue braiding, repeat steps 2 through 6 in the given sequence. Step 3 braid braid inner straws, then 2 steps — the outer straws make festoons.
Similar scalloped netting can make to other flat braids of 7, 9, 11 Solomin. Extreme straw place free. The straws that are inside the netting, begin to make any flat braid with a smooth edge. After a single proplyene all internal Solomin make extreme straws scallops. Festoons can be single or double. In the second case, free leave not one Solomin on each side, and two.
Network "Chinese chain zigzag" (photo 84). Netting is borrowed from the technology of weaving straw Asian countries. 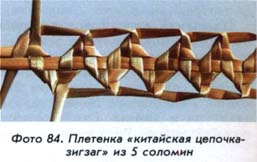
Netting runs from 5 Solomin first knee straw stem.
1. Take 5 long, thin straws of equal diameter and length. Tie them in a bundle. The straw was spread in right and left hand in two bundles: one will be 3 straws and 2 straw. Extreme straw 1 and 5 move in some way, so they do not interfere with the netting (figure 5.43 a). 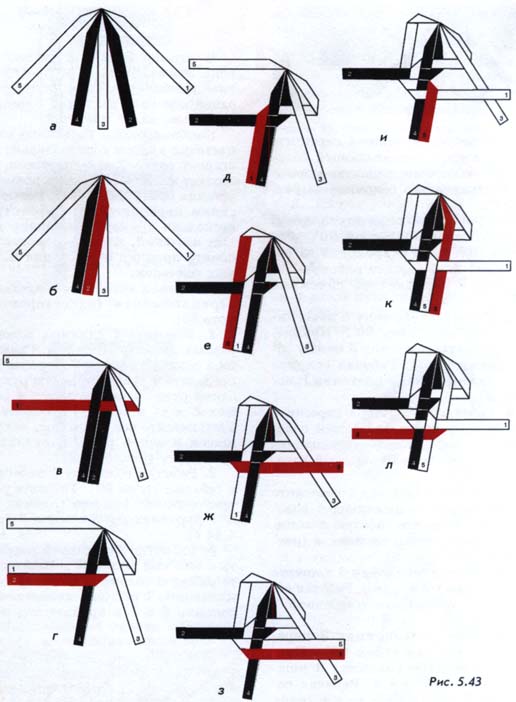
2. Working straw 2 fold yourself around the guide of the straw 3. Put a straw 2 working in parallel Solomin 4 (figure 5.43 b).
3. Working straw 1 fold myself. Proplatit working between 1 straw 3 straws, 2 and 4. Working straw 1 will be held under the straws of 3 and 4 and lie on top of the straw 2. Aimed working 1 straw sideways from netting (figure 5.43).
4. Working straw 2 fold it around the straw guide 4. Put a straw 2 working in parallel Solomin 1 (figure 5.43 d).
5. Working straw 1 fold yourself around the guide of the straw 2. Put a straw 1 working in parallel Solomin 4 (figure 5.43 d).
6. Working from a straw 5 fold under 90° angle. Working Solomina 5 passes for culm 2. Put a straw 5 working in parallel Solomin 1 (figure 5.43).
7. Working fold a straw 5 under a 90° angle. Proplatit working straw 5 straws between 1 and 4. Working straw 5 will fall sideways from netting (figure 5.43 g).
8. Working straw 1 fold yourself around the straw guide 4. Put a straw 1 working in parallel Solomin 5 (figure 5.43 b).
9. Working stubble 5 fold to his guide around the straw 1. Put a straw 5 working in parallel Solomin 4 (figure 5.43).
10. Working straw 3 put in parallel Solomin 5. Working straw 3 will be culm 1 (figure 5.43 and:).
11. Working straw 3 fold under 90°. Proplatit working straw 3 straws between 5 and 4. Working straw 3 will fall sideways from netting (figure 5.43 l).
To continue braiding, repeat steps 5-11.
Braided line has the same textured pattern on the obverse and on the reverse side.
Select your language