


")

Network, usually made of a small length (the size of the straw), as certain difficulties arise when extending working Solomin. Netting can take two types of cross sections — triangular and rectangular.
1. Take a long straw from the middle part of the stem with a diameter of 3 to 4 mm. Fold it in half and pinch the ends at an angle of 120° (figure 5.63 a). Working culm straw is lying on the bottom (in the figure is a straw 2). This situation Solomin is the starting position to complete the chain with a triangular cross-section. If the straw to breed at an angle of 90°, the network will have a square section. The fundamental difference between these two braids will not. The only thing that distinguishes them outwardly from each other, is more dense interweaving the braids with triangular cross-section.
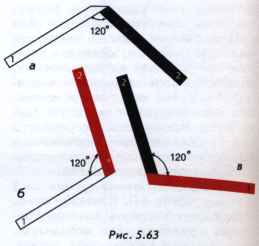
2. Working straw 2 fold itself around the straw 1 and place on top of the straw 1 (figure 5.63 b) (the crest line is along the straw 1). Between the straws keep the angle 120°.
3. Working through a straw 1 straw 2 fold (figure 5.63).
Then follow the description from step 2. After the weaving of the straw 1 and 2 tie together and stretch it slightly in his fingers. Chain kinked in half made of straw, has a length of no more than 10-12 cm If you require a more long braids, you can proceed as follows. Take 2 straws of equal diameter and length (can be used as the straw from the middle part of the stem and the top). Straw tie together the ends apart at the desired angle and begin braiding. In this case you have netting over 20 cm in length, without joints.
Braid "chain" is very plastic. In the wet state it is possible to fix threads or needles, take the form of spirals, volutes, rings. After drying, the braid holds shape.
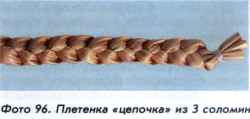
Braid "chain" of 3 Solomin (photo 96). Weaving is a complex pattern that looks similar to the combined two "chains" of 2 Solomin. Its decorative qualities and plasticity it is similar to the previous braid.
1. Tie together 3 not very thick straw is equal to the diameter and length of the middle part of the stem. Spread all of the straw at an angle 120° to each other (figure 5.64 a).
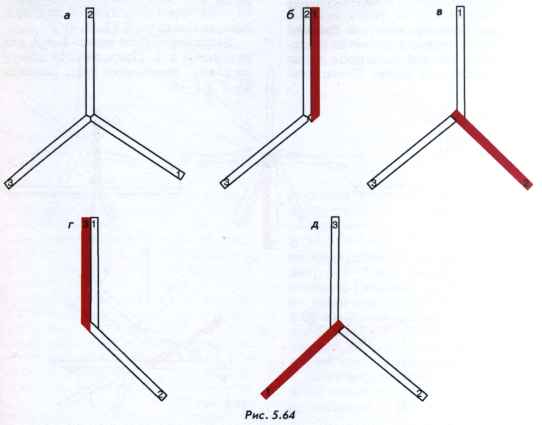
2. Working from a straw 1 fold itself, and put 3 in parallel Solomin (figure 5.64 b).
3. Working straw 3 fold on itself, and lay at an angle of 120° to the straws of 2 and 1 (figure 5.64).
4. Working from a straw 2 fold itself, and put in parallel Solomin 1 (figure 5.64 g).
5. Working straw 1 fold on itself through the straw 2 and 3 and put to them at an angle of 120° (figure 5.64 a).
Continue weaving with the straw 3, following steps 2-5.
Braided line with a closed middle of the 4 straws. This weave is found in many traditional harvest and Christmas decorations, made in England, Western Europe.
The netting can have two production version depending on the angle of bending of the workers Solomin relative to each other. If the workers of the straw to bend at an angle of 90° relative to each other, the braid will have a strong tetrahedral structure. If the workers of the straw to bend at an acute angle of approximately 30°, netting takes the form of a screw relative to each other two helical strips.
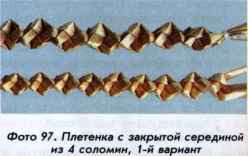
The first version of the weave — right angle (photo 97).
1. Take 4 not very thick straw from the upper or middle part of the stem of equal diameter and length. The length of each straw should be at least 15 cm, diametr — 1.5—3 mm. Tie the straw together and apart relative to each other at a right angle (figure 5.65 a).
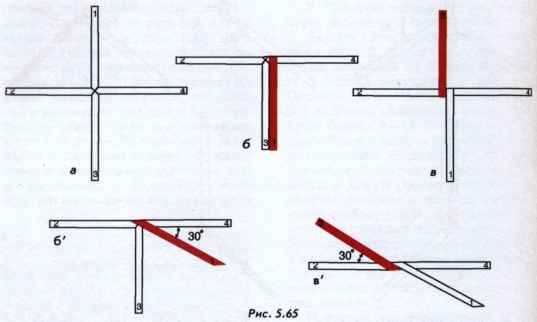
2. Working 1 fold a straw to her through a straw 2 at a right angle and lay parallel Solomin 3 (figure 5.65 b).
3. Working straw 3 fold away from you through a straw 4 at a right angle (figure 5.65 b).
Then repeat steps 2 and 3 for Solomin 1 and 4. Continue to braid the scheme, stranding a pair of straws 2-3 and 1-4.
The second variant of the weave is at an acute angle (photo 98).
Repeat step 1 from previous version of the weave.
2. Working 1 fold a straw to her through a straw 2 at an acute angle (-30°) (figure 5.65 b).
3. Working straw 3 fold away from you through a straw 4 at an acute angle (-30°) (figure 5.65 b).
Then continue weaving according to the described scheme. You have formed two pairs of interwoven Solomin — 1-2 and 3-4.
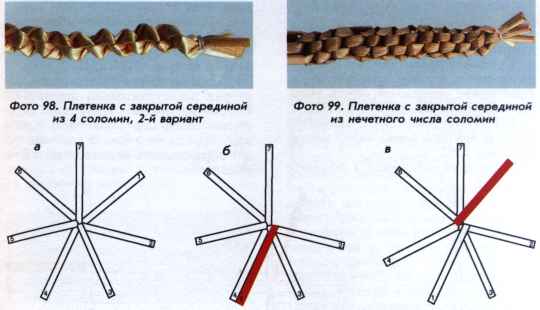
Braid with a closed middle can make using a greater number of straws — 6, 8. All of the straw has bred in a circle. Divide conditionally on two parts and then alternately shift in accordance with the above principle.
Braided line with a closed middle of the odd number of straws (photo 99). 1. Take 7 is not very thick Solomin from the upper or middle part of the stem of equal diameter and length. The length of each straw should be at least 15 cm, diameter 1.5—3 mm. Tie the straw together and apart relative to each other at equal angles (figure 5.66 a). Then the straw will be distributed in two groups, 3 in each group. One straw will remain outside the group.
2. Working 1 fold a straw through the straw 2 and 3 and place the straws between 3 and 4 (figure 5.66 b).
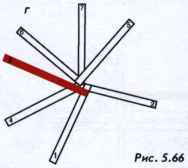
3. Miss a straw 4. Working 5 fold a straw through the straw 6 and 7 and place between 7 and 2 straws (figure 5.66).
4. Skip the straw 2. Working 3 fold straw through the straw 1 and 4 and place between the straws 4 and 6 (figure 5.66 g).
Then continue according to the scheme, leaving the loose straw, which follows immediately after the working.
Braided cord 7 Solomin guide (photo 100). In weaving involved Solomin 7: 6 Solomin are working alternately, the 7th straw forms the skeleton of the weave.

1. Take 7 straws of equal length and diameter. One of Solomin insert the wire, this straw will be the base for the weaving. Tie the remaining six straws around the frame (figure 5.67 a).
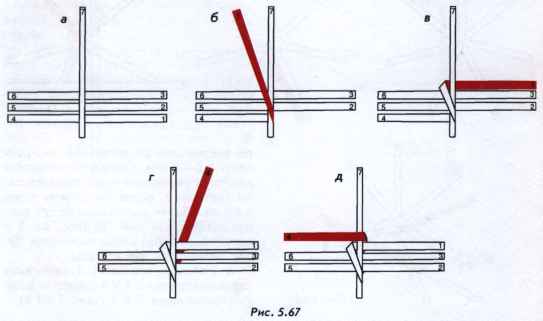
2. Working straw 1 point up and slightly to the left front of the frame (figure 5.67 b).
3. Working culm 1 go around the frame 7 and put a straw right working 1 on culm 3 parallel to it (figure 5.67).
4. Working stubble 4 upwards and slightly to the right behind the frame (figure 5.67 g).
5. Working culm 4 go around the frame 7 and place a straw working 4 left over culm 6 parallel to it (figure 5.67 d).
Next, continue weaving, sequentially repeating steps 2-5. A group of right-wing 3 Solomin will form the front of the netting. A group of left 3 Solomin will form the back part of the weave.
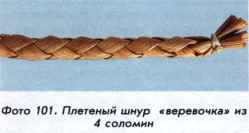
Braided cord "rope" of 4 solomyn (photo 101). Weaving has long been used by Belarusian masters, known to the masters of other countries. Braid is very flexible and durable, can be performed on the frame.

1. Take 4 straws from the top of the stalk of equal length and diameter. Bind them and distribute two straws in the left and right hands.
2. Working straw 1 fold myself. Behind the straw 2 and 3 and place on top of the straw 4 (figure 5.68 a).
3. Working fold around a straw 2 straw 3 and put 2 in parallel Solomin (figure 5.68 b).
4. Working stubble 4 bend away from you. Behind the straw 3 and 1 and place 2 on top of the straw (figure 5.68).
5. Working fold around a straw 4 straw 1 and put 3 in parallel Solomin (figure 5.68 g).
Next, continue weaving, since the straw 2, continue through steps 2-5.
Netting with a large diameter can be performed as above using 6 or 8 of the straws