


")
When making a braided edge it can have a triangular or rectangular shape. The following ways to stumble edge shows the beginning of the weaving to braiding to the number of straws equal to 6. These methods are applicable to all the braids are made from any even number of straws ranging from 4. It is necessary to consider the following implementation of the braids during the braiding of the ends of each straw is bent in half and performs the function of two straws so to start netting it is necessary to take a number of straws in two times less than the number of straws from which you will be braiding (plaiting of 4 straws — 2 for braids from 6 Solomin — 3, for plaiting of straws from 8 to 4, etc.).
Triangle. When braiding the edge area of the straw are substituted slowly (this method allows you to make uniform extension of the braids and is often used by masters, for example, flower petals).
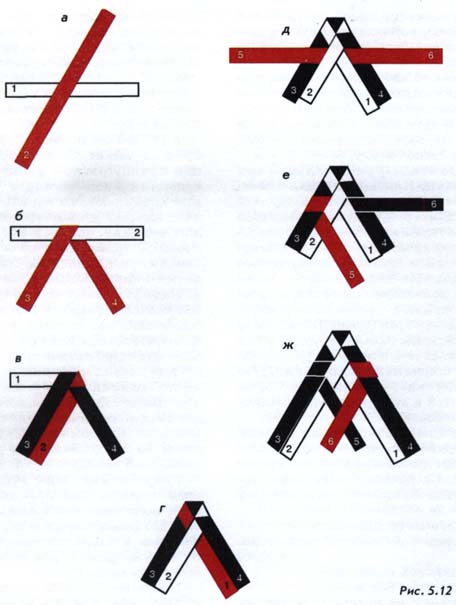
1. Starts the night with 2 straws that are crosswise to each other (figure 5.12 a).
2. 2 fold through a straw 1 straw (figure 5.12 b). You then have in your hands is the interlocking 4 Solomin, since each end takes the function of a separate straw. Change to the numbering scheme Solomin from their new location, the intersection of Solomin is considered the beginning of each new straw (figure 5.12 b).
3. Working from a straw 2 fold itself around the straw 4. The crest line is on the outside of the straw 4. Put it in your left hand parallel to Solomin 3 (figure 5.12 b).
4. Working straw 1 fold yourself around the straw 3. The crest line is on the outside of the straw 3. Twist the working of the straw culm 1 3 and 2. After weave straw 1 will fall on top of the straw 3 and the straw will be bottom 2 (figure 5.12 d). In this step, the straw is prepared for weaving most flat braids of the four straws.
If you want to perform the netting of a larger number of straws in commenced weaving a new straw substitute.
5. Take another straw and weave it between the woven straws of 1, 2, 3 and 4, as shown in figure 5.12 d. New straw is placed over the extreme Solomin 3 and 4 and passes under the straws 1 and 2, which are in the middle of the weave.
6. Working stubble 5 fold myself around the straw 3. The crest line is on the outside of the straw 3. Twist the working of the straw culm 5 3 and 2. After the woven straw 5 will pass the bottom of the straw 3 and lie on top of the straw 2, parallel to the straws 1 and 4 (figure 5.12 e).
7. Working from a straw 6 fold itself around the straw 4. The crest line is on the outside of the straw 4. Twist the working of the straw culm 6 4 and 1. After the woven straw 6 will be the bottom 4 of the straw and lie on top of the straw 1, in parallel with the straws 2 and 3 (figure 5.12 g). In this step, the straw is prepared for weaving most flat braids of the six Solomin.
If you want to prepare the straw for the execution of the braids of 8, 10 or more straws, they are substituted consistently reviewed above. Each new straw is placed over the extreme Solomin 3 and 4; all of the straw, located in the middle part, are arranged on top of the new, regardless of their number. The ends of the new braided woven-straw according to the schemes 5.12 e, f.
Rectangle. An example of a stumble straight edge consider to perform the plaiting of 8 Solomin. Take 4 long straw of the same diameter from the middle part of the stem. Twist them back on the table surface, in the Central part, as shown in figure 5.13. Splicing straight edge always starts from the innermost Solomin, in the example of the straw 1 and 3.
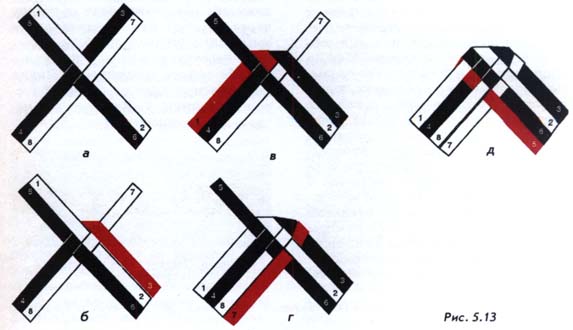
1. Working straw 3 fold under the right angle through a straw 1. Lay it parallel Solomin 2 (figure 5.13 b).
2. Working straw 1 fold from itself at a right angle through a straw 5. Lay it parallel Solomin 4 (figure 5.13).
3. Working straw 7 fold to itself at 180° through a straw 3. Twist it between the straws of 3, 2 and 6, stacking 8 in parallel Solomin (figure 5.13 g).
4. Working stubble 5 fold at 180° through a straw 1. Twist it between the straws of 1, 4, 8, and 7, stacking parallel Solomin 6 (figure 5.13 d).
All straw removed and took the position, which will further can make all the main types of flat braids for an even number of straws.
Splicing straight edge of the braids of 6, 10 and more the number of straws is carried out according to the considered scheme. According to her braided initially, all the inner straw, and then extreme. If the straw has a little pull when performing interlacing, edge can be rounded. This technique can be used when vypletenii petals and other decorative elements.
If you compare all three methods (tying in a bun, braiding angle and the braiding the smooth edge) enterprises Solomin to run flat braiding of even number of straws it should be noted that each has its advantages and disadvantages, which will be opened to you as you gain your own experience of weaving. We can only say that most associate the straw in those cases when start weaving long braids, because it is more convenient to start weaving long straws, when they should then gradually increase. Braided edge is more common in short braids that are used as small decorative items. Examples are common, but not mandatory. In each case you must decide how you should start weaving. Well, if in the initial stage of learning the technologies of weaving you try different options: this allows you to get your own experience which will prove more important than multiple recommendations and advice.
We proceed to the consideration of the technologies of weaving of various kinds of flat braids from an even number of straws. All of the following schemes of weaves will start with weave Solomin area. This technique will use, to simplify the understanding of circuits. If you wish, you can change the first step in schemes using two other ways of combining Solomin in a flat beam or direct splicing region (figure 5.13 a—d).