


")
Straw tape tends to curl. This property is often used by the masters. It can take the form of elongated or rounded spiral. After complete drying of the ribbon shape remains unchanged.
A curl of straw ribbons. Take a straw from the middle part of the stem length less than 12 cm Laminate it with one hand and prepare a straw ribbon, without drying to the end. For Curling ribbon in a rounded spiral coils Navata one another by a pencil or any other cylindrical object (you can use a Curling iron with a clip for Curling the hair). To obtain an elongated spiral, the coils are placed in rows. The end of the tape with a length of 2-3 cm Express even, in the future it will need to consolidate and link elements.
From one straw ribbon directly joined together a lot of curls: for this retreat from direct end is curled straw wide ribbon 2-3 cm (this portion will remain solid), the remaining part of the tape laminate into narrow strips, width of which can be varied as needed. As a result, you get ready, a very beautiful decorative item in the future he can become a part of parts of a flower or the plumage of a bird.
Straw tape is also used to manufacture some of the most popular weaving of decorative elements — loops. Despite the fact that technology is making loops very easy, the masters manage to make them very varied on the basis of only three basic types (figure 5.3 a).
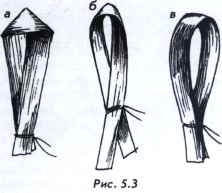
For making loops will need a straw tape long, twice the length of the future loop, plus 3-4 cm on tying the ends, bends and curvature. If you want a large number of identical straw loops or loops which have a rhythmic change in the size or width, the required number of strips straw with the specified parameters to be procured in advance.
Flat loop. For the manufacture of flat loop (figure 5.3 a) straw tape turn to his wrong side and fold the ends in the middle of the tape at an angle of 45°. Ends put one on the other and tightly wrap with a thread at a distance of 5-10 mm from the edge. If you want to further fix the loop, it can be rolled with a rolling pin on a flat surface, placing one or two layers of fabric to soak up moisture. Flat loops can be given a curved shape with different radii. Have a not very hot iron, a loop, put it face on the surface. Iron press half of the loop from the embedded area, free slightly raise the tail to the loop is not formed a sharp border iron a little bit move along the loop (in this case, will produce a smooth arc).
Inverted loop. For the manufacture of twisted loops (figure 5.3 b) straw tape take up, face up, curve its arc, dropping the ends down. Tips splitte with each other and turn so that they touched the front side. Tie the ends together at a distance of 5-10 mm from the edge. Loop made this way tends to independently bend, and the loop which has a larger radius of curvature of the arc that bends is stronger with a smaller radius of bend less. The radius of curvature of the arc of the loop depends on the humidity of the straw tape. More wet feeds can have a small radius of curvature, the drier the ribbon, the larger arc, it bends. Try experimenting and you will gradually begin to understand the nature and language of straws.
Video loop. For making straight hinge (figure 5.3) straw tape take in hand face-up as in the previous example, curve arc, dropping the ends down. Fold the ends together wrong side and bind at a distance of 5-10 mm from the edge. Direct loops, you can only change the radius of curvature and dimensions.
If you use loops as decorative elements in various compositions, in sculpture, they can be used single or as well as straw tubes grouped in bundles and contracepti in tape.
Straw beads especially loved by the artists who have been designing and manufacturing jewelry, Christmas decorations, decorative straw flowers and arrangements. Often they are used in the decoration of sculptures and straw "spiders". Beads blend perfectly with all the other decorative elements and braiding. They are easy to stick on the straw, strung on threads, as they are hollow inside.
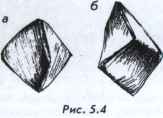
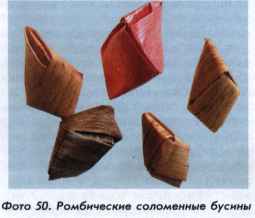
There are two types of beads: triangular pyramid (figure 5.4 a) tetrahedral and rhombic (figure 5.4 b).
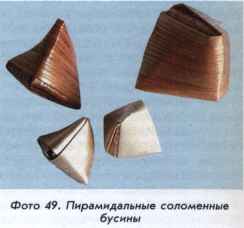
Triangular pyramid bead (photo 49).
1. For the manufacture of triangular pyramidal beads take a straw from the middle part of the stem with a length of about 12 cm.
Laminate on one side and the fingers of both hands spread flat one of the ends of the segment with a length of 2-3 cm (wrong side facing you).
2. Fold the straight end on the wrong side so as to form a square (side of the folded square should exactly match the width of the straw with tape). The smoothen line of bend in the fingers. Lay the box 7-8 times along the straw of the tape, gradually smoothing it, a good crimp line bends. Expand the folded tape and you will see it printed lines denote the boundaries of 8 of the squares (figure 5.5 a).
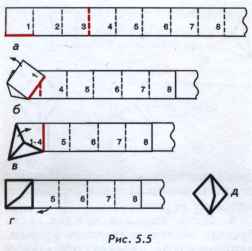
3. Next, you need to start forming the main volume of the beads, which has the shape of a dipper (figure 5.5 b). To do this, take the tape from the printed squares in the right hand, purl side facing you. The left hand take the end of ribbon in place, • where the printed box 1. Wrap a square of 1 to itself (figure 5.5 b). Straw then wrap the tape so that the box 1, turning, aligns with the 4 square. The position of the box 1 must be rotated in the plane of the ribbon so that its lower horizontal side coincided with the vertical face which divides the squares 3 and 4 (figure 5.5 a, b). You should now have a triangular scoop, and a fourth face which is open. If it happened, you created the form, which will be the basis for further development of the beads. You may have to practice that all steps associated with the manufacture of this primary form was unmistakable.
4. Turning straw tape, cover the hole of the scoop double box 1-4 (figure 5.5 d). Now you will see a basic outline of the future of the beads, but this way she won't be strong enough.
5. In order to give the wall strength of the beads, should be duplicated several layers of straw ribbons. Having expressed the geometric shape of the bead itself will determine the direction for which must be laid straw ribbon. Freely wrap the straw tape on bead. Ensure that the edge beads that is in contact with the surface of the straw tape it perpendicular to the sides of the tape. Enough, if you make one full turn of all the faces on the tape (in this case, each face will have two layers). A large number of layers of tape will make the edge thick, violated their square shape, the lower layers will protrude from under the top layers. These beads look is not very neat.
6. The remaining end of the straw tape a length of 4-6 cm cut the corner and tuck under one of the faces. Speaking from under the edge of the tail pure shear at the edge.
Bead ready, it turned out light and durable (figure 5.5 d). After drying of the straw tape it will become more rigid. If you take straws of different diameter, the beads will be different sizes.
Four-sided rhombic bead (photo 50). For the manufacture of four-sided rhombic beads, you must repeat the initial techniques from the previous example, including the formation of the scoop. Briefly review these basic methods to consolidate.
1. Take a straw tube with a length of about 12 cm and Laminate it along one of the sides and flatten one end in his fingers. Smooth the end of the straw facing you side. Lay the box, wrapped smooth edge on the wrong side (towards you). Next, wrap the tape, repeating the received square even 7-8 times. Don't forget pressing the edges with each wrapping of the box. Expand the ribbon. It turned out with the creases that mark the boundaries lay of the squares (figure 5.5 a).
2. Take the edge of the straw with tape first laid the box in the left hand, the rest of the tape is in the right hand. Get box 1 to itself, turning it so that the bottom horizontal side coincided with the vertical face which divides the squares 3 and 4 (figure 5.5 b).
3. Align the flattened square 1 with the fourth box, you get a small bucket (figure 5.5 b). As you can see, all our actions did the actions for the production of a triangular pyramid beads.
4. Next we need to form a fourth line. Holding the left hand a ladle in the top, right-hand, wrap the loose end of the tape to itself (figure 5.6 a). Close the hole of the scoop element 5 (figure 5.6 b). You've got the basic shape four-sided rhombic beads.

5. To strengthen the edges beads straw lay the tape repeatedly on each of the faces. The tape itself will be laid in accordance with the shape of the beads. You should only follow, in order to avoid distortions of the ribs, they are at the corners of the tape should be laid perpendicular to the upper and lower edge.
6. After each face of the beads were covered with a second, overlapping layer of straw strips, cut the remaining free end of the straw ribbon on the corner and tuck it under one of the faces, which should in the course of wrapping tape on bead. Speaking on the part of the straw strips cut from the edge of the beads.
The obtained bead has four sides, its form is elongated and different from the triangular pyramidal shapes of the beads (figure 5.6).
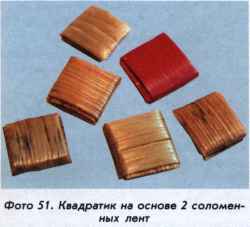
From straw ribbon beads in addition to the voluminous and curls can produce several types of flat decorative elements: small and large squares, stars. These items came to the straw in the early 1990-ies from the traditions of the craft of weaving of birch bark.
The box is based on 2 straw ribbons (photo 51).
1. For the manufacture of straw small squares straw take 2 tubes of the same diameter, length 10-12 cm Prepare from straw tubes two tapes (tapes should be moist). Lay the tape on the plane of the table wrong side facing you, the front — to the surface of the table so that they intersect at right angles. The vertical strip 1 located below the horizontal tape 2 (figure 5.7 a). The length of the protruding short ends 1 and 2 is equal to the width of the tapes.
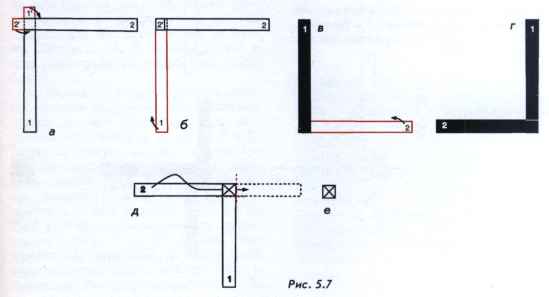
2. Alternately fold the short ends of the ribbons. The line of the bend is on the boundary lines of the strips 1 and 2. First fold the end lying from below — 1. On top of it fold the short end 2. Intersecting strips now look as shown in figure 5.7 b.
3. Now fold the long end of the straw tape 1, the line of bend will be along the bottom side of the tape 2 (figure 5.7).
4. Then in the appropriate direction similarly fold the long end of the straw tape 2 (figure 5.7 g). In this position, the straw ribbon turned his face, glossy side facing you, wrong side — to the table.
5. Flip the blank squares wrong side of the tape to itself and hold it in his hands. End of tape 2 fold up and tuck under the edge of the box (figure 5.7 d). To tape 2 freely entered under the line, its end can be cut in the area. Pull the end of the tape 2 over the entire length. Cut off the protruding ends of the strips 1 and 2 along the sides of the formed box (figure 5.7 e).
The size of the squares corresponds to the width of a straw ribbon. If you take a straw ribbons of different colors, you get boxes with different color faces.
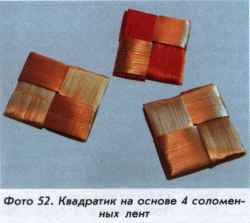
Box on the basis of 4 straw ribbon (photo 52).
1. For the manufacture of this box you will need 4 straw tubes of the same diameter, 10-12 cm length of Arm from Solomin 4 tape (tape must have the same width, and remain wet throughout the work). Lay on the table surface of the ribbon, wrong side up, front toward the top surface of the table. They must intertwine as shown in figure 5.8. You should pay attention to the following provisions of twisted tapes:
the short ends of the strips 1, 2, 3, 4 must be from under long ends;
the length of the short protruding ends of the straw equal to twice the width of the tape;
when moving in a circle the ends of the short strips interleaved with long ends.
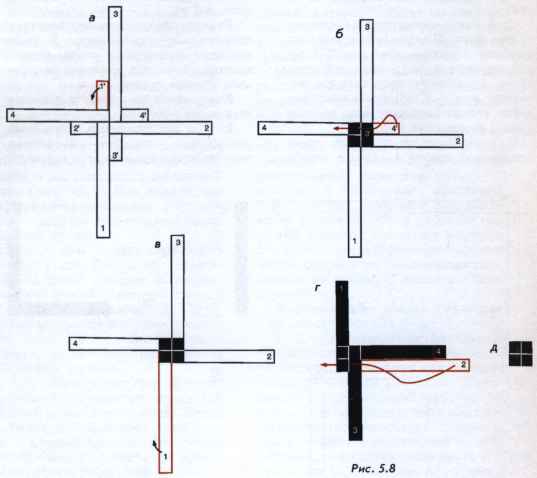
2. Lay the short ends of the strips inside the weave. Start with strip 1 (figure 5.8 a). Next fold the tape 2, then 3" and finally — 4. The tape is folded in such a sequence that each successive pressed the end of the previous. All bends iron with your fingers so that they remain visible on the ribbon.
3. The last tape 4 to be stretch under band 1 (figure 5.8 b). As a result of this weave the ends of the straw strips are well secured. For convenience, the end of the tape 4 can be cut in the area.
In the middle of a weave get a square, the sides of which are formed right sides of the four straw strips (figure 5.8 b). The edge of the great square consists of four small squares with a different direction of the straw fibers. In the light, each little square will have its own color, combined they will give the product a beautiful decorative shimmering effect.
4. Next, you should secure each of the two faces (front and back) large square overlapping layers of strips. Work can already take up all of the tape is fixed and does not break, you can continue its execution on the table. Bands 1, 2, 3, 4 are turned to you wrong side (figure 5.8 b).
5. Lay the ribbon 1 on top of the twisted square. Line bend going on its lower edge. Next, fold the tape 4, then 3 and 2. Tape 2 should be fixed, it will fix all the wiring. Similarly to the previous cases, you have to stretch the tape 2 tape 1 on its entire length (figure 5.8 g). For convenience, you can cut the end of the tape 2 on the area. All bends smooth strips with your fingers. As such, the square has become more neat and durable. Speakers bands 1, 2, 3, 4 cut along the edges of a square (figure 5.8 d).
Before you trim the tape, you can repeat the weave from the opposite side. You can make the number of layers of interweaving, if desired, on each side from 2 to 4. With increasing number of layers the square will look more voluminous.
You can using tape of different width, change the size of the squares. You can get the colored squares if interlocking to include ribbons of different colors.
Four-pointed and eight-pointed straw stars (photo 53). Woven straw stars are based on the mentioned square. To perform four-pointed stars we repeat the main steps for the square of 4 straw ribbon.
1. Take the four straw tubes with a length of 17-20 cm from the middle part of the stem of the same diameter. Prepare of them thatched strips of equal width, which must remain moist.
2. On the table top with twist straw tape, putting them wrong side facing you and the front — surface table, as shown in figure 5.8.
3. Fold the straw ends of strips 1, 2, 3 and 4 as described in the previous example (figure 5.8 b). You have got recorded the interlocking of all the strips (figure 5.8 b).
Next proceed to the formation of rays of the stars. Each ray is formed by a triple twist one of the ribbons.
4. For the formation of the first beam tape 1 bend up at a 45° angle (figure 5.9 a). Please note that the sloping line of the bend out of the middle of the square. Tape 1 takes a horizontal position and is turned to you her face-and wrong — to the table (figure 5.9 b).
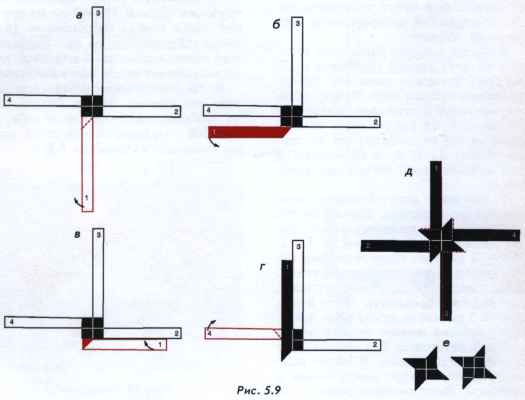
5. Take all weave together. The second time the tape 1 bend the line bend will be along the side formed in the previous step of the area (figure 5.9 b). Tape 1 takes a horizontal position parallel to the tape 2 and is turned to you, the reverse side (figure 5.9 b).
6. Again fold the tape 1 along the inclined side of the formed area (figure 5.9 b). Tape 1 will take its final position (figure 5.9 g). The speaker area is one of the four rays future stars, the band is in a position twisted over a Central square.
7. The following beam is formed by the tape 4 (figure 5.9 g). Tape for subsequent rays are not chosen randomly. It must, in its latest position to push previous the tape, not allowing it to turn. In our scheme tape is tape 4, when she bends will lock the position of the tape 1. The tape 4 is folded around three times, the same way as the strip 1 (figure 5.9 a—d).
8. The third beam is formed by a triple kinking of the tape 3. Her last position fix tape 4.
9. The fourth and last beam will be formed by the triple kinking of the tape 2, the latter provision which will record every weave. To do this, the end of the tape 2 pull under the band 1, as you have repeatedly done. After the last weave, you should get an asterisk with four rays (figure 5.9 e).
The protruding ends of the straw ribbon trim along the edges of the square. In the final version of the asterisk shown in figure 5.9 E. As can be seen from your sample and from the figure, the asterisk has a different pattern of weaves on either sides. On the one hand the rays of the stars are a continuation of its inner part, on the other hand, asterisk has a distinct square in the middle and extending from the smaller triangles-rays.
For the formation of eight-pointed stars, you must repeat all the steps you did when creating the stars with 4 rays (figure 5.8 a, 5.9 a—d). Length of straws for the manufacture of straw ribbons should be the same as for the four-pointed stars, — 17— 20 see
1. Once you follow a star with 4 rays (figure 5.10 a), we proceed to the formation of subsequent rays. To do this, turn the sprocket so that the uncut ends of the strips 1, 2, 3 and 4 were turned to their side.
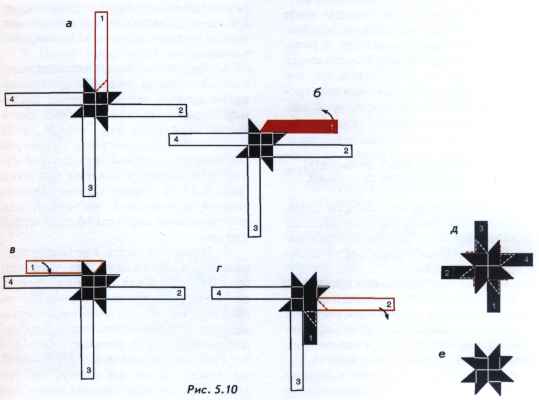
2. The following four rays of our stars will be formed in exactly the same way as in the previous example, the triple bending each straw ribbon. Let's start with tape 1 (figure 5.10 a), bending it. The bend of the tape is at an angle of 45° to the edge of the square and out of the middle of it (figure 5.10 b).
3. Next, make the second bend of the tape 1 around the sides of the formed triangle (figure 5.10 b).
4. In the third bend of the strip 1 (figure 5.10 g) forms a ray.
5. Subsequent beams will be formed similarly. Each subsequent tape must record the location of the previous tape. In our example, this tape will be the tape 2 (figure 5.10 d), in his last position, it will lock the tape 1.
Once all the beams are formed, the fourth and most recent tape should fix all the wiring. The end of the tape stretch under band 1. Left trim the protruding free ends of the tapes along edges of the Central square, and the asterisk will be ready (figure 5.10 e). It has the same pattern on either side. If you use straw ribbons of different colors, you get a sprocket with the colored rays.