


")
Utilitarian products form an entire movement in the straw. The precursors of the utilitarian straw products have many peoples of the world from prehistoric times was the product woven from grasses, reeds, twigs. With the development of agriculture and the beginning of the cultivation of cereals straw superseding all other herbaceous materials, becoming the main material along with twigs of shrubs used for making baskets, various containers for storing food and clothes and hats and many other products.
Modern craftsmen produce a wide range of a variety of utilitarian items. In our home, they in addition to their utilitarian function are more and decorative, often becomes the main. Straw boxes, sweets bowls, baskets, hats, made by masters of Belarus, it is rather a relic preserved a unique tradition of our land.
Napkin, diameter 16 cm
Materials:
64 straw ribbon with a width of 10 mm and a length of 20 cm;
50-60 long Solomin from the middle part of the stem with a diameter of 3 mm;
1 sheet of thick paper 20x20 cm;
PVA glue, needle, thread number 10 or thread, scissors.
Equipment:
simple interlacing "checkerboard" ;
flat braid "catfish" .
Execution of the work.
1. Getting started with the preparation of 64 straw ribbons. Straw ribbon split into 2 parts, with 32 strips each. Weave of each part of the simple interlacing "checkerboard" straw layers (you get two layers measuring approximately 16x16 cm).
2. Grease one side of a sheet of paper over the entire surface with white glue. Glue one of the straw layers, the reverse side on a sheet of paper. Then apply the adhesive sheet on the other side and glue the second straw layer. Pasted on paper layers will serve as a basis for future wipes. Put the Foundation in a press and allow it to dry.
3. Of prepared for the bundle of straw weave flat twist "catfish" length 120 cm nastavlenie Cut all of the straw and press the braid.
4. Of heavy paper, cut round the stencil with a diameter of 16 cm stencil cut out from the dried bases of the circle.
5. Wet straw tape cut in half. From the ribbon, follow these Kant napkins from two sides of the cut out layer. Sew the first strip to do this, put it on the seam to 2/3 the width of the tape was on the reservoir, and 1/3 were for the region (figure 5.89). First, tape the pin on the perimeter of the bases of the pins, then sew. 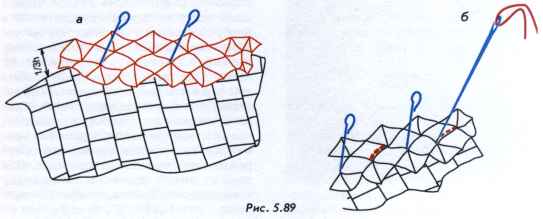
The way of sewing. For sewing you can take the thread of light colors or the line. Pass the thread into the needle, make one of the ends of the thread a knot. Injections with a needle do in the middle part of the straw ribbon, in places of an interlacing of straws without destroying their integrity. Hide the knot under a thatched tape from the base. Stitches along the route weaves under straws "catfish" so that the thread is hiding under the netting (figure 5.89 b). On the reverse side of the seam put the stitches along the edge at the distance of 5-7 mm.
After the tape is sewn around the perimeter, neatly sew the ends. The ends of the tape ssuite overlap, the value of which is 1.5—2 cm Make 5-6 stitches, firmly connecting the ends, and securing the trimmed straw so as not to break the pattern of the weave. Stitches try as best as possible to disguise. Secure the thread inside the weaving and cut it off.
6. Tab second straw tape on the back side of the straw layer. The protruding edges of the first and second strips should be the same. The joints of the second ends of the straw strips, place in another part of the edge of the foundations so that they do not coincide with the joints of the ends of the first tape. A way of sewing the second strip similar to that described above. Slight complication is that the injections the needle should be directed between the straws in one ribbon weave Solomin other tapes. The stitches should be masked with one and the other side of Kant.
Once you gently close up the ends of the second strip, dry cloth under the pressure, and it will be completely ready.
With experience you can try to sew straw tape edging on two sides at the same time, pre-pinned their pins to the base.
You can run a set of napkins for the table, making them different sizes. Ways to change the appearance of such a simple product like tissue paper, very much to change the shape of the bases, to use weaves colored straw and tape the straw to change the types of weaves.
The production of wipes will prepare you for the manufacture of more complicated articles of straw. Methods of bonding layers to the substrate, stitching flat braided, fixing and sealing of the ends of the flat braids are repeated and increasingly to improve your other products.
Plate (diameter 20 cm). Consider the sequence of manufacture of the bins on the basis of more complex construction napkins.
Materials:
100 straw tape width of 8 mm and a length of 22 cm.
30-40 long Solomin from the middle part of the stem with a diameter of 3 mm;
60-80 long Solomin from the upper part of the stem with a diameter of 1.5— 2 mm;
1 sheet of thick paper or cardboard 25x25 cm;
PVA glue, needle, thread # 40 or fishing line, soft wire with a diameter of 1-3 mm, scissors, wire cutters.
Equipment:
plain weave ", Parkett" ;
flat braid "catfish" ;
twisted braid of 5 Solomin on the wire frame .
Execution of work: 1. Start with a prepare straw ribbons. Straw ribbon split into 2 parts, 50 strips
each. Weave each piece from a simple melody", Parkett" straw layers, you get two layers measuring approximately 20 x 20 cm.
2. Stick, as in the previous example, the straw layers on a sheet of heavy paper or cardboard. Put under a press to dry.
3. Of prepared to work a straw from the middle parts of the stem straw weave flat tape "catfish" with a length of about 70 cm nastavlenie Cut all of the straw and press the braid.
4. From prepared to face the sticks of the upper parts of the stalk weave the two twisted braids of 5 straws with a length of 70 cm and a diameter of 2 cm, with a wire frame inside the weave. For thickening of the frame, use rough strips that impose around the wire.
5. Of heavy paper, cut round the stencil with a diameter of 20 cm stencil cut out from the dried bases of the circle.
6. Of moist straw tape "catfish" run the piping on the bottom of the bins, carefully sew it to the edge of the cut straw of the reservoir (the technique of sewing, see the previous example).
7. Straw plaits are made of a wall of bins. Wiring work should be dry. Put a tourniquet around the perimeter of the bottom raw side. That straw broke at the bends, tuck up your braid, don't give her much to stretch. The edge of the bases should be closed plait. Laying out the wiring, fix it based on the pins. Trim the excess part of the twisted cable scissors, wire snack cutter. Try not to crush the coils of braids. Both ends of the twisted braids connect at the butt so to match the angles 1 and 1, 2 and 2, 3 and 3, 4 and 4 (figure 5.90). The coils from one end of the netting coincides with the coils on the other end. Visually, this network will not be perceived as a cut, the pattern of turns will remain solid. The ends of the braids connect the pins. In the dry twisted sennit straw is stored in the netting, not replicas, this is a very easy stitching and sealing ends. 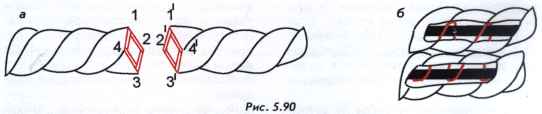
8. Sew the twisted braid to the base of the bins. The knot securing the string inside of the hide netting. Twisted braid sew in frame, skipping the needle and thread together between straw turns first one side of the frame, then on the other. On the reverse side of the bottom stitches hide under a woven straw belt. After all straw the cord is sewn to the base, sew the ends, simultaneously fastening them together and attaching to the base. Hide the stitches in the weave of the harness. The connection with the inner sides can be slightly miss the mark glue PVA. Most important when knitting ends is the preservation of the integrity of the picture of twisted braids, and gently and firmly connected.
9. For the second tier side made need to sew a second ring of twisted braids, which run from the second workpiece. The second twist position so that the joints of the upper and lower tiers are not located one above the other, and were in different parts of the circle. Braids first, seal with pins, then sew with each other the frames. Hide the stitches between the loops of the weaving (figure 5.90 b).
10. The ends of the netting to gently sew back to back, combining a twisted pattern.
You can perform different types of bread bins, confetis, changing the shape of the bottom, making it oval, rectangular, rhombic. Try to perform the twisted weaving of different numbers of straws and combine them. Between the twisted tangles insert a chain of diamonds, and your bread will look very different.
Box. 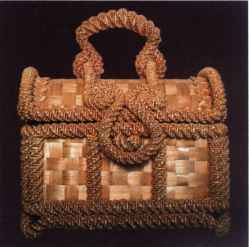
Materials:
-140 straw ribbon, width 10 mm and length 20 cm each;
a bunch of long straws (150 pieces) from the middle part of the stem, the diameter of one of the straw 3-4 mm;
a bunch of long STRAWS (~ 300 pieces) from the top of the stem, the diameter of one of the straw 1.5—2 mm;
1 sheet of cardboard with a size of 30x20 cm for the bottom of the cover with cap semicircular side;
1 sheet of cardboard with a size of 20x20 cm to top of lid;
2 sheets of cardboard the size of 20x16 cm of the bottom, front and rear walls of the housing;
1 piece of cardboard the size 12x16 cm for the side walls of the housing;
3.5 m of copper or aluminum wire with a diameter of 2-3 mm;
PVA glue, a thick needle, thread No. 10 for sewing items, scissors, cutters.
Equipment:
plain weave ", Parkett" ;
flat braid "catfish" ;
twisted voluminous braid of 5 Solomin .
Preparation weaving:
1. Start with a prepare straw ribbons. Then weave from them a simple weave", Parkett" layers in the following sizes:
one straw layer with a size of 20x20 cm to the top of the lid of the box;
two straw layer with a size of 20x16 cm of the bottom, front and rear walls of the housing;
one straw layer size 20x12 cm for the side walls of the housing.
2. Layers of straw put under a press to dry.
3. Of prepared to work a straw from the middle parts of the stem straw weave flat tape "catfish" with a length of about 2.5 m. Cut all nastavlenie the straw and press the braid.
4. From the most part trained to work fine straw weave twisted braids of 5 Solomin on wire frame with a length of 3.5 m with a diameter of 1.3 cm To seal the frame, use rough strips that you place in the hole of the netting to the wire. From twisted braids on the frame will run twisted edging of the trunk.
5. Part of the remaining thin straws weave twisted braids without a frame of 5 straws with a length of 110 cm and a diameter of 1.3 cm coiled All the braids before beginning work on box allow to dry.
6. Separately vyplatit blanks for lock and handle. Both are trailing blanks on the frame. Lock weave on a frame of wire twisted braid with a length of 40 cm and a 1 cm diameter Braided lignite in the form of a castle (figure 5.91 a), the size of the head from the specified pattern. All curved elements of the stitch for better fixation. 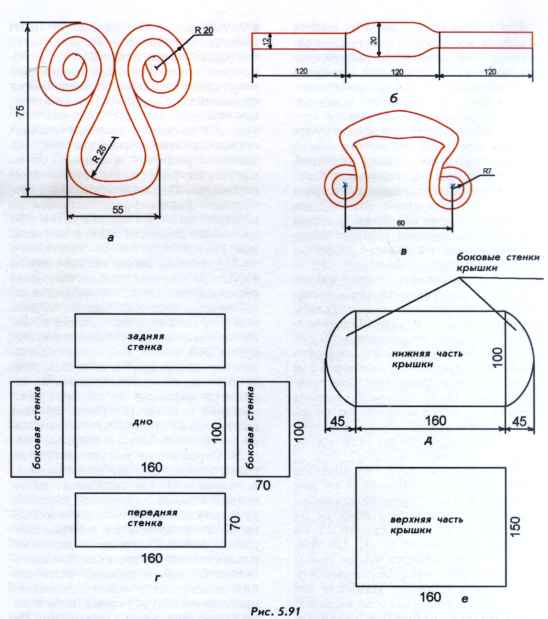
7. Vyplatit billet for the handle. Pen box has a bulge in the middle part to make it a sophisticated framework (figure 5.91 b) and appetite his twisted braid of 5 Solomin. Wet braid lignite in form, the bent ends of the handle sew in a ring (figure 5.91).
The manufacture of the body of the box.
1. To cut out cardboard of the bottom and side walls of the box:
from a single sheet of size 20s x16 cm cut base to bottom of box size 16x10 cm (figure 5.91 g);
from the second sheet size 20x16 cm cut the front and back walls of the box size 16x7 cm (figure 5.89 g);
from a sheet size 12x16 cm cut out two side walls of the box size 10x7 cm (figure 5.91 g).
2. On the cardboard blank of the bottom in several places secure the glue one straw layer of size 20x16 cm On the entire surface of the layer of glue is not necessary, otherwise it will warp. Pristrochite on a sewing machine or sew manually the straw layer on the paperboard around the perimeter, retreating from the edge of the cardboard Then cut 2-3 mm. advocating for the straw cardboard ribbon formation. Side of the bottom, made with a simple weave, will be on the outside of the box. The inner side of the bottom, as well as the inner side of the walls will be decorated with thatched strips laid parallel to each other flooring. Straw lay the tape along the lower side of the bottom one, with little overlap and sew to the cardboard. To cardboard are not torn, the stitching that is sewn straw layer straw and tape, do it with a displacement of 1-1,5 mm from each other.
3. From the second straw layer of size 20x16 cm cut out two blanks for the front and rear walls of the box, whose dimensions are 16x7 cm of the Workpiece must be greater than cardboard. For this layer, it is sufficient to cut in half side 20 cm. Lightly clamp the seams in several places with glue on cardboard blanks front and rear walls and tab, as described in the previous step the bottom. Exposed edges of layers cut. On the reverse side of the cardboard straw ribbon tab, positioning them along the short side walls.
4. Straw reservoir size 20x12 cm cut out two blanks for the sides of the boxes, whose dimensions are 10x7 cm Layer cut in half side 20 cm. Each half lock to glue onto the cardboard pieces and sew. Exposed edges of layers cut. On the reverse side of the cardboard blank walls fill sewn straw ribbons. Tape position along the short side.
5. Lightly moisten straw tape "catfish". Cut strips corresponding to the size of the bottom, with a small margin for allowances: 2 strips with a length of 17 cm and 2 strips with a length of 11 cm At the ends of the strips make slanting cuts at a 45° angle, located mirror to each other. Tab strips, flat braids around the perimeter of the bottom side is lined with straw ribbons. The braid should extend beyond the edge of the blank bottom is not less than a half of its width. Pay particular attention to the sealing of joints at the corners of the bottom. Do not sew all the ends, without breaking the pattern of weaving.
6. Sew all the prepared workpiece lateral sides of the body casket to the exposed edge of the catfish. Along the sides of length 16 cm tab front and back walls, along the sides of length 10 cm — side walls. Blank walls, place the sides, lined with straw ribbons, "catfish", they form the inner part of the box. When assembling the side walls should fit dockable to the sides of the pan. Stitches mask under weave "catfish". From the side walls they should be placed at a distance of 3-3,5 mm from the edge. Stitches can be glued with a thin straw with tape.
7. Cut straw tape "catfish" strips corresponding to the size of the bottom, with a small margin for allowances: 2 strips with a length of 17 cm and 2 strips with a length of 11 cm At the ends of the strips make slanting cuts at a 45° angle, located mirror to each other. Tab strips, flat braids around the perimeter of the bottom from the straw layer. The braid should extend beyond the edge of the blank bottom not less than 1/3 of its width.
8. Cut the dried billet handset coil cord, carried on the frame, a piece of netting, the length of which is equal to the outside perimeter of the box plus 5 cm considering bending allowances and the tightening of the weave (in total length of the cut cord is approximately 60 cm). In the lower part of the walls of the boxes at the bottom of the sewn cord, strengthening their walls in a vertical position. Decide which of the large walls will have you front and which is rear. The cord start to sew from the middle of the rear wall of the frame. "Catfish" from the inner surface of the box do not overwrite. The only cord is sewn to a cardboard wall, the stitches will be covered by a "catfish". Side wall stitches do 2-2. 5 cm, 5-8 mm. cord After the cord is sewn around the perimeter of the box, sew the right and left butt the ends, aligning a twisted pattern.
9. Cut another piece of twisted cord with a length of approximately 60 cm and is similar to the described above method to sew it on the upper edge of the walls of the box.
10. Follow the vertical bars on the walls and the corners of the box. To do this, from twisted cable, vypechennogo without a frame, cut 12 short pieces of the weave, the length of which is equal to the height of the walls of the box between the top and bottom cords. The length of each column will be approximately equal to 5.5—6 see When you cut the bars, the cord be careful not to stretch. Sew the columns between the upper and lower cords of the edging of the walls. Corner columns should adjoin densely to each other, sew them together. Divide the front and back walls of the boxes into 3 equal parts and between these parts position the columns. The length of one box will be approximately 5 cm.
11. To complete the legs of the box from the blank the handset coil cord to the frame cut a piece of netting, the length of which will correspond to the length of the cord edging (approximately 60 cm plus 20 cm for the execution of the legs is only about 80 cm). All measurements commence its work. Sew the cord to the bottom edging of the box, positioning it under her. Sew on the cord, start from the middle of the back wall. Is short by about 2cm to the corner of the free end of the cord match the leg. To ensure that all the legs were done the same way, the bending of the cord guide do around, such as around a ballpoint pen or pencil. Hold the handle at the corner of the box in a diagonal direction parallel to the bottom of the box, go around around it the cord. Continue to sew the cord on the other side of the box, departing from the corner 2 see Sew around the perimeter of the entire cord, sew the ends of the netting back to back.
12. Run the lower part of the castle. From harvesting the cord without wire frame cut a piece of netting with a length of 5-6 cm, curve it into a horseshoe shape. Attach the ends to the middle part of the front wall of the box under the top edging and sew. Arrange stitches as the edging and the wall of the box.
13. Place the narrow straw ribbon with a width of 5-7 mm along the upper perimeter of the box on the inside, covering the stitches. Belt widths 2-3mm seal the upper end of the box.
Making the cover of the box.
1. To cut out from the third sheet of cardboard with a size of 30x20 cm in the lower part of the box with the whole knitting round bumpers, the size of which is on the rectangle 25x11 cm (figure 5.91 g);
from a sheet of cardboard the size of 20x X20 cm cut the top part of the box, which is sized at 16x14 cm (figure 5.91 d).
2. A cardboard blank for the lower part of the cover with one hand straw tab of the ribbon, arranging them parallel to each other along the short side with a small overlap, on a semicircular wall elements of the straw tape glue. The protruding ends of the ribbon trim. Semicircular elements bend at a right angle to the side nataliena of the cardboard.
3. On the cardboard workpiece cover top box sew billet straw layer with a size of 20x20 cm, projecting beyond the cardboard of the seam cut (figure 5.91).
4. Lightly moisten straw tape "catfish". Cut strips corresponding to the dimensions of the rectangular part of the lower element of the cover, with a small margin for allowances: 2 strips with a length of 17 cm and 2 strips with a length of 11 cm At the ends of the strips make slanting cuts at a 45° angle, located mirror to each other. Tab strips, flat braids around the perimeter of a rectangle with sides lined with straw ribbons. The braid should extend beyond the edge perimeter is not less than a half of its width.
5. Cut and dry-the handset coil cord on the frame 2 of the piece of netting with a length that corresponds to the perimeter of the semicircular side walls of the cover (the length of one piece is approximately equal to 25 cm). Cords tab on the perimeter wall from the pasted straw ribbons. The junction of the ends of the nettings do on the direct side. The cord is a bit protruding over the edge of the cardboard.
6. Cut straw tape "catfish" strips corresponding to the size of the top of the lid, with a small margin for allowances: 2 strips with a length of 17 cm and 2 strips of length 15 cm At the ends of the strips make slanting cuts at a 45° angle, located mirror to each other. Tab strips, flat braids around the perimeter from the straw layer. The braid should extend beyond the edge of the cardboard blank to not less than 1/3 of its width.
7. Cut from billet handset coil cord, without frame 2 of the piece of netting with a length of 15 cm each. They will be attached to the lid of the box, dividing it into three parts, and serve for fixing of handle and lock. Miss cut twisted braids using curved ring handle box. Sew the handle in the middle of the braids. Divide the top of the cap along the longest side into 3 equal parts. In between first and second, second and third parts tab prepared strips of twisted cord, positioning them perpendicular to the large side. The handle will be placed in the middle of the lid vertically.
8. Connect the bottom and top of the cap pins. "Catfish" the top of the lid along the long sides; sew with a "catfish" the bottom of the cover. Around the curved sides of the "catfish" sew to the cord of the sidewalls.
9. Cut the dried billet handset coil cord, carried on the frame, a piece of netting with a length of the outer perimeter of the semicircular cover of the box, plus 5 cm considering bending allowances and the tightening of the weave. In total, the length of the cut cord will be approximately 75 cm Decide which of the sides of the cover will have you front and which is rear. The cord start to sew from the middle of the back side of the cover along the edge. The last stitch butt right and left ends of the cord, aligning the twisted figure. The perimeter of the manufactured cover must exactly match the perimeter of the body of the box. The cover rests on the upper edge of the skirting without internal and external gaps.
10. At the bottom front of the cover for dividing the strips fasten the prepared upper part of the castle. Adjust the position of the lock, put the cover on the housing box, the upper part of the castle should be easy to dress for the lower part.
11. The box cover sew to the body for a long Kant of twisted braids. Make the stitches loose so the cover can be opened easily.
Note. Making the box, check the real dimensions of the parts that you get.
Using the technology of the manufacture of this box, it is possible to develop and produce a variety of shapes of boxes, trunks, chests, combining them with other types of nettings, making the insertion made in the techniques of geometric and curvilinear applications.
Select your language