


")
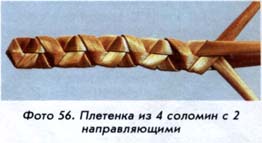
1. Take 2 straws from the middle part of the stalk of equal length and diameter. Fold one straw through another, as it did for the stumble area (figure 5.14 a).
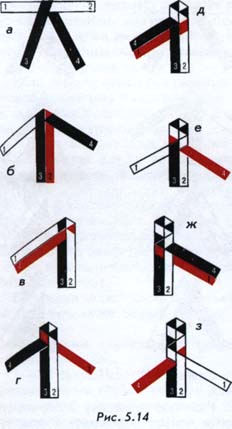 2. Working from a straw 2 fold itself around the straw 4. The crest line is on the outside of the straw 4. Lay it parallel Solomin 3 (figure 5.14 b).
In the future, the straw will work alternately 1 and 4, the guide can remain of the straw 2 and 3. Netting keep themselves relatively in the position shown in figure 5.14 b.
2. Working from a straw 2 fold itself around the straw 4. The crest line is on the outside of the straw 4. Lay it parallel Solomin 3 (figure 5.14 b).
In the future, the straw will work alternately 1 and 4, the guide can remain of the straw 2 and 3. Netting keep themselves relatively in the position shown in figure 5.14 b.
3. Working from a straw 4 fold itself around the straw 2. The crest line is on the outside of the straw 2. Twist the working straw 4 straws 2 and 3 (it will be held under culm 2 and 3 on top of the straw). Put a straw 4 working in parallel Solomin 1 (figure 5.14 b).
4. Working straw 1 fold yourself around the straw 3. The crest line is on the outside of the straw 3. Twist the working straw straws 1 between 3 and 2 (it will go on top of the straw 3 and under culm 2). The final position of the working straw 1 takes the extreme position to the right (figure 5.14 g).
5. Working straw 1 fold yourself around the straw 2. The crest line is on the outside of the straw 2. Twist the working straw straws 1 between 2 and 3 (she will be on top of the straw 2 and under culm 3). Put a straw 1 working in parallel Solomin 4 (figure 5.14 d).
6. Working from a straw 4 fold itself around the straw 3. The crest line is on the outside of the straw 3. Twist the working straw 4 straws of 3 and 2 (it will be held under culm 3 and 2 on top of the straw). The final straw position working 4 takes the extreme position to the right (figure 5.14 e).
7. Working straw 1 fold yourself around the straw 3. The crest line is on the outside of the straw 3. Twist the working straw straws 1 between 3 and 2 (it will go on top of the straw 3 and under culm 2). Put a straw 1 working in parallel Solomin 4 (figure 5.14 g).
8. Working from a straw 4 fold itself around the straw 2. The crest line is on the outside of the straw 2. Twist the working straw 4 straws 2 and 3 (it will be held under culm 2 and 3 on top of the straw). The final straw position working 4 takes the extreme left position (figure 5.14 h).
To continue braiding, repeat all the steps 4-8.
After weaving ends Solomin tie.
Braid has a beautiful texture, it can bend in the plane of the netting. Used as an element of decoration.
A simple network (one-sided, photo 57).
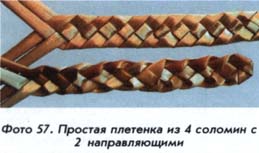
1. Take 2 straws from the middle part of the stalk of equal length and diameter. Fold one straw through another, as it did for the stumble area (figure 5.15 a).
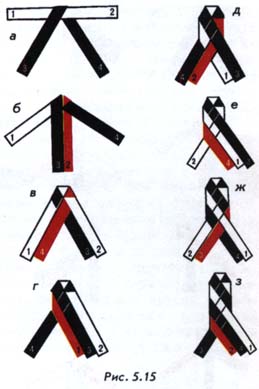
2-3. Remember how you braided area of the 4 straws and repeat all the steps and refer to figures 5.15 b, V.
After the stumble of the area to commence plaiting. Workers will be extreme straw alternately with the right and left sides.
4. Working straw 1 fold yourself around the straw 4 at an angle of 45°. The crest line passes vertically. Put a straw parallel to a working 1 3 Solomin (figure 5.15 d).
5. Working from a straw 2 fold itself around the straw 3 at an angle of 45°. The crest line passes vertically. Twist the working straw 2 straws between 3 and 1 (it will be held under culm 3 and 1 on top of the straw). Put a straw 2 working in parallel Solomin 4 (figure 5.15 d).
6. Working stubble 4 to fold around the straw 2 under the angle of 45°. The crest line passes vertically. Put a straw 4 working in parallel Solomin 1 (figure 5.15 e).
7. Working from a straw 3 fold itself around the straw 1 at an angle of 45°. The crest line passes vertically. Twist the working straw 3 straws between 1 and 4 (it will go under culm 1 and 4 on top of the straw). Put a straw 3 parallel working Solomin 2 (figure 5.15 f).
8. Working straw 2 fold to his 3 around the straw at a 45° angle. The crest line passes vertically. Put a straw 2 working in parallel Solomin 4 (figure 5.15 h).
To continue braiding, repeat all the steps 4-8. Workers of the straw are from the outside of the netting, taking alternately the right and left extreme position. Inflection workers Solomin is conducted in different directions: right — on my own, left to themselves. Bend the working straw form at braids smooth edge. To weave more dense, slightly pull it over the loose ends of straws, throwing them in different directions from the center.
If, instead of the excesses of workers Solomin apply them curves (figure 5.1 d), the braid will be wavy with textured edge.
After vpleteny braids to the required length of the straw all tie together. The way of extending this Solomin braids will be discussed in the appropriate section. Braid laminate. Short twist spontaneously bent in a spiral (this property can be used in the manufacture of decorative elements).
Braided line can be used to create a variety of products.
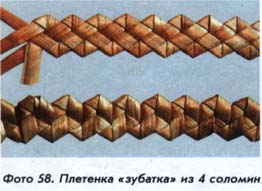
Braid "catfish" (bilateral, photo 58).
1-3. Take 2 straws from the middle part of the stalk of equal length and diameter. Braid area of 4 Solomin (figure 5.16 a—C).
After the stumble of the area to commence plaiting. Weaving will participate in series two to the right of the straw, then two straws left.
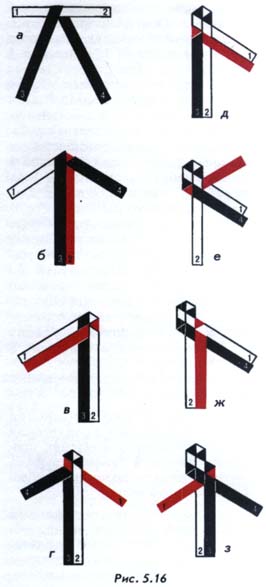
4. Working straw 1 fold yourself around the straw 3. The crest line is on the outside of the straw 3. Twist the working straw straws 1 between 3 and 2 (it lies on top of the straw 3 and under culm 2). Solomina 4 will be between Solomin 3 and 4 (figure 5.16 d).
5. Working from a straw 4 fold itself around the straw 3. The crest line is on the outside of the straw 3. Twist the working straw 4 straws of 3 and 2 (it will be held under culm 3 and lie on top of the straw 2). Put a straw 4 working in parallel Solomin 1 (figure 5.16 d).
6. Working from a straw 3 fold itself around the straw 4. The crest line is on the outside of the straw 4. Twist the working straw 3 straws between 4 and 1 (it will be held under Solomin 2, 4, and lie on top of the straw 1). Put a straw working 3 at an acute angle to Solomin 1 (figure 5.16 e).
7. Working from a straw 3 fold itself around the straw 1. The crest line is on the outside of the straw 1. Twist the working straw 3 straws between 1 and 4 (it will go under culm 1 and lie on top of the straw 4). Put a straw 3 parallel working Solomin 2 (figure 5.16 f).
8. Working straw 1 fold myself around the straw 3. The crest line is on the outside of the straw 3. Twist the working straw straws 1 between 3 and 2 (it will be held under the straws 4, 3, and lie on top of the straw 2). Put a straw working 1 at an acute angle to Solomin 2 (figure 5.16 b).
To continue braiding, repeat steps 5-8.
Note. The numbering of straws will be the same after proplyene two pairs of teeth, so if you continue plaiting, follow the appropriate location Solomin relative to each other.
Braid has a very beautiful scalloped edge. Each kink is formed by the successive braiding 2 working Solomin, who are on one side of the netting. Braid has a different texture weave on the front side and purl, very plastic like most flat braids and can be bent in a wet condition in different planes, fixed form is retained after drying the braids.
Due to its decorative and technological qualities of the "catfish" has been very widespread among the masters. It is used for sewing hats, and decorative hats, and various utilitarian items, straw decor sculpture, it is included in the composition of toys. In products it blends perfectly with other weaves and decorative elements.
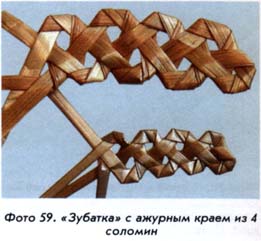
"Catfish" with an openwork edge (bilateral, photo 59). This network was developed in the early 1980-ies Lydia glowacki she used the master in the author's works when making sculptures, in the manufacture of decorative straw flowers. Feature braids are round shape prongs with holes in the middle, that create a light fishnet pattern.
1-3. Take 2 straws from the middle part of the stalk of equal length and diameter. Braid area of 4 Solomin (figure 5.16 a—C).
After the stumble of the area to commence plaiting. 4. Working straw 1 fold yourself around the straw 3. The crest line is on the outside of the straw 3. Twist the working straw straws 1 between 3 and 2 (it lies on top of the straw 3 and under culm 2). Solomina 4 will be between 3 and 4 straws (figure 5.17 a). The straw 3 and 2 apart at an acute angle, as shown in the diagram.
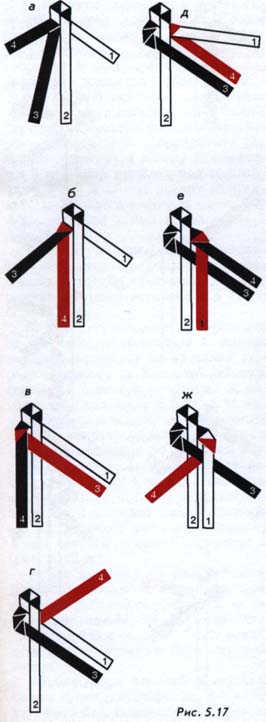
5. Working from a straw 4 fold itself around the straw 3. The crest line is on the outside of the straw 3. Put a straw 4 working in parallel Solomin 2 (figure 5.17 b).
6. Working from a straw 3 fold itself around the straw 4. The crest line is on the outside of the straw 4. Twist the working straw 3 straws between 4 and 2 (it will be held under culm 4 and lie on top of the straw 2). Put a straw 3 parallel working Solomin 1 (figure 5.17).
7. Working from a straw 4 fold itself around the straw 3. The crest line is on the outside of the straw 3. Twist the working straw 4 straws between 3 and 1 (she will be held under the straws 2, 3, and lie on top of the straw 1). Put a straw working 4 at an acute angle to Solomin 1 (figure 5.17 d).
8. Working from a straw 4 fold itself around the straw 1. The crest line is on the outside of the straw 1. The straw 1 and 3, spread at an acute angle. Put a straw 4 working in parallel Solomin 2 (figure 5.17 d).
9. Working straw 1 fold myself around the straw 4. The crest line is on the outside of the straw 4. Twist the working straw 1 between the straws 4 and 3 (it will be held under culm 4 and lie on top of the straw 3). Put a straw 1 working in parallel Solomin 2 (figure 5.17 e).
10. Working from a straw 4 fold itself around the straw 1. The crest line is on the outside of the straw 1. Twist the working straw 4 straws 1 and 2 (it will be held under the straws 1, 3, and lie on top of the straw 2). Put a straw working 4 at an acute angle to Solomin 2 (figure 5.17 g).
You got two openwork cloves. Then continue make a twist from the working of the straw 4, starting from figure 5.17. Do not forget that numbering Solomin will coincide with the repetition of two pairs of teeth.
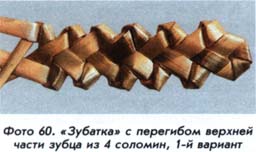
"Catfish" with a bend top teeth (bilateral, 1st option, photo 60). Braid was developed by Anna Ivanova in 1996. Wizard when making straw sculptures, as an element of decorative compositions in straw toys. Feature of braids is the pronounced texture of teeth, the upper part of which is thickened.
1-3. Take 2 straws from the middle part of the stalk of equal length and diameter. Braid area of 4 Solomin (figure 5.16 a—C).
After the stumble of the area to commence plaiting (figure 5.18 a).
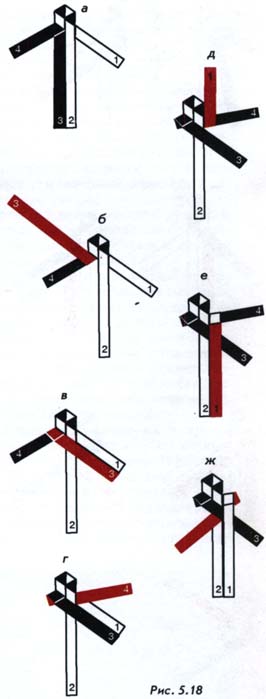
4. Working straw 3 fold to his 4 up around the straw. The crest line is on the inner side of the straw 4 (figure 5.18 b).
5. Working from a straw 3 fold itself around the straw 4. The crest line is on the outside of the straw 4. Lay the working straw over the straw 3 2 parallel 1 Solomin (figure 5.18 b).
6. Working from a straw 4 fold itself around the straw 3. The crest line is on the outside of the straw 3. Twist the working straw 4 straws between 3 and 1 (she will be held under the straws 2 and 3 and lie on top of the straw 1). Put a straw working 4 at an acute angle to Solomin 1 (figure 5.18 d).
7. Working straw 1 fold yourself around the straw 4 up. The crest line is on the inner side of the straw 4 (figure 5.18 d).
8. Working straw 1 fold myself around the straw 4. The crest line is on the outside of the straw 4. Lay the working straw over the straw 1 3 parallel 2 Solomin (figure 5.18 e).
9. Working from a straw 4 fold itself around the straw 1. The crest line is on the outside of the straw 1. Twist the working straw 4 straws 1 and 2 (it will be held under the straws 1 and 3 and lie on top of the straw 2). Put a straw working 4 at an acute angle to Solomin 2 (figure 5.18 f).
You have got two cloves. Then continue make a twist from the working of the straw 2, starting from figure 5.18 b. Do not forget that numbering Solomin will coincide with the repetition of two pairs of teeth.
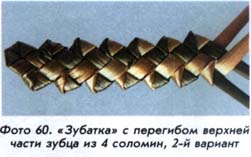
"Catfish" with the inflection of the upper part of the prong (double-sided, 2-nd version, photo 61). Braid was developed by Anna Ivanova in 1996. Feature of braids is expressed texture of teeth. The upper part of the clove is the inversion in the form of a triangle.
1-3. Take 2 straws from the middle part of the stalk of equal length and diameter. Braid area of 4 Solomin (figure 5.16 a—C).
After the stumble of the area to commence plaiting (figure 5.19 a).
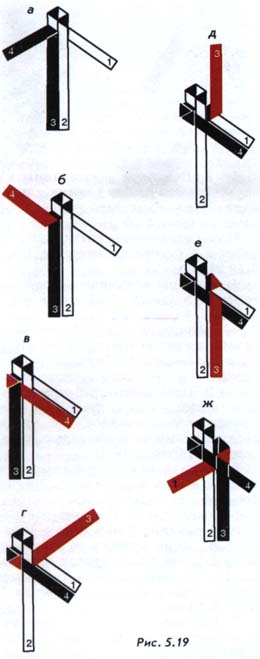
4. Working straw fold 4 under an angle of 45° upwards (figure 5.19 b).
5. Working straw fold 4 of the folded myself around her area and the straw 3. The crest line is on the outside of the straw 3. Twist the working straw 4 straws of 3 and 2 (it will be held under culm 3 and lie on top of the straw 2, parallel Solomin 1) (figure 5.19 b).
6. Working from a straw 3 fold itself around the straw 4. The crest line is on the outside of the straw 4. Twist the working straw 3 straws between 4 and 1 (it will go under the 2 straws and 4 and lie on top of the straw 1). Put a straw working 3 at an acute angle to Solomin 1 (figure 5.19 g).
7. Working straw 3 fold under an angle of 45° upwards (figure 5.19 d).
8. Working straw 3 fold from the folded itself around her area and the straw 1. The crest line is on the outside of the straw 1. Twist the working straw 3 straws between 1 and 4 (it will go under culm 1 and lie on top of the straw 4, in parallel Solomin 2) (figure 5.19 e).
9. Working straw 1 fold myself around the straw 3. The crest line is on the outside of the straw 3. Twist the working straw straws 1 between 3 and 2 (it will be held under the straws 4 and 3 and lie on top of the straw 2). Put a straw working 1 at an acute angle to Solomin 2 (figure 5.19 g).
You have got two cloves. Then continue make a twist from the working of the straw 1, beginning with figure 5.19 b. Do not forget that numbering Solomin will coincide with the repetition of two pairs of teeth.
In all of the above braided straw workers have taken the extreme position from the outside of the netting.
Next, we consider three kinds of weaving, in which the workers are inside of the straw weave. To perform these nettings is better to choose thin or split into narrow ribbon strips. To start weaving, you can stumble to the corner of the four Solomin (in the schemes you are considering this option) or tying four of the straw into a flat beam. If you tie the straw in a bundle, you need to consider the decoration tied the ends: they can fluff up, put on their bead a tube or straw, wrap the thread or ribbon straw.
Network "bug" (bilateral, photo 62). Braid was developed by Anna Ivanova in 1996. Feature of braids is a chain of convex squares, which is located along the midline of the braids from the front side.
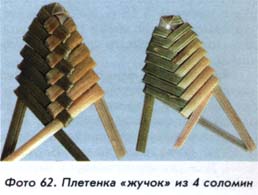
1-3. Take 2 long thin straw of equal length and diameter. Braid area of 4 Solomin (figure 5.20 a—C).
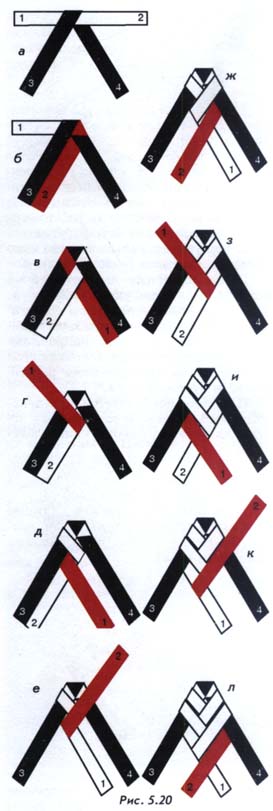
4. Working straw 1 fold yourself around the straw 2. The crest line will pass through the inner side of the straw 2. Lay straw on top of working 1 Solomin 2 and 3 (figure 5.20 d).
5. Working straw 1 fold myself around the straw 3. The crest line is on the outside of the straw 3. Twist the working straw straws 1 between 3 and 2 (it will be held under culm 3 and lie on top of the straw 2, parallel Solomin 4, at a distance of several millimeters from it) (figure 5.20 d).
6. Working straw 2 fold it around the straw 1. The crest line will pass through the inner side of the straw 1. Lay straw on top of working 2 straws 1 and 4 (figure 5.20 e).
7. Working from a straw 2 fold itself around the straw 4. The crest line is on the outside of the straw 4. Twist the working straw straws 1 between 4 and 1 (it will be held under culm 4 and lie on top of the straw 1, in parallel Solomin 3 at a distance of several millimeters from it) (figure 5.20 f).
8. Working straw 1 fold yourself around the straw 2. The crest line will pass through the inner side of the straw 2. Lay straw on top of working 1 Solomin 2 and 3 (figure 5.20 h).
9. Working straw 1 fold myself around the straw 3. The crest line is on the outside of the straw 3. Twist the working straw straws 1 between 3 and 2 (it will be held under culm 3 and lie on top of the straw 2, parallel Solomin 4), the distance between the straws 1 and 4 will gradually increase as vpleteny braids (figure 5.20).
10. Working straw 2 fold it around the straw 1. The crest line will pass through the inner side of the straw 1. Lay straw on top of working 2 straws 1 and 4 (figure 5.20).
11. Working from a straw 2 fold itself around the straw 4. The crest line is on the outside of the straw 4. Twist the working straw straws 1 between 4 and 1 (it will be held under culm 4 and lie on top of the straw 1, in parallel Solomin 3), the distance between the straws 2 and 3 will gradually increase as vpleteny braids (figure 5.20 liters).
Further, the network vyplatit schemes, following figures 5.20, z—L. After the weaving of the straw tie. Braid can make with different angle guides Solomin, during the braiding angle can be changed, making the expansion and contraction of edges.
Braid used as a decorative element in a thatched toys, colours, decorative compositions.
Network "bug" (one-sided, photo 63). Braid was developed by Love selivonchyk in 2000.
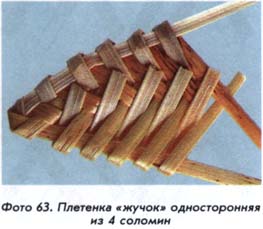
1-3. Take 2 long thin straw of equal length and diameter. Braid area of 4 Solomin (figure 5.20 a—C).
4. Working straw 1 fold yourself around the straw 2. The crest line will pass through the inner side of the straw 2. Twist the working straw straws 1 between 2 and 3 (she will be on top of the straw 2 and will be held under culm 3) (figure 5.21 a).
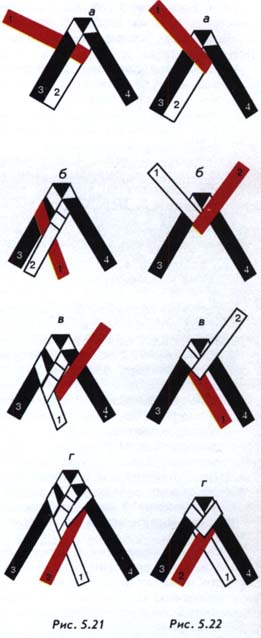
5. Working straw 1 fold yourself around the straw 3. The crest line is on the outside of the straw 3. Twist the working straw straws 1 between 3 and 2 (it lies on top of the straw 3 and will be held under culm 2). Put a straw 1 working in parallel Solomin 4 at a distance of several millimeters from it (figure 5.21 b).
6. Working from a straw 2 fold itself around the straw 1. The crest line will pass through the inner side of the straw 1. Twist the working straw 2 straws between 1 and 4 (it will go under culm 1 and lie on top of the straw 4) (figure 5.21 b).
7. Working from a straw 2 fold itself around the straw 4. The crest line is on the outside of the straw 4. Twist the working straw 2 straws between 4 and 1 (it will be held under culm 4 and lie on top of the straw 1, in parallel Solomin 3 at a distance of several millimeters from it) (figure 5.21 g).
Continue on braiding, following the patterns depicted in figures 5.21 a—G.
After the weaving of the straw tie. As in the previous weave, this basket can make with different angle guides Solomin, during the braiding angle can be changed, making the expansion and contraction of edges.
Braid "scales" (bilateral, photo 64). Braid was developed by Love selivonchyk in 2000.
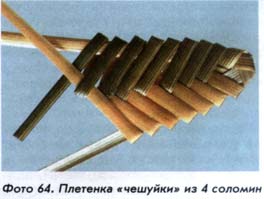
1-3. Take 2 long thin straw of equal length and diameter. Braid area of 4 Solomin (figure 5.20 a—C).
4. Working straw 1 fold yourself around the straw 2. The crest line will pass through the inner side of the straw 2. Lay straw on top of working 1 Solomin 2 and 3 (figure 5.22 a).
5. Working straw 2 fold it around the straw 1. The crest line will pass through the inner side of the straw 1. Lay the working straw over the straw 2 4 (figure 5.22 b).
6. Working straw 1 fold myself around the straw 3. The crest line will be on the outside of the straw 3. Put a straw 1 working in parallel Solomin 4 at a distance of several millimeters from it (figure 5.22).
7. Working from a straw 2 fold itself around the straw 4. The crest line is on the outside of the straw 4. Twist the working straw 2 straws between 4 and 1 (it will be held under culm 4 and lie on top of the straw 1, in parallel Solomin 3 at a distance of several millimeters from it) (figure 5.22 d).
Keep on braiding by following the schemes shown in figures 5.22 a—G.
After the weaving of the straw tie. As in the previous networks, this network can make a different angle with the guide Solomin, during the braiding angle can be changed, making the expansion and contraction of edges.