


")
With the increasing number of straws that are involved in netting, increases the number of tangles. Basic techniques cover tions when making smooth and scalloped edges of the braids will be drawn from the above weaving 4 Solomin. A variety of textures are formed by changing the order of interlacing work Solomin and varied their grouping.
To start weaving you can use any of the previously discussed methods: linking the necessary number of straws in a flat beam (figure 5.1) that braiding the edge of the area or exactly (figure 5.12 a—f, 5.13 a—d in the article, Weaving with the even numbers Solomin).
From the above examples of networks highlight the main features of flat braided, which we will need in the future:
braids with the straight edge, formed under the sequential proletarii working Solomin right and left;
braids with a serrated edge, are formed at proletarii couple of working Solomin right and left;
when vypletenii tangles with a smooth edge possible splicing of the regional working Solomin in one direction (towards you or away from you) and in different directions (one straw, for example, right, trudges to her, and the second, for example, the left — away from you).
Braid "braid" (one-sided, photo 65). Working straw braided to one side. 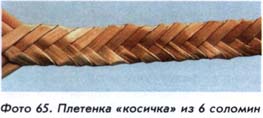
1. Grab 6 long straws of equal diameter and length. Tie them in a bundle. If you want to run braid with a braided edge for any of the previously discussed schemes, you will need three of the same straw. After connecting Solomin any of your chosen methods to commence plaiting. All 6 Solomin distribute equally in right and left hand, hold all the straw in one hand parallel to each other (figure 5.23 a). 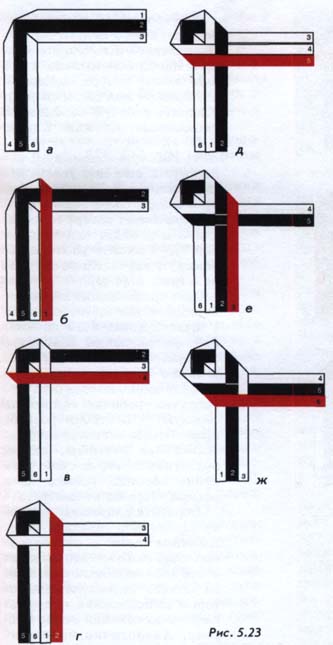
2. Working straw 1 fold under 90°. Lay straw on top of working 1 Solomin 2 and 3, parallel Solomin 6 (figure 5.23 b).
3. Working straw fold 4 under an angle of 90°. Lay straw on top of working 4 Solomin 5, 6 and 1, parallel Solomin 3 (figure 5.23 b).
4. Working straw 2 fold under 90°. Lay straw on top of working 5 6 straws 1 and 2 parallel Solomin 4 (figure 5.23 d).
5. Working fold a straw 5 under a 90° angle. Lay straw on top of working 2 Solomin 3 and 4, parallel to Solomin 1 (figure 5.23 d).
6. Working straw 3 fold under 90°. Lay straw on top of working 3 Solomin 4 and 5, parallel Solomin 2 (figure 5.23 e).
7. Working straw 6 fold under 90°. Lay on top of working a straw 6 straws 1, 2 and 3, parallel Solomin 5 (figure 5.23 g).
To continue weaving, follow the diagrams shown in figures 5.23 b—W. Workers of the straw are from the outside of the netting, taking alternately the right and left extreme position. Bend the working straw form at braids smooth edge. To weave more dense, slightly pull it over the loose ends of straws, throwing them in different directions from the center. Please note that the resulting braid has a asymmetric structure is a feature of all such tangles of an even number of straws. Similarly, the pigtail of the six Solomin run pigtails from a greater number of straws. With the increasing number of straws weaving are more dense and thick.
If, instead of the excesses of workers Solomin apply them the bends, the braid will be wavy with textured edge.
Simple twist (photo 66). In a simple network working straw braided to one side. 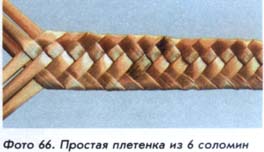
1. Grab 6 long straws of equal diameter and length. Tie them in a bundle. If you want to run braid with a braided edge for any of the previously discussed schemes, you will need 3 of the same straw.
After connecting Solomin any of your chosen methods to commence plaiting. All six Solomin distribute equally in right and left hand, hold the straw, which are in one hand, parallel to each other (figure 5.24 a). 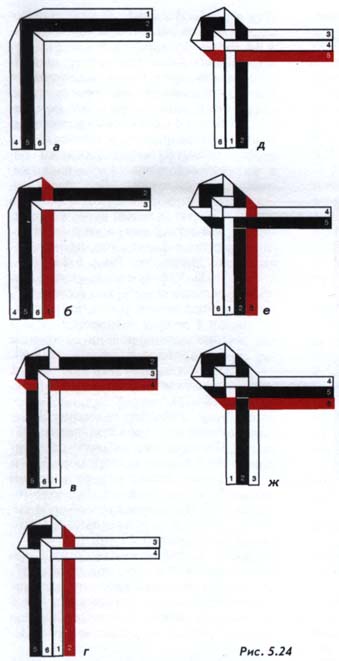
2. Working straw 1 fold under 90°. Twist the working straw straws 1 between 2 and 3 (she will be on top of the straw 2 and will be held under culm 3). Put a straw 1 working in parallel Solomin 6 (figure 5.24 b).
3. Working straw fold 4 under an angle of 90°. Twist the working straw 4 straws 5, 6 and 1 (it lies on top of the straws 1 and 5 and will be held under culm 6). Put a straw 4 working in parallel Solomin 3 (figure 5.24).
4. Working straw 2 fold under 90°. Twist the working straw 2 straws between 3 and 4 (it lies on top of the straw 3 and will be held under culm 4).
Put a straw 2 working in parallel Solomin 1 (figure 5.24 g).
5. Working fold a straw 5 under a 90° angle. Twist the working straw 5 straws between 6, 1 and 2 (it lies on top of Solomin 6 and 2 and will be held under culm 1). Put a straw 5 working in parallel Solomin 4 (figure 5.24 d).
6. Working straw 3 fold under 90°. Twist the working straw 3 straws between 4 and 5 (she will be 4 on top of the straw and held under culm 5). Put a straw 3 parallel working Solomin 2 (figure 5.24 e).
7. Working straw 6 fold under 90°. Twist working between a straw 6 straws 1, 2 and 3 (she will be on top of the straws 1 and 3 and will be held under culm 2). Put a straw 6 working in parallel Solomin 5 (figure 5.24 g).
To continue braiding, repeat all steps starting with step 2 (figure 5.24 b—g). Workers of the straw are from the outside of the netting, taking alternately the right and left extreme position. Bend the working straw form at braids smooth edge. To weave more dense, slightly pull it over the loose ends of straws, throwing them in different directions from the center.
Please note that the resulting in the middle of the weave has asymmetric structure is a feature of all such tangles of an even number of straws that are made by weaving the working Solomin in one direction. Similarly, given the network of six Solomin executed braids of a larger number of straws.
If, instead of the excesses of workers Solomin apply them the bends, the braid will be wavy with textured edge.
After vpleteny braids to the required length of the straw all tie together. The way of extending this Solomin braids will be discussed in the section "Extension workers Solomin in flat weaves". Braid laminate.
Next, consider netting, which work the straw from the right and left sides will trudge in different directions: right — to himself, and left.
Braid the basket weave 6 Solomin (photo 67). Working straw weaved in different directions. 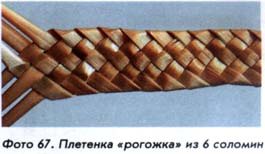
1. Grab 6 long straws of equal diameter and length. Tie them in a bundle. If you want to run braid with a braided edge for any of the previously discussed schemes, you will need three of the same straw.
After connecting Solomin any of your chosen methods to commence plaiting. All 6 Solomin distribute equally in right and left hand, hold the straw, which are in one hand, parallel to each other (figure 5.25 a). 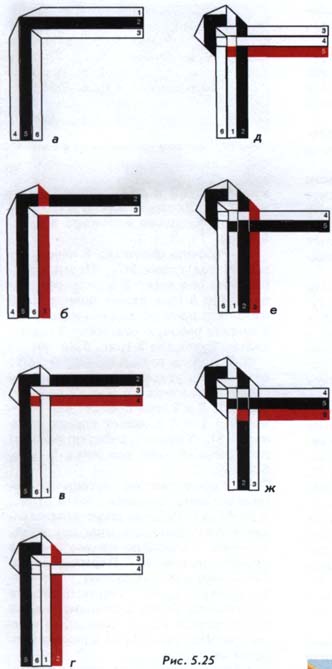
2. Working straw 1 fold under 90°. Twist the working straw straws 1 between 2 and 3 (she will be on top of the straw 2 and will be held under culm 3). Put a straw 1 working in parallel Solomin 6 (figure 5.25 b).
3. Working from a straw 4 fold itself at an angle of 90°. Twist the working straw 4 straws 5, 6 and 1 (it will be held under the straws 1 and 5, and lie on top of the straw 6). Put a straw 4 working in parallel Solomin 3 (figure 5.25 b).
4. Working straw 2 fold under 90°. Twist the working straw 2 straws between 3 and 4 (it lies on top of the straw 3 and will be held under culm 4). Put a straw 2 working in parallel Solomin 1 (figure 5.25 d).
5. Working from a straw 5 fold under 90° angle. Twist the working straw 5 straws between 6, 1 and 2 (it will be held under Solomin 6 and 2 and lie on top of the straw 1). Put a straw 5 working in parallel Solomin 4 (figure 5.25 d).
6. Working straw 3 fold under 90°. Twist the working straw 3 straws between 4 and 5 (she will be 4 on top of the straw and held under culm 5). Put a straw 3 parallel working Solomin 2 (figure 5.25 e).
7. Working from a straw 6 fold itself at an angle of 90°. Twist working between a straw 6 straws 1, 2 and 3 (she will be held under the straws 1 and 3 and lie on top of the straw 2). Put a straw 6 working in parallel Solomin 5 (figure 5.25 W).
To continue braiding, repeat all steps starting with step 2 (figure 5.25 b—f). Workers of the straw are from the outside of the netting, taking alternately the right and left extreme position. Bend the working straw form at braids smooth edge. To weave more dense, slightly pull it over the loose ends of straws, throwing them in different directions from the center.
Please note that the resulting in the middle of the weave "Gunny" has a symmetrical structure — this is a feature of all such tangles of an even number of straws that are made by weaving the working Solomin in different directions. Similarly, given the network of six Solomin executed braids more even Solomin.
After vpleteny braids to the required length of the straw all tie together. The way of extending this Solomin braids will be discussed in the appropriate section. Braid laminate.
Braid "deck" of 6 Solomin (photo 68). Working straw weaved in different directions. 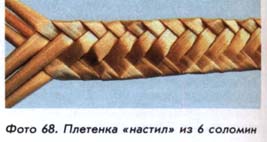
1. Grab 6 long straws of equal diameter and length. Tie them in a bundle. If you want to run braid with a braided edge for any of the previously discussed schemes, you will need 3 of the same straw.
After connecting Solomin any of your chosen methods to commence plaiting. All six Solomin distribute equally in right and left hand, hold the straw, which are in one hand, parallel to each other (figure 5.26 a). 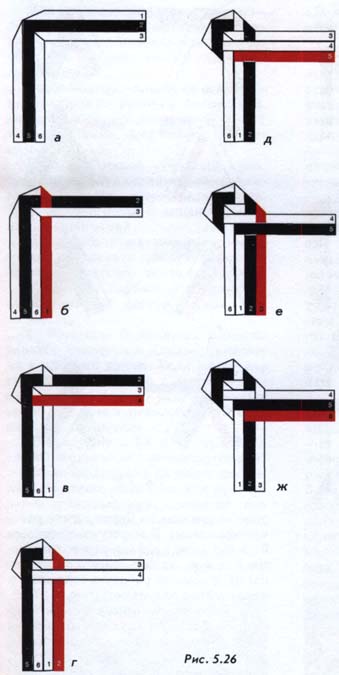
2. Working straw 1 fold under 90°. Twist the working straw straws 1 between 2 and 3 (she will be on top of the straw 2 and will be held under culm 3). Put a straw 1 working in parallel Solomin 6 (figure 5.26 b).
3. Working from a straw 4 fold itself at an angle of 90°. Twist the working straw 4 straws between 5 and 6 (it will go under culm 5 and lie on top of Solomin 6 and 1). Put a straw 4 working in parallel Solomin 3 (figure 5.26 b).
4. Working straw 2 fold under 90°. Twist the working straw 2 straws between 3 and 4 (it lies on top of the straw 3 and will be held under culm 4). Put a straw 2 working in parallel Solomin 1 (figure 5.26 d).
5. Working from a straw 5 fold under 90° angle. Twist the working straw 5 straws between 6 and 1 (it will be held under culm 6 and lie on top of the straws 1 and 2). Put a straw 5 working in parallel Solomin 4 (figure 5.26 d).
6. Working straw 3 fold under 90°. Twist the working straw 3 straws between 4 and 5 (she will be 4 on top of the straw and held under culm 5). Put a straw 3 parallel working Solomin 2 (figure 5.26 e).
7. Working from a straw 6 fold itself at an angle of 90°. Twist working a straw 6 straws between 1 and 2 (it will be held under culm 1 and lie on top of Solomin 2 and 3). Put a straw 6 working in parallel Solomin 5 (figure 5.26 f).
To continue braiding, repeat all steps starting with step 2 (figure 5.26 b—W). Workers of the straw are from the outside of the netting, taking alternately the right and left extreme position. Bend the working straw form at braids smooth edge. To weave more dense, slightly pull it over the loose ends of straws, throwing them in different directions from the center.
Please note that the resulting interweaving of flooring of obliquely stacked parallel Solomin will always have to be braided from any even number of straws that are made by weaving the working Solomin in different directions.
After vpleteny braids to the required length of the straw all tie together. Braid laminate.
Braid "catfish with matting" from 6 Solomin (bilateral, photo 69). 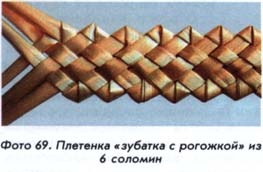
1. Grab 6 long straws of equal diameter and length. Tie them in a bundle. If you want to run braid with a braided edge for any of the previously discussed schemes, you will need three of the same straw.
In figure 5.27 a—d illustrates yet another way to stumble braided area. 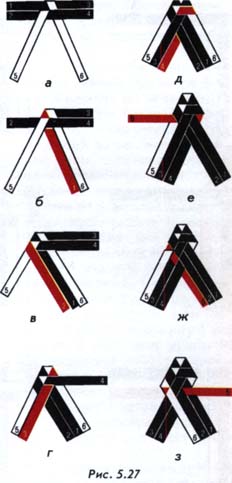
After connecting Solomin any of your chosen methods to commence plaiting. All 6 Solomin distribute equally in right and left hand, hold the straw, which are in one hand, parallel to each other (figure 5.27 d). Weaving will participate consistently 2 of the straw on the left, then 2 to the right of the straw, as in vypletenii wicker "catfish" 4 Solomin (figure 5.16 a—z).
2. Working from a straw 6 fold itself around the straw 4. The crest line is on the outside of the straw 4. Twist working a straw 6 straws between 5 and 3 (she will be on top of the straw 5 and will be held under all the other straws weaving) (figure 5.27 e).
3. Working from a straw 6 fold itself around the straw 5. The crest line is on the outside of the straw 5. Twist working a straw 6 straws between 5, 3 and 4 (it will go under the straws 4 and 5 and lies on top of the straw 3). Put a straw 6 working in parallel Solomin 2 (figure 5.27 f).
4. Working stubble 5 fold myself around the straw 6. The crest line is on the outside of the straw 6. Twist working between straw 5 straws of 2 and 1 (it will go under all the straws of the weave and lies on top of the straw 1). Put a straw working 3 at an acute angle to Solomin 1 (figure 5.27 b).
To continue braiding, repeat steps 2-4 mirroring. Continue braiding with the straw 5 is necessary and then follow the diagram.
The feature of braiding is the interweaving of the working culm, which forms the second part of the clove braids, all guides Solomin.
Braid features a scalloped edge, middle part twisted "matting". Braid has a different texture weave on the front side and purl.
Using this scheme, you can make this braid from any even number of straws.
Braid "catfish with tree" 6 Solomin (bilateral, photo 70). 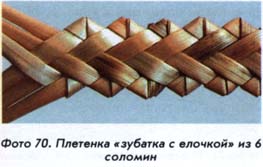
1. Grab 6 long straws of equal diameter and length. Tie them in a bundle. If you want to run braid with a braided edge for any of the previously discussed schemes, you will need 3 of the same straw.
Figure 5.28 a—d given way to stumble braided area. 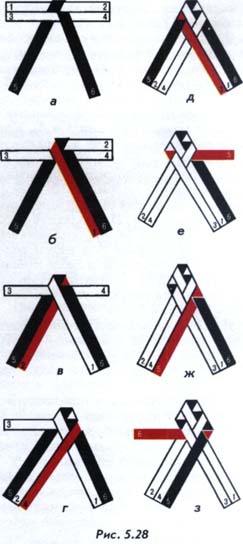
After connecting Solomin any of your chosen methods to commence plaiting. All 6 Solomin distribute equally in right and left hand, hold the straw, which are in one hand, parallel to each other (figure 5.28 d). Weaving will participate in series two of the straw on the left, then two to the right of the straw, as when vypletenii wicker "catfish" 4 Solomin.
2. Working stubble 5 fold myself around the straw 3. The crest line is on the outside of the straw 3. Twist the working straw 5 straws between 1 and 6 (it will be on top of the straw 6 and will be held under all the other straws weaving). Put a straw working 5 at an acute angle to Solomin 6 (figure 5.28 e).
3. Working stubble 5 fold myself around the straw 6. The crest line is on the outside of the straw 6. Twist the working straw 5 straws between 6 and 1 (it will be held under culm 6 and lie on top of the straws 1 and 3). Put a straw 5 working in parallel Solomin 4 (figure 5.28 W).
4. Working from a straw 6 fold itself around the straw 5. The crest line is on the outside of the straw 5. Twist working a straw 6 straws between 4 and 2 (it will go under all the straws of the weave and lies on top of the straw 2). Put a straw working 6 at an acute angle to Solomin 2 (figure 5.28 b).
To continue braiding, repeat steps 2-4 mirroring. Continue braiding with the straw 6 should continue to follow the pattern.
The feature of braiding is the interweaving of the working culm, which forms the second part of the clove braids, only one extreme of the straw guide.
Braid features a scalloped edge, middle part of a twisted "pigtail". Braid has a different texture weave on the front side and purl.
Using this scheme, you can make this braid with any even number of straws.
How to get a new weave? When you increase the number of straws in weaving to 8, 10, 12 and the increasing number of options for the weave. Working culm you can twist the straw guides, grouping them two or three. You can set the rhythm of the weave guides Solomin, for example 1-2-1 or 2-1-2. Try to run the samples braided lines, changing combinations of weaves. Use as base schemes the above schemes.
Select your language