


")
The sleeves and coat. The crown bases of the sleeve, respectively, draw the armhole of the dress. In jackets and coats the size of the openings is greatly increased, so you need to change the size of the sleeve.
Put on a sheet of paper drawing the basics of a sleeve or double seam of the sleeve, shown in figure 172 in the article of Building drawing fundamentals of sleeves.
Continue the line a (figure 272). Extend and lower the ends of the top part of the sleeve in accordance with the arm openings. Prepare the sleeve for direct coat, a drawing of which is shown in figure 267 the article Coat of a direct silhouette. 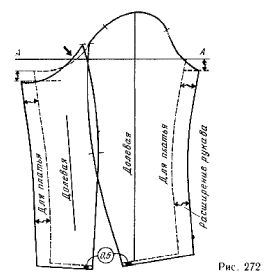
To change the width of the sleeve parallel to the lines of the front sections guide line at a distance equal to the extension of the bodice plus 0.3 cm (for the arm openings, see figure 268 in the article the Practical use of different bases jackets and coats) plus 0.8 cm (armhole to D; for example: direct coat 2,5+0,8=3.3 cm, see figure 272, solid lines).
Extend sleeve at the bottom to 0.5 cm, Such extension is given for sleeves of all jackets and coats.
At the ends of the top part of the sleeve indicate the magnitude of the reduction, which is equal to the deepening of the armhole plus 0.5 cm in the case of the use of the shoulder pads (for example: live coat 2+0,5=2,5 cm (figure 272 lowering the ends of the top part shows the winding line of the mi with the two arrows). This compensates for the loss of the length of the sleeve, caused by the ascent of the shoulder of the bodice. New line lifts the sleeve merges with the existing pattern 272 of the line crown at the level of line A (see thick arrow).
If the crown and armhole sleeves of the jacket and coat is built correctly and if the form of the openings of the framework has no features, then further refinements of the crown and the openings are not needed. The sleeve on the crown will have the necessary boost to land.
If necessary, check the openings of the product and lifts the sleeves measure the length of the new line of armhole and sleeve crown and check their compliance at the table. 3. 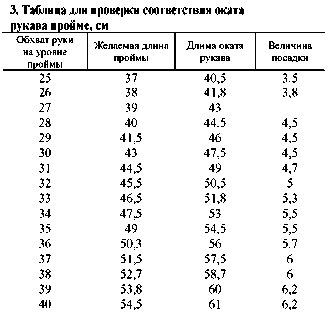
If the top part of the sleeve is small enough to expand the top part of the sleeve or to deepen his (less desirable).
If the top part of the sleeve is great, it is better to straighten the bends than zawjati sleeve. For very thin arms, i.e. to girth hands less than 27 cm, extend sleeve give more normal. For straight female coat sleeve width should be not less than 38 cm.
In jackets and coats line of the elbow section of the upper and lower parts (halves) of the sleeve must be moved 1 cm toward the bottom of the sleeve.
Specify the position of the Darts in accordance with the perimeter of openings.
Figure 273 shows the four sleeves, the width corresponding to the openings shown in figure 268 in the article the Practical use of different bases of jackets and coats.
Follow one pattern all the sleeves of jackets and coats using colored pencils. 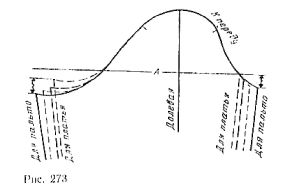 Narrow sleeve dress. This sleeve provides freedom of movement and fit of the shape of the hand. In the elbow seam lines and Darts are provided clasp. This sleeve can be used for coat.
Put on a sheet of paper based sleeves, do not forget to specify the direction of the grain lines and the notch on the line of the top part. Draw a line to the elbow and tuck in the elbow seam of the base (see figure 274, dashed lines). From the ends of the crown reduce the width of the sleeve 1 cm on each side and slide a solid line, as shown in figure 274.
To check the width of the sleeve at the elbow compare it with the measure of the circumference of the hand (for example: the circumference of the arm at the level of the elbow plus 3 cm, ie 24+3=27 cm). The magnitude of increase to measure the circumference of the hand through the elbow in the sleeve adjacent the following: 3-4 cm for circumference hands to 34 cm; 4.5 cm girth of the hands 35 to 37 cm ; 5 cm for circumference of the hand 37 see more
If the extension of the sleeve through the elbow excessively or insufficiently, subtract the excess or add additional expansion equally on both sides but the elbow. Starting from the new front lines of the cut sleeve, put on the inclined lines of the bottom sleeve half measurements of wrist circumference plus 1 cm at the top (half) sleeves and a Polo the guilt of the circumference of the wrist minus 1 cm on the lower part of the sleeve (nadechka About; for example a : 16 :2 =8 cm ; 8+1=9 cm ; 8 -1=7 cm ).
Make a new tuck, joining the notch O with a point In the line of elbow to education at the level of the elbow bulges.
Measure both lines darting from nasechek About to the elbow. On the top of the sleeve line tuck is longer than the lower, although these lines should be of equal length. It is impossible to equalize the length of the lines as on a drawing basis. Should do otherwise. Starting from the notch on the bottom of the sleeves put on the line tuck the cut is equal to the length of the line Darts at top of sleeve (from About to). Nadechka At the bottom of the sleeve located just above the elbow.
Move figure 274 on a sheet of paper the entire upper part (half) sleeves and enter nadziejko (figure 275). From this notch draw a straight dashed line of the elbow joint. 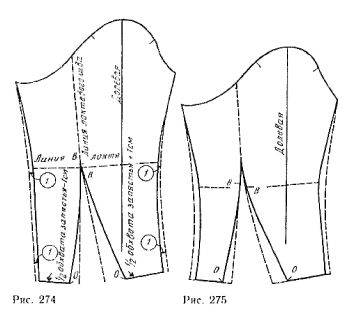
Move the sheet of paper to combine nadziejko At the top of the sleeve with nadrezkoj At the bottom of the sleeves and line of the elbow sections at the crown. Move the entire lower part of the sleeve and fix the damn e W how to AZ and ri p. 276 ( see arrow ).
Sleeve consisting of two parts (figure 277), could be designed for different girths of arms; in addition, it is recommended when the fullness of the small hands, the width of the back (for example: the circumference of the hand at the armholes equal 34-35 cm). 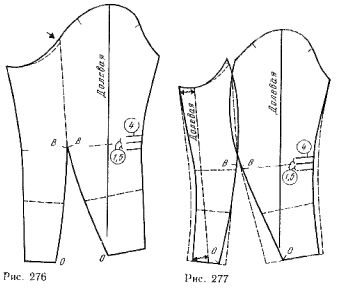
The support patterns of the sleeves in the top of the line elbow build a small tuck.
From nasechek To swipe a curved line of the elbow sections of the upper and lower parts of the sleeves. For small and average circumference of the hand at the armholes, the deflection of the lines should be minimal. For full hands it is much more. Align the length of elbow sections and specify the direction of the grain lines.
On the dashed lines of the upper part of elbow sleeve set aside a segment of length 4 cm from the front of the line of cut (see figure 276). On either side of it draw two straight lines that show the direction the three small Darts. Tuck performed after grinding of the front sections. To do this, fold the fabric along the line and zastrugivajut folds to a depth of 0.2 cm, taking his place in the end.
By reducing the length of sleeves, hem line guide at the desired level parallel to the existing hem. For sleeves three quarters (see figure 277, dashed lines) the decrease in the length ranges from 12 to 15 cm.
Instead of three small Darts at the front seam line, make a deep crease. To this end, alongside the Central tuck run the same line 4 cm below and these lines will astrocyte fold after stitching the front sections of the sleeve, passing 2 cm at the bottom of the sleeve. Zautyuzhte fold as a counter, then secure it on razotajiem front seam a few hand stitches. When the fold is exactly on the bend of the arm, it is invisible, despite its greater depth. One-piece sleeve dresses, jacket and coats. Use one-piece sleeves instead of the double seam is dictated by fashion. In addition, one-piece sleeve is recommended for the striped fabric to line the bottom of the sleeves coincide with the direction of the weft thread. Take the basis of dress (see picture in article 172 Construction drawing basics sleeves), move the line of the crown with his control nadechka, specify the ends of the crown (najceska 1 , figure 278). You should not draw lines elbow seam and Darts.
Draw a line From the direction of the grain lines, not through e right and left swipe if any, and A, D and E.
To simplify the construction, put the value of the width of the sleeves on the line And equally on either side of the line (the notch 2; for example: 35 cm, 17.5 cm in each direction from the line).
Line the bottom of the sleeves E, specify its width, also placing it equally on both sides of the line With (4 notch). Usually this value is equal to the measure of wrist circumference plus 10 cm Connect the notch 4 and 2 two lines.
To check the width of the sleeve at the level of the elbow measure the line to line D. For dresses sleeve width is given in the explanation of the pattern 170 in the article Construction drawing basics sleeves. If you want to extend the sleeve, then the amount of expansion is determined during the fitting (for example: 24+6=30 cm). On both sides of the line, specify the size increase (see figure 278, the notch 5). If the extension is very large, do not take it into account. Lack of extension can occur for two reasons: 1) the bottom of the sleeves narrow. For correction it is necessary to expand the bottom and connect the resulting points with nasecki 2 straight lines; 2) measurement of circumference of the hand through the elbow disproportionately large compared to other standards of the hands. In this case it is better to make a double seam sleeve with a tuck at the elbow.
For building line of the crown the upper part of the sleeve fold the sleeve and draw the missing part of the crown nadrezkoj between the front 1 and rear 3 natsukoi. To hold the line of sections of sleeves, spread the width of the sleeve on both sides of the line C. this Seam will be invisible, as the line runs down the middle of the sleeve (on the continuation of the shoulder seam of the bodice).
The location of the suture sleeve in relation to the side seam of the bodice is not significant, so no need to move the seam unnecessarily. If the seams should match, it is necessary to measure separately the length of the armhole front and back and starting from the highest point of the crown on the line, to postpone these cuts on the line lifts the shoulders, and adding on each side for more length for landing.
Draw a new line cuts the sleeves parallel to the first and correct the line of the top part. This sleeve is applied in clothing mass tailoring to facilitate connection of the sleeve with the product when first stachivaya sleeve into armhole, then sew at the same time the side sections of the bodice and sleeves, as well as in men's shirts and children's clothing. 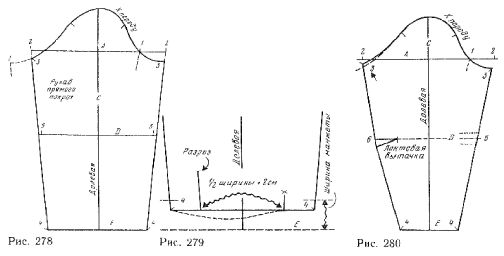 Sleeve shirting type. The drawing of this sleeve is constructed in the same way as the previous drawing, with the only difference that the bottom of the sleeves is padded with cuff.
Install the appropriate size cuff according to the model (adjacent to the wrist or loose). Classic cuff shirt has a conventional width of 6 cm and length equal to the circumference of the wrist plus 6 cm collar Shape is a rectangle cut on the share thread direction. If cuff with a buttoned placket (in blouses, dresses), width make allowance for the clasp.
Of the total length sleeves cuff width subtract and add the value intended for slouchy fit. The sleeve with classic cuff overlap equal to 2 cm
Based on cuff width, determine the width of the bottom of the sleeves, with the necessary allowance for tucks, pleats or Assembly. Distribute this quantity on both sides of the line to the new line length sleeves (the notch 4, figure 279).
Connect the notch 4 nasecki 2 (see figure 278) to get the seam lines of the sleeves.
The incision at the bottom of a sleeve or suture sleeve, or in front of the little finger. In the latter case, the fabric is cut in the appropriate place. To properly distribute the Assembly, i.e. the focus on the upper part of the sleeve put on both sides of the line With half the width of the sleeve at the bottom plus 2.
The line indicated with a cross (see figure 279) on the upper part of the sleeve indicates the middle of the cuff and the location of the thumb. The line on the left arrow drawn parallel to the corresponding line of the seam, the location of the little finger and cut. The length of the line 8 see Narrow one-piece sleeve. In jackets and coats use a sleeve with the elbow dart from the seam (figure 280). This sleeve less corresponds to the shape of the hand than the slim sleeves with the tuck in the front seam, but it has a number of advantages. So, it is used when you want to save the vertical direction common thread in the middle of the sleeve or the direction of the strips of fabric parallel to the line of the bottom of the sleeves.
Put on a sheet of paper pattern of a sleeve, as shown in figure 278. To determine the width of the sleeve below measure the size of the girth of the palm (to do without context). Line E (see figure 280) put the selected value equally from the line With (4 notch).
On the front connect the notch 4 and 2 with a straight line and aside from her left through the elbow measure the circumference of the elbow plus the desired extension (the notch 5 and 6). Draw a cutting line the back of the sleeve, connecting the notch 4 and 2 and forming a small bulge at the level of the notch 6
.To hold the line of the crown from the notch 1 on the front of the sleeve, fold the sleeve, aligning the top of the rear and front sections with the line S.
From the front the notch 1 will continue the bending of the crown to the back of the sleeve and, if necessary, correct the line of the crown (figure 280, nadechka 3, marked with arrow).
To determine the solution of the elbow tuck measure the length of the front and rear sections of the sleeve and compare measurement values. Over the length of the back of the cut should be put in the tuck. Put this value on the rear cut down from the notch 6 and draw a tuck a length of 6 cm, as shown in figure 280.
Tuck from the front of the slice to be unnecessary, so figure 280 they are marked with dashed lines with a length of 4-5 cm at a distance of 1.5 cm from one another Sleeve with tuck from the line of the top part. Long narrow tuck, shown in figure 281, replaces the fit of the top part of the sleeves and is typically used only in relief, which is a continuation of the shoulder seam of the bodice. Most often, this tuck is used in single-joint sleeve.
Put on a sheet of paper the upper part of the patterns of single-joint sleeves and mark the length of the tuck at a distance of 8 cm from the highest point of the line of the top part.
Solution tuck, equal to 1.5 cm, spread both sides of the line common thread through the resulting points draw a concave line tuck, as shown in figure 281.  Sleeve with several Darts along the line of the top part.
Four little jotted from the back tuck doing the sleeve on the crown is more convex.
On the top of the sleeve curves indicate the middle of each of the tuck (figure 282), placed from one another at the distance indicated in the circle. The middle two Darts have the solution equal to 0.8 cm and length 1 cm Lateral tuck have a solution equal to 0.6 cm and a length of 0.8 cm sleeve Extend 0.5 cm at the front and rear sections to compensate for the reduction in the length of the line of the top part.
Sleeve men's shirts. The height of the top part of this sleeve is less than the height of the crown other sleeves. This provides freedom of arm movement and facilitates its connection with the armhole of a shirt with a lapped seam.
Put on a sheet of paper vtachnoy sleeve with figure 174 (figure 283, dashed lines). From one end line to the other top part, draw a horizontal line, then parallel to this line at a distance of 4 cm from it up the dashed lines.
Starting from the top-end of the line, showing the direction of grain lines, draw a new line lifts the shoulders, as shown in figure 283.
Move on to a new line the exact length of the front and back of armhole and, if necessary, continue horizontally to the front of the crown.
As this sleeve is not landing on top part and the bottom seam of the sleeve must be connected with the side seam of the bodice, it is sufficient to measure separately armhole front and back, to transfer their dimensions to the new line of crown sleeves. From the new ends of the line okata draw lines front and rear sections of the sleeve parallel to the existing one.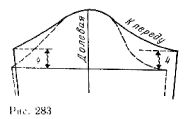
Select your language