


")
1. Sleeve width. At a distance of 20 cm from the top edge of a sheet of paper, draw a horizontal line A (figure 168), equal in length to measure the circumference of the hand at the armholes plus 6 cm (for example, 29 +6 =35 cm ). Draw two vertical and B1 through the ends of the line A.
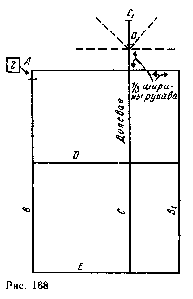
The line indicates the direction of the grain lines and corresponds to the direction of the shoulder seam of the bodice. It is parallel to the line nm, and B1 and located at a distance of 1/3 the width of the sleeve from the line 1 (35:3=11.5 cm). Instead of taking 11.5 cm 11,6 cm
Continue the line up from the line And a distance equal to 1/3 the width of the sleeve, and set point S1.
2. Sleeve length. From the point C, put down measurements of the length of the arm up to the elbow and hand length to the wrist and a swipe at this level the horizontal lines D and E. From first measurements subtract 0.5 cm (34-0,5=33.5 cm), and the second — 1 cm (60-1=59 cm). This decrease is due to the fact that measurements removed in a downward direction on the arm bent, and then transfer them to a straight line drawing.
On the line To mark the point of the lower end of the crown sleeve and mark it with number 2 (for example, this point is located 2 cm down from line A).
Line of lifts the shoulders must pass between the lines b and B1 point C1 Point 2 (figure 169) is located at the bottom of the top part of the sleeve. The distance from point 2 to lines A — vacillates, so she circled in a square, unlike regular numbers, circled.
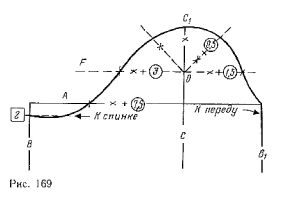
For example, the circumference of the hand at the armholes, equal 29-34 cm, this value is equal to 2 cm increase in circumference per cm value is increased by 0.1 cm (but total not more than 2.5 cm). When you reduce the circumference (29 cm) on every inch of this value decreases to 0.1 cm (but total not less than 1 cm). So, when gripping the hand, equal to 24 cm, this point is located below the line L by 1.5 cm in girth, equal to 39 cm at a distance of 2.5 cm.
3. The top part of the sleeve. Divide in half the distance between point C1 and line and the resulting points put down 1 see Through the new point O, draw a horizontal dashed line F (11,6:2=5,8+1=6,8 cm).
Divide in half both right angles formed by the lines C and F .
To construct a line of the top part of the sleeve, starting from the point On, put on the inclined dashed line to the right distance С1О plus 0.5 cm (6,84-0,5=7.3 cm). The line F to the right of point O set aside the distance,plus 1.5 cm (6,8+l,5=8,3 cm).
On the sloping dashed line on the left put distance С1О (6.8 cm). The line F to the left of point O put distance С1О plus 3 cm (from 6.8+3=9.8 cm).
Line And to the left from line, put distance С1О plus 7.5 cm (6,8+7,5=14.3 cm).
Draw the top part using the points from the line B1 to line In, some of which make a small trough (0.5-0.7 cm), as shown in figure 169.
For hand circumference at the armholes, equal to 34-35 cm, it is necessary to increase the line of crown to the left of the line 0.5-1 cm along the line F and a little less on the line A. For hands with girth over 40 cm, the magnification can be up to 2 cm, which is detected at a fitting.
Check that the top part of the sleeve to the armhole. To check the length of the top part of the sleeve, measure with measuring tape line of the top part and the armhole of the bodice. Compare both measurements. Line length the top part of the sleeve must be greater than the perimeter of the openings 3.5-6 cm, depending on the girth of the hand. For sleeves shown in the example, the length of the top part is 46 cm and the perimeter of the armhole of the basic patterns — 42 cm, 0.5 cm longer than the values given in the table. This small deviation is acceptable.
The excess tissue along the line of the crown is called a landing. From the size of the landing depends on the appearance of a sleeve. If the planting is large, the sleeve will be more lush, if small, the sleeve will tightly encircle the hand, and the freedom of movement.
Mismatch lifts the sleeve to the armhole can be eliminated by taking advantage of their dependence derived empirically and are presented in table. 3.
Consider the examples of the application of this checklist.
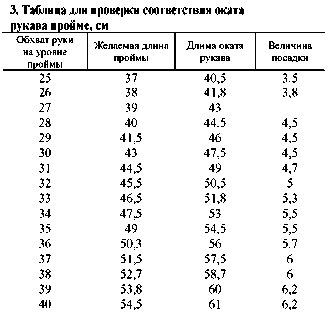
Armhole is big. For example, the circumference of the hand through the openings is equal to 29 see If the armhole is equal to 43 cm, it is too large, as in the table. 3 the circumference of the hand meets the arm at 41.5 see a Significant discrepancy between the specified dimensions can occur for three reasons: 1) incorrectly taken measurements (circumference of the hand at the armholes); 2) the feature of the physique (small perimeter of the articular ligaments and the thick arm, or Vice versa); 3) incorrectly drawn line openings. Correct the situation in the following way.
The first decision. Precise measurement of the girth of the hand and view not suitable for hand girth at 30 cm (see table. 3). For hand, a disproportionately thin compared to the figure, it is possible to increase this measure to improve the proportions of the product.
Second solution. Measurement of the circumference of the right hand removed, but the sleeve I want to make some already. In this case, you need to reduce the perimeter of the openings, which save the deepening of the openings.
The third decision. Increase a little the measure of the circumference of the arm and slightly change the armhole.
 The armhole is small. For example, the circumference of the hand in the upper part is 32 cm Armhole must be equal to 45.5 cm (see table. 3), and it is in this example is 43 cm around the perimeter of the openings is not enough 2.5 cm.
The first decision. Make sure you correctly removed the merc hands. On the basis of the table. 3 the armhole, equal to 43 cm, corresponds to the circumference of the arm equal to 30 cm.
Second solution. If the measure of the girth of the lifted right hand, take an extra landing on the crown or put a tuck in the lower half of the sleeve, as shown in figure 173.
The third decision. If the measure of the circumference of the hand captured properly and want to increase landing lifts the shoulders need to alter accordingly armhole (to extend the bodice at the side seam lines or deepen armhole).
The fourth decision. Reduce a little bit the measure of the circumference of the hand, so as not to alter the armhole.
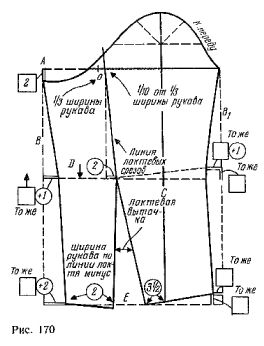
In figure 170 the creation of the drawing the basis of all the sleeves.
4. Lower part (half) sleeves. The lower part of the sleeve is bounded on the left by the line B. line D from line, put the amount of bending of the lower part of the sleeve (called below a constant value), to which add 1 cm (for example 2+1=3 cm). This value is equal to the circumference at 2 cm on the drawing is enclosed in a square the words The same. Increase in it is enclosed in a circle.
On line E on the left put a constant value plus 2 cm (2+2=4 cm). Draw a line the front edge of the lower part of the sleeve slightly curving it at the level of line D.
5. The upper part (half) sleeves. The top of the sleeve bounded by a line B1.
Move to the drawing shown value and guide front line top of the sleeve. The line bends above the elbow by a constant value. This is necessary in order to compensate for the shortening of the front of the line at the bottom of the top.
New level line of the elbow sleeve is indicated by the dashed line.
6. Line elbow cut sleeves. This line starts from the level of the width of the back, passes through the projecting point of the elbow and ends at the wrist.
On line A, from line In, put a third of the width of the sleeves, put a point on (for example 35:3=11.6 cm). To find the point through which must pass the line of the elbow, put from the point of the right tenth of the values obtained (1,16 cm).
Measure the distance from the received point to the line (share thread) and reducing it by 2 cm, set aside the resulting cut line D from line C (see figure 2 in the circle).
Starting from the D-line, connect the two obtained point slope straight line, continuing until the line lifts the shoulders.
7. The bottom of the sleeves. The width of the sleeve at the bottom expect for the classic sleeve. On the E left of the line put 3.5 cm, the resulting point is connect by a straight line with the front end of the line of cut with the point of intersection of the elbow of the cut line D. Measure the width of the sleeve at the level of the elbow from the line of the front edge of the lower part of the sleeve up to the elbow. On the E-table this value is reduced by 2 cm to the right from the line of the front edge of the lower part of the sleeve.
Join the obtained point with the line of the elbow in a straight line, continue down, equalizing both the elbow cut sleeves. This line crosses the line E. draw a line the bottom of the bottom of the sleeve, as shown in the figure.
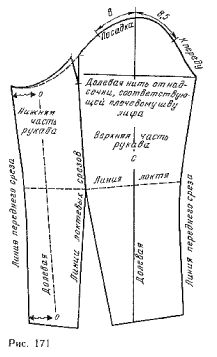
8. Landing on the line lifts the shoulders. The excess fabric at the top part of the sleeve intended for planting, providing a natural bulge of the sleeve in the shoulder area. Landing split between nasecki on the line of the crown, located at a distance of 8 and 8.5 cm from the line (figure 171).
Line length the top part of the sleeve between nasecki after running landing should be equal to 15 see the Rest of the planting will spread down from nasechek. If fashion requires a pronounced landing, between nasecki will be more builds; sometimes the sleeve in the region of the crown expand.
9. Tuck in the elbow. When cutting the sleeves, consisting of one part (see figure 170), it is enough to make a tuck from the level of the elbow to the bottom of the sleeves.
Line okata make additional small tuck (see figure 171) to shape the outside seam. To do this, on the line of the crown in both directions from the line of the elbow sections set aside for 0.5 cm and mark the points obtained by nasecki. From these nasechek spend slightly convex line with a length of 5-6 cm.
Align the length of both sides of the Darts on the right side, then the resulting point connect smooth curved line with the line of the crown bottom of the sleeve.
The length of the Darts tick natsukoi. This tuck can only be a continuation of the elbow joint (in sleeves in two parts).
For the sleeves, consisting of one part, share the thread denoted by the line C. In the sleeve in two parts, you need to specify a fractional thread on both parts. If the drawing is made correctly, the points located near the line of the top part and a bottom spaced from the front edge of the lower part of the sleeve at an equal distance should be on the common thread (see figure 171, wavy arrows).
Sleeve width line D must be equal to the measure of the circumference of the hand through the elbow plus an allowance equal to not less than 5-6 cm (29+5=34 cm ).
Allowance through the elbow depends on the measurements: the allowance is equal to 5-6 cm for circumference of the hand through the elbow to 34 cm; 6.5 cm for the girth of the hands 35 to 37 cm; 7 cm — girth of arms from 38 to 39 cm; 8 cm for the hand girth of 40 cm or more.
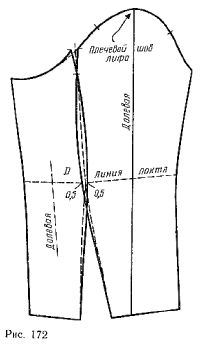
If the extension sleeve is not enough to make the elbow more convex sections, as shown in figure 172 (solid lines). The resulting points and lines of the elbow connect with the tuck end lifts the sleeve of smooth lines, then continue the line down as shown in the figure.
If the extension sleeve is large, adjust the width of sleeves on the D equally on each of the sleeves (figure 173). Connect the points obtained slightly curved lines with tuck lifts the shoulders.
Then continue the line down.
If a decrease in the width of the sleeves is small, you should save the width of its upper part. Sometimes it is necessary to make a small additional extension sleeve at the top, if the arm has a noticeable fullness in this place.
If the length of the top part of the sleeve doesn't match the armhole, you need to make the crown a little special tuck, shown in figure 173 dashed lines.