


")
Skirt wedges complex (figure 233). This skirt has a flared wedges that have a significant extension in the lower due to hitting little wedges which can be replaced by pleated.
Compare the width of the large width wedges small wedges to determine the exact proportion. In this model we assume a small width of the wedge equal to the floor of the barn width is large (figure 234).
To determine the width of the two connected parts (big and small wedges) waist, divide into six pieces (instead of five).
Build a drawing of a wedge in accordance with the measurements (for example, waist 6 cm plus the seam allowance on the dart is 1.5 cm, hem 6X4=24 cm). Place, nadechka marked with a cross, where it begins, a small wedge (for example, at 13-14 cm below the waist line).
For shapes with fairly steep hips need to wedge the hips were wide enough. For this reason, reduce the extension at the bottom, i.e. multiply 6 by 4, not 5.
Compare overall width of big and small wedge with a wide base patterns on the same level. To expand enough to make the side line of the wedge extending from the waist line, bulging and then continue in a straight line at the bottom (on the drawing 234 of the lateral side of the wedge is slightly convex).
To build a little wedge measure its length from the notch, which is marked to line the bottom and draw a vertical line that size. On either side of this line, divide the desired width of the wedge at the bottom (for example 12 cm). The resulting points draw a line. 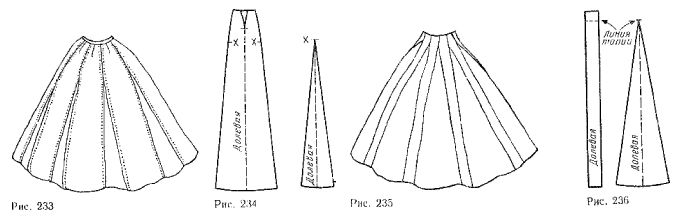
Fold the piece, to check the symmetry of the sides of the wedge. Small wedges can be zaplanirovany. Pleats come from the top corner. Wedges with pleating cut out but oblique direction yarns of the fabric.
The skirt, shown in figure 235, is formed in straight strips at the waist. The extension, starting from the waist line, obtained only by sharp wedges. The continuation of the stripes above the waist eliminates the need for a stitched belt.
Divide the waist line to the desired number of straight stripes. For this model skirts is a need for greater calculation accuracy, since the error in each strip, even at 0.2 cm causes a noticeable change in waist girth.
Build drawing straight strips of a fixed width. Its length must equal the length skirt plus the height of the belt (figure 236). Build a drawing of a wedge, as explained above. Its width at the bottom approximately 4 times greater than the width of the straight strip. For shapes with steep hips to the sides of the wedge at the top you can make convex.
The mounting skirt is better to start with connecting all direct bars at waist level. This will allow you to check the accuracy of her line of thallium.
Skirt wedges with assemblies. To determine the width of the skirt (figure 237) below, determine the number of wedges and build my drawing of a simple wedge. Figure 238 this wedge shown by dashed lines. 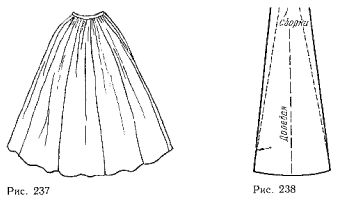
Determine the allowance for Assembly. It is equal to one or two widths of the wedge at the top. Extend the wedge at the waist line in accordance with a selected allowance on the Assembly and slide the new side line of the wedge (figure 238 solid lines).
Skirt cut "barrel". Construction drawing of this skirt (figure 239) does not depend on its length and width at the bottom.
Determine the desired width of the skirt at the hip line, measuring the base curve. Divide this width by the desired number of wedges and draw a rectangle whose length is equal to the length of the skirt (figure 240, dashed lines; for example 70Х10 cm). Measurements of the waist girth divided by the number of wedges (for example, 7 cm), spread on both sides of the line indicating the direction of grain lines. 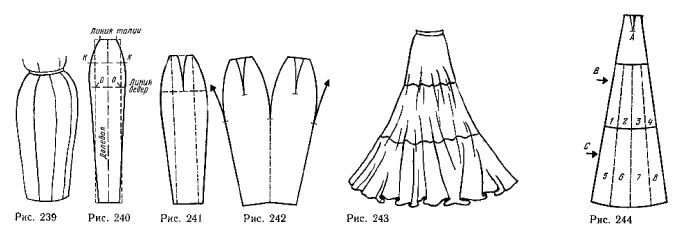
At the level of maximum bulge of the hips swipe horizontal and set the desired width (for example 2 cm). The notch is midway between the lines of the waist and hips. The cut ends of the waist line connect with nasecki To convex lines, then continue down these lines (straight or convex depending on the model).
If the bulge of the skirt at the hip line should be pronounced, it is desirable to plan tuck, more or less deep. Figure 241 tuck is long and deep. The bulge on the hip line has a maximum value.
To reduce the number of stitches you can use the drawing shown in figure 242.
The direction of the grain lines is determined by the model.
Flared skirt with two horizontal lines of the section (figure 243). This skirt often made of five or six wedges. Thus for a basis we can take the pattern of the skirt shown in figure 203, or pattern the straight skirt.
Divide the measure of waist girth into 5 parts and build a wedge, extended down to 4.5-fold (figure 244). Draw a line cuts parallel to the line of the bottom of the skirt. Part and divide into strips, as shown in figure 244, and number them.
Cut the top And without making any changes to it. Cut numbered strips B and C according to the planned lines. Put them on a sheet of paper and spread, forming a lower extension of the line parts With a little more than half the width of the strips (figure 245).
Cut along the planned lines In detail and put the detail In, the construction of which can be considered complete.
Divide a new part With a large number of strips and number them again. Cut the item into strips and spread them, forming a bottom extension on half of their width (figure 246).
Every detail of the transfer onto the fabric five times, as indicated by the model, positioning the lobe filament fabric in the middle of each part. The number of longitudinal seams can be reduced by combining two or three parts each of parts A, b and C.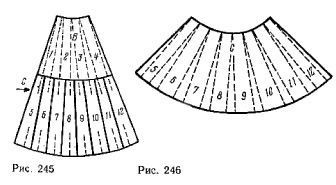
Select your language