


")
Skirt with a fold in the continuation of tuck. In carrying out such folds in tuck end side seam allowance on the fold formed by the unnecessary landing.
To fold lying well, you need to eliminate the resulting fit, subtracting the excess fabric caused by the crease. Incise the tissue as shown in figure 247, then connect both of the slice with the manually tuck. Top cut part of the stock on the crease which can be more or less depending on where the crease in the middle of the rear cloth skirts or side-cut. 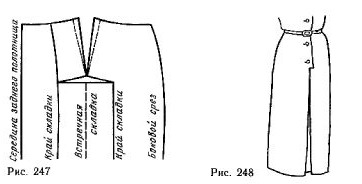
Skirt with a fold in the continuation of the clasp. If the fold is a continuation of the edge of the clasp, it is simple. More difficult to comply with the crease exactly on the line of means (figure 248).
Mark on the pattern the width of polutanata and mark the location of the buttons on the line of mid front (figure 249). Spend a horizontal line at the end of the zipper, starting from the middle of the front (nadechka A) and ending at the edge of the Board. Continue this line to the same length to the right and put nadziejko V. 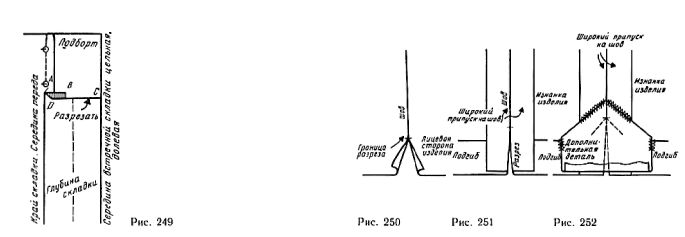
Aside from the line of mid front 9 cm (or 12 cm for the counter-folds), slide vertical, indicating the depth of the folds and the edge of podborta.
With counter crease width podborta will be sufficient to handle the zipper; when unilateral crease to handle the fasteners need more width than stock on the crease.
1 cm below the horizontal line AB draw a second horizontal CD, a little to the left reaching to the line of mid front; point D connect with point A. the line CD cut the fabric and peel off podbor from the crease. After processing of the angle BAD connect the bottom section of podborta with a cut crease.
The clasp and the fold of the model is treated in the following way. Fold padbolt on the front side of the skirt along the line of the side, combining points b and A, and sew the fabric along the horizontal line to the middle of the front. Cut the fabric along the line CD and make nadziejko at an angle to the point A and the vertical nadziejko to point B.
Remove podbot, guiding the little area at the bottom of the zipper. All the shaded part in figure 249 will be in the corner. Lay the pleat extending from the notch And at the bottom (see figure 248), seal lower cut podborta with a cut crease to secure the fold. Trim excess width podborta.
At the top right side skirt agree with the left through the middle of the counter folds or on the inner bend of unilateral folds.
Slit skirt that replaces the classic crease: Small incisions placed at the end of the side seams or the seam at the bottom middle of the rear cloth skirts, easy movement when walking. If the incision from the inside will not be disguised, make it no longer than 4-5 cm. an exception is the long skirt, where the cut has both utilitarian and decorative purpose.
Figure 250 shows a cut along the seam from the front side. Figure 251 the same incision are shown on the reverse side. To handle the cut should be made wide enough seam allowance (5-10cm) along the seam, treating it like a coat.
If an incision is necessary to mask, from the inside to the seam allowance and sew the bottom, attach additional rather broad detail (figure 252). For greater strength lay in the line at the end of the connecting seam at a certain angle as the handling of the folds in the middle of the rear cloth skirts.
Flared skirt with non-parallel folds (figure 253). On the patterns front cloth skirts draw the folds parallel to the middle, placing them on the model. Take half the width of folds is equal to 4 cm. 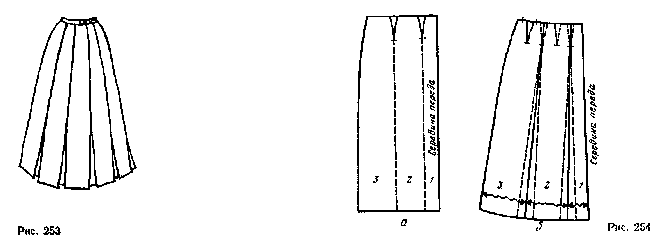
Spread tuck the basics in two Darts with a length of 8 cm along the planned lines (figure 254). Number and cut strips, cutting Darts. Put them on another sheet of paper and close the tuck forming an extension at the bottom. The value of the extension must not exceed half the width of the folds are equal in this example, 4 cm (figure 254, b). If the solution tucks insufficient to obtain the necessary extension (which is very rare), should further push one detail from another.
If the Darts do not close completely, they should be left where they are, but better to move them closer to the side cut (one or two) or in the middle of each wedge (see dashed tuck).
Draw a new line in the middle of each fold expansion (see solid lines).
Cut the pattern along the planned lines and run the pleats (see figure 166).
Skirt wedges, laid in press folds (figure 255). The pattern of this skirt runs way used for the manufacture of counter and one-sided folds. 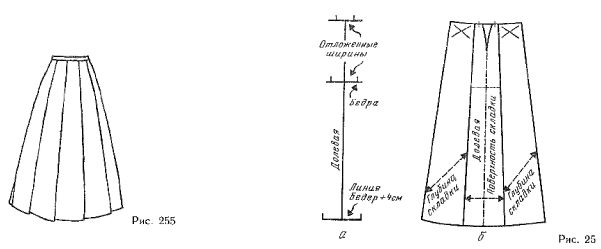
Draw a vertical line of length equal to the length of the skirt (figure 256). It will point the direction of the common thread (for example the length of the skirt is 70 cm). Perpendicular to the line mark on top of waist line, and then at a distance of 22 cm from the hips and bottom — line bottom skirt.
Determine the width of the folds, dividing the measurements of the girths of your hips and waist to the desired number of folds (for example: the line of hips — 100:10=10 cm; waist — 70:10=7 cm). On both sides of the equity
put the obtained segments. At the bottom put a cut equal to the width of the wedge at the hips plus 4 cm (skirt length 70 cm). If the skirt shorter or longer, you need to put this segment at the end of the specified length (70 cm) and to change the length of the skirt after it is completed the entire drawing. Connect the marked points on the lines of the bottom and thighs and continue the straight line to the intersection with the waist line.
If the width folds has increased slightly, the excess fabric is necessary to take in a little tuck in the middle of the folds of the waist line (figure 256, b). More convex tuck line should be located closer to the side cut, less convex in the middle of the front straight — on the rear panel.
If the width of the folds is much increased, it is necessary to slightly extend it down and to draw new lines that will approach nadechka so that you can excess width to get in a tuck (1.5-2 cm).
If the width of the folds at the waist line has decreased (which happens very rarely), it is necessary to reduce width bottom line.
The depth of folds is equal to the width of two exactly the same wedges.
The patterns you can perform both one-sided and inverted pleats. Transfer the pattern to the fabric as many times as is provided folds. Joints unilateral folds are placed inside the folds, so they will be invisible.
Seams the connection of the counter-folds are placed in the middle of the depth of the folds, this will not affect the appearance of the skirt, because the seam will be resutured.
Skirt wedges, laid in pseudogene folds (figure 257). The necessary fabric width for these folds is much less than to press it. However pseudogene pleats down the effects of a significant expansion of the skirt.
You first need to determine the width of the folds at the waist ( for example 5 cm ; figure 258 , the notch x). In accordance with the constructions described above, widths and pleating bottom line will be equal to 25 cm .
To add depth to the folds on each side of the wedge, fold the paper along the edges of the folds and move the waist line from the notch to the line indicating the direction of the grain lines, and set point O. the same run on the other side of the wedge.
Flatten the paper and draw a straight dashed line from the notch to the bottom (see figure 258). Fold the paper along the inclined line and swipe a small line between nasecki on x. Flatten the paper and spend a third angled line, which will be the edge of the patterns (solid line in figure 258). Folds can be single-sided and counter.
When transferring patterns to fabric note not only contour, but also necessary for the stability and folds sloping line drawn between nasecki x and O.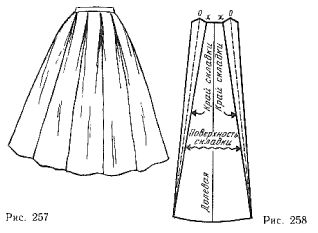
Select your language