


")
The cap collar is formed at the front continuation of the bodice. The rear part of the collar cut out along with the front of the bodice. These collars can be worn and urgent, but often they are made with lapels.
Shift collars are used in cases where accuracy of detail is not important or is required to facilitate the processing of (blouses, casual dresses, etc.).
Fold-over collar with lapels (figure 316). Such a collar is normally folded back along the sides of the neck. On the front of the bodice, drawing a line of prosanos and mark button (figure 317). Polutanata equal to the width of 2 cm will Continue a line mid-front to top. 
Perpendicular to the shoulder line draw a line which represents the line of the front rear of the collar. Aside from below the line segment equal to the length of the neck backless (najceska 1; for example 6 cm). When measuring the length of the neck backless must subtract the value of the solution tucks, if any.
From the notch 1 swipe right line perpendicular to the line of strut, put on it the desired height of the stand and put nadziejko 2.
Rack height is always limited to the length of the neck; in this case it is equal to 8 cm From the notch 2 draw a line parallel to the uprights (nadechka 3).
Build a line of inflection lapel. Put a dot in the middle of the distance between natsukoi 3 and the shoulder line. 0.2-0.3 cm to the left from this point spend a slightly curved line running from the middle of the collar parallel to the rack, and then to the notch 4 located on the line of prosanos on the level of the first loop.
In most such collars, the lapels do not have a sharp line of bend, so it is not necessary to draw.
To build the lapel turn the collar pattern on a sheet of paper, leaving a small seam along lines which will not change (the line of the shoulder, rack, mid-collar, cut lines between nasecki 2 and 3 and the bottom of the line polutanata from the notch 4). Leave a wide margin between nasecki 3 and 4.
Cut the paper along the lines of the shoulder and rack. Fold the collar along the fold line, place the middle of the collar in the proper position, secure it on the figure and mark the lapel; then put the drawing on the table and specify the form of the lapel.
To improve the fit of the collar between the shoulder line and of the line of the neck lay the foundations of a small tuck (figure 318). On the translated curve continue line stand collar down. Then smoothly connect it with the curved neckline of the front.
The length of the Darts equal to 2/3 of the length of the neck of the front. Solution tuck varies depending on the curvature of the neck the basics of the front and is approximately 1 cm.
On the patterns (figure 319) set the width of podborta at the level of the buttons. Podbot needs to close the loop and have an allowance of 1-2 cm usually is done with a width of 8-10 cm.
Continue with the line sloping up to the line of the shoulder she stood up from the line of the neck 2-3 cm
Determine the direction of the common thread of podborta. There may be two options for equity lines of thread:
through the middle of the front. This is the most simple solution, but the result will be in the middle of the collar seam;
in the middle of the collar to avoid a seam. In this case, have different direction threads on both parts of podborta.
Cutting cap collar at oblique to the direction of threads of the fabric are not reflected in the quality of the product, especially if there's a side gasket. But if the clothing is often subjected to washing and the fabric has larger shrinkage, you need the middle of the front podborta positioning the common thread.
The lower part of podborta cut out the common thread. To do this, cut off the mold podborta a few inches below the first loop and pulling it apart (see arrow in figure 319).
The product shown in figure 320, collar less snugly to the neck and lies flat over the shoulders. 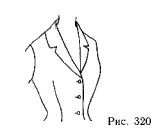
The drawing of such a collar is put on a sheet of paper a drawing is given in figure 318. Split collar on the back of four parallel strips (figure 321).
Transfer the drawing again on another sheet of paper, pushing each strip of 0.8 cm (figure 322). The amount of expansion desired, you can decrease or increase from 0.4 to 1.2, see 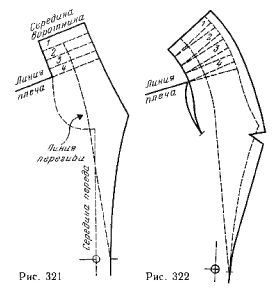
Draw a line of departure of the collar (solid line) as well as in the previous collar. In this case, the bend line is closer to the rack. Move the pattern a little tuck of the neck, using the drawing in figure 318.
Drawing podborta build, as mentioned above.
Collar type shawl, one-piece with podborta (figure 323). When processing such a collar bottom collar stachivaya in the neck that helps it fit. 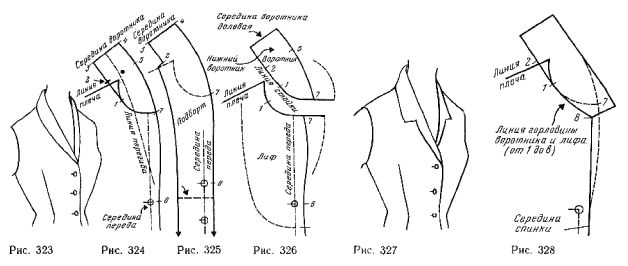
In the drawing the collar on the shelf, draw a line of prosanos and mark button (figure 324).
On the shoulder line at a distance of 3 cm from neckline to specify the point through which pass the oblique marking a line stand collar. This value corresponds to the average and large size products (for chest girth of 90 cm and more). For small sizes, an amount equal to 3 cm, decrease by 0.2 for every 5 cm to a minimum value, equal to 1.6 cm (for example, for chest girth of 90 cm and more 3; 85 cm — 2,8; 80 cm — 2.6, etc.).
Using the marked point draw a line stand collar tangent to the neckline in point 1.
From the notch 1 measure the length of the line of the neck to the shoulder line and transfer this amount to line rack. Put nadziejko 2. This nadechka may be located above, below the shoulder line, and sometimes at the top of the shoulder.
Line stand (base) of the collar put up from the notch 2 cut equal to the length of the neck backless minus the solution of the shoulder Darts on the back, if any. Put nadziejko 3. From the notch 3 draw a line the middle of the collar, perpendicular to the base, mark on it the width of the collar and put nadziejko 4.
Parallel to the base of the collar draw a line of departure a length equal to the length of the neck of the back, and put nadziejko 5.
To build the fold line of the collar, put a point halfway between nasecki 2 and 5. Fold line of the rack is to the left of this point by 0.4-0.5 cm.
Mark the line of departure of the collar. Fold the paper on the fold line of the collar from the notch 6 in the line of prosanos to the level of notch 1. Attach the mold to the figure and mark the lapel. Put the mold on the table and check the chalk line from notch 6 to notch 5. Continue the line of the neck from notch 1 to the line of departure and put nadziejko 7.
On a prepared drawing, build the lower part of podborta (down from the chest line) as shown in figure 325. At the level of the notch 2, swipe left, cut length of 1.5 cm, and connect the obtained point podborta at the level of the chest.
The direction of the common thread of podborta choose, as stated on p. 60.
The edge of podborta the level of notch 1 (see figure 324) to the shoulder line needs to be drawn.
To verify the location of the line side turn on a sheet of paper part of the collar pattern 324 and move all the notch (figure 326). Move part of the bodice. Transfer the drawing of the two parts on a cotton cloth, positioning the line of mid front and collar the common thread of the fabric (to one side of the figure).
Cut out the details, leaving allowances for seams and the stock fabric on the lapel (the dashed lines for nadrezkoj 7). Draw a line mid-front and mark the top button.
Vacate collar into the neck line of the rack, i.e., from the notch 2 to the notch 7, then 7 nadechka. Nadsekite and Ratatouille seam. Attach the collar to the shape by bending it in the desired location. Line Board correct if necessary.
The line of departure of the collar shown in figure 327, schedule, as shown in figure 328.
Uplift collar between nasecki 1 and 2 and position the fabric exactly on the table. Overlap the fabric on the auxiliary curve (see figure 324) and carry on this pattern for a new Board.
The neckline in such a collar should be complete, as shown in figure 328.
Collar shirting type, one-piece with podborany. This collar can be worn closed (figure 329) or with open lapels (figure 330). 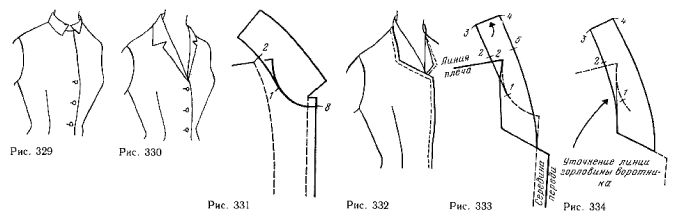
Complete the drawing of the collar, telecronaca with podborom, and slightly extend it (figure 331). Spend the neckline, collar and bodice at the neck base (from notch 1 to notch 8). Specify the width of the collar and prosanos. The line of departure of the guide collar according to the model. It does not make too acute angle at the end of the collar, as it is difficult to handle. Drawing podborta build as described above.
Drawings are shown collars can be used only for dresses, but not for coats.
Collar pressing (figure 332). This collar should fit snugly to the neck, for which the slope of the rack classic collar should be change.
Draw a line stand collar, as shown in figure 333 (oblique crosses the shoulder line for a distance of 2 cm from the line of the neck is 3 cm). For products of small dimensions proportionally reduce this value, as mentioned for the classic collar.
In the same way as for single cut classic collar, transfer this drawing a line the length of the neckline of the front of the notch 1 to the shoulder line, then the line length of the neck backless nasecki between 2 and 3.
Draw a line perpendicular to the line stand collar, in accordance with the width of the collar (on average 3-4 cm). Draw a line of departure of the collar along the neck of the back (parallel with the rack between nasecki 4 and 5).
On the bodice draw lines of prosanos, neck and departure according to the model. A line stand collar needs to be clarified, i.e. to conduct it smoothly from nasechek 2 down (figure 334).
Check if the lengths of lines stand collar and neckline. If necessary, change the length, stand collar, moving the line means.
Podbot cut out separately or tselnokrajnimi with a collar.
Stand-up collar (figure 335). This collar is formed by a continuation of the front and back of the bodice. To this collar did not cause creases on the bodice, you need to consider the difference of inclination of the neck towards the bodice. 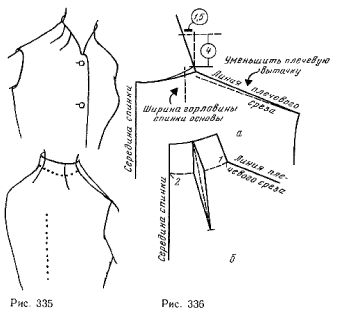
Take base curve of the back and put it on a sheet of paper. Draw a tuck from the neckline. For this, increase by 0.5 cm the width of the neck backless and slim at the same solution of the shoulder tuck. Close it and draw a new shoulder line cut through a new point of the width of the neck backless without changing its height (see figure 336, a, solid line). Will continue to push the middle back up and through the new point of the width of the neck backless swipe up, and parallel to the line of mid-back (dashed line). Put on this straight segment of length 4 cm and to the left of the plotting points are put horizontally 1.5 cm (numbers in circles). The line of the rack guide, as shown in figure 336.
The contours of the collar, swipe horizontally or parallel to the line of the neck of the backrest (see figure 336,b).
To draw a tuck, first mark the middle, with a tuck in the middle of the segment 1-2. On both sides of the line of mid-tuck postpone periods is equal to 0.4-0.5 cm . The length of the Darts equal to 6-8 cm from the neckline. Connect the resulting points. Tuck may have both vertical and inclined position. In this shoulder tuck should be parallel with the tuck, spaced from the neckline.
On the front of the bodice through the highest point of the shoulder cut guide horizontal length of 4 cm and using the obtained point up the vertical length of 3 cm Line of the rack guide, as shown in figure 337. Right along this line, put the cut equal to the width of the rack (figure 337, b), and swipe the outline of the collar on the model. 
On the front of the bodice need to draw two small Darts. Take their direction is the same as on the back.
On both sides from the middle of the neck front, 2 cm left and 1 cm to the right of it, draw parallel lines the middle of the Darts. The solution of each tuck neckline is 3-4 cm and a length of 5-6 cm and the inclination of the recesses depends on the shape, fabric, fashion, etc.
Podbot in products with stand-up collar is drawn one-piece for the front, as shown in figure 145 and 146 (article of Podborta) with the addition of the collar.
Tuck neck podborta front should draw only for fabric, not stretch. The Darts move a little so they do not overlap tuck the main fabric.
The rear part of the handle collar oblique stripe fabric width equal to the width of podborta front.
Select your language