")
The pattern of any collar should be run on the basic pattern described in the beginning of the book. Set collars— the most simple.
Collar with a straight bar. The drawing of the collar shown in figure 294, take the drawing of the front (figure 295), specify the width and depth of the neck through the middle of the front and place nadziejko And 1.5 cm to the left.
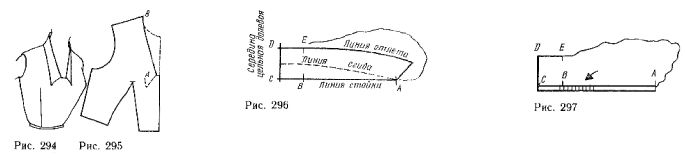
From the notch And draw a line of the neck and mark the end of the collar (dashed line). Measure the length of the line of the neck from the notch And the line of the shoulders and ( nadechka In ) and add to the resulting value is half the length of the neckline backless.
On another sheet of paper draw a straight line ABC received length. It will be a line stand collar (figure 296). Specify the notch and in accordance with nasecki on the front. Through the point draw a line With the middle of the collar is perpendicular to line CD rack.
The line CD aside the width of collar and draw a line DE parallel to the line of strut length equal to SV. Rack height is limited to the height of the neck. Usually this value is equal to 3-4 cm draw a line of departure of the collar. Form the end of the collar depends on the model.
Cut out the pattern of the collar, leaving a seam allowance for the line AC. Between points E and A, leave a large allowance to clarify the shape of the end of the collar.
Put on paper the upper part of the front bodice and cut out neckline at the planned lines. Nadsekite cut stand collar to the bend line of the neck (see the arrow in figure
297). Pin the collar to the outlet of the neck (A to b), and fold it so that it sits around the neck.
Refine the shape of the end of the collar. Chip collar, put it on the table, specify its form and cut the folded paper along the line CD in half. In order to make the collar, enough to put the resulting template on the twice folded tissue.
The line CD often include in the direction of the grain lines. In some cases, the collar cut out, positioning the line CD in the oblique direction of the threads to the collar, gently lying on the neck, or to create a contrasting pattern placement of the fabric.
Should not be a seam through the middle of the collar (if it is not determined by technical necessity), because it breaks the smooth line of departure of the collar.
Reclining collar. To build casting reclining collar toggle the drawing of the collar, shown in figure 296. Take the height equal to 8 cm When cut out collar, it is necessary to leave a wide seam along the line of the strut top collar. This part must be free to bend (after connecting it with the lower collar), so it requires an excessive height, to ensure the bend at the bend line of the rack. Take the height equal to 8 cm for all collars of this type (figure 298). All the instructions in the book relating to such collars, the collar for this height.
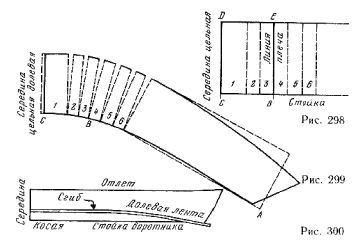
Divide into equal vertical stripes of a width of 1-2 cm of the entire portion of the collar adjacent to the neck side, so that two strips to the left of the shoulder line BE occupied half of the neck backless.
Then draw the right of three strips. Number the strips and cut the pattern on the lines.
Polo the corn cut the pattern on another sheet of paper and slide it, as shown in figure 299. For reclining a collar of this type of extension is set to 0.8 cm In other cases it can be of 0.4-1.2 cm
Parallel to the mid-cut collar at the rate of 0.1 cm on each extension line of departure (for example 0,48 cm).
Dispose of the line of the shoulder on the collar (nadziejko), as it will shift due to the shortening of the line rack. This shortening is done because due to the curvature of the line stands a pulling collar on the side. You should also shorten that part of the collar, which participantsa to the front, as it has a slanting cut, extending in the installation of the product.
The amount that is necessary to make narrower the front of the collar, calculate as follows: aside from the crossed-out points within 5 cm, then, starting from this new point, measure the distance to the point A. the End of the collar will reduce by a tenth from last measurement (for example of 0.6-0.7 cm).
Draw a line stand collar, rotting it in the middle section of AV 0.5 cm, as shown in figure 299. Secure the collar to the neckline, fold it, then draw the end of the collar the desired shape.
Reclining collars can be made from bakey, cut oblique to the direction of the threads for its entire length.
Measure on the drawing the length of the neck and define the width of the collar. On these dimensions, cut a strip (the left part of the collar plus right, plus the seam), which will lower the collar (figure 300).
Put a strip on the table and mark the middle of the collar and the fold line of the rack, passing at a distance of 1/3 the height of the collar parallel to the line of departure for the neck back, and then by oblique lines as shown in the figure. Along this line manually attach to the underside of the silk thread (matching fabric) narrow fractional band. Selecting the shape of the neck, fasten the neck cut also narrow strip equity from the inside. Put a dress on the figure and pin the collar in the back, not reaching 4-5 cm to the shoulder line.
Pulling the rack and departure collar, continue to pin the collar to the cut of the neck. If necessary, the collar can be separated from the neck and pull the edge of the iron to the desired shape, a fold line stands thus prevents deformation of the fixed proportional band.
Along departure baste equity tape to secure the line of procrastination.
Tie collars. To receive a collar ending in front in a simple knot, a bow or tie, you can use the above templates or a straight strip of cloth.
To receive a collar, shown in figure 301, determine its size and shape and tie ends. Then make a pattern to its end, which attach to a straight strip of fabric with a width of 3-4 cm and a length equal to the length of the neck. The production of this collar are done at a distance of 1-1,5 cm from mid front on each side.
Women's flat collars. To make the collar lay flat around the neck, it is necessary to draw on the patterns of the bodice. Most often used classic collar (figure 302).
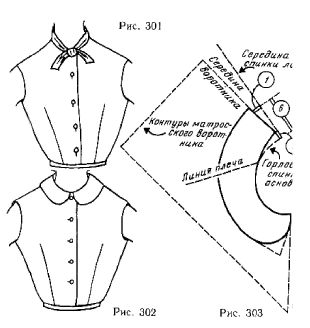
Classic flat collar is a medium-sized lapel and is located at the very base of the neck. This collar is used most often in children's products. It is the basis for the implementation of all women's flat collar.
Construct a half-line of the neck, connecting the shoulder line front and back (figure 303).
Draw a line mid-collar, rejecting her inside from the middle of the back 1 cm, and the neckline, the back of the collar, deepening its 1 cm from the mid line of the back. Thanks to this collar is a little behind from the neck in this place.
Through the middle of the collar indicate his desired height, then draw a line of departure of the collar from the middle of the back parallel to the line of the neck. The end of collar round off (solid line) or ending angle (dashed line).
Fold the paper along the line of the middle of the collar, move the collar drawing a few inches over the line mid-collar, and unfurling the paper, fix the line of the collar, if they are not smooth.
A collar of this type is cut out of fabric, folded in half through the middle of the collar.
Collar sailor type differs from the classical one only by the shape and size of the departure.
Draw the drawing of the bodice neckline and the middle of the collar, as explained above, and then draw the outline of the collar (see figure 303, dashed lines).
Collar, slightly retarded from the neck (figure 304). For this collar, turn three times, drawing patterns with the pattern 303 on a clean sheet of paper. The width of the collar is 8 cm When the mold is finished, you can change it at will.
Divide each of these patterns has six equal parts (figure 305). On both sides of drawn lines (see illustration 305, a) draw the solutions tucks, shown in figure 305, b. Do the same on the second curve of the collar (see figure 305, b). These quantities are solutions of Darts can be used for any of the openings.
To align the contour of the collar, close the Darts, move the resulting patterns on one sheet of paper and compare them (see figure 305, g)
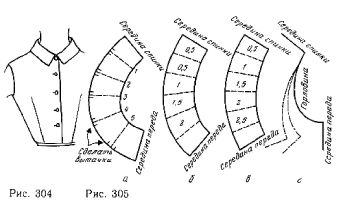
To finish these patterns, slim collar, shown in figure 305, b, 0.5-0.7 cm, as in figure 305, b — 1 cm
Below the collar behind the neck along the entire length of the neck by the same amount, have the magnitude of solutions of Darts, including Darts in the middle of the collar, make equal, equal, for example 1.5 cm.
Collars shirting type. These collars come in several varieties.
A classic collar is the collar of men's shirts. It cuts out on the neck the basics, it is bent back and sides and tight to the neck. The bend line is such a stand collar ends at the base of the neck to the middle of the front (figure 306). Measuring tape measure precisely on the mold bases length half neckline. On a clean sheet of paper, draw a horizontal line AB, the length of which is equal to the received amount minus 0.2 cm (for example, 18.5 cm, figure 307).
To the left of the point To set aside 1/4 of the segment AB and place a point (18,5:4=4.6 cm). Cut SV, divide by 4, subtract 0.1 cm Put the cut up point and place point D (4 ,6 :4 =1 ,1 5-0,1=1,05 cm).

Draw a line stand collar, smoothly connecting the points C and D. draw a line the middle of the collar, perpendicular to the line of the rack. The overall width of the collar of AE = 7.5 cm Line EF parallel to the line of the strut and corresponds to the length of the neck of the back, measured from the template.
Cut is a helper template, leaving a seam allowance at the line of departure to Refine the shape of the end of the collar. Attach the collar to the neck of the dress on the figure and mark the end of the model (figure 308). Loosen the collar, put it on the table and specify the form (figure 309).
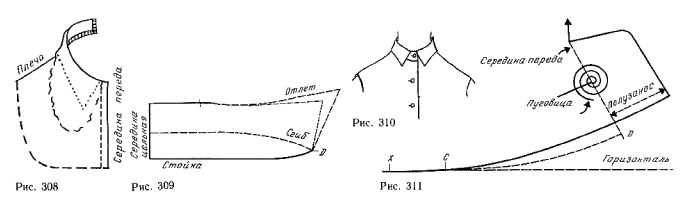
Collar front (figure 310) differs from the classical fact that he has a fold line stand at middle of bodice front ends above the line of the neck.
Put on paper the lines of the strut and the mid-collar pattern 307, denoting the notch C and D. Apply this pattern in figure 311, drawn life-size, aligning the notch C and D. Turn the rack a new collar, his line mid-front, loops and prosanos.
The front part of this collar can be used to build all such collars of all sizes, changing only the width of the collar (2 to 2.5 cm).
To draw a collar on the back, build on a piece of paper a right angle with the sides equal to 12-15 cm horizontally and 8 cm vertically. Mark the middle of the collar. Then, starting from this line, lay on a horizontal line segment equal to the width of the neck backless (figure 312, and; for example, put 6 cm). Divide this piece in half and draw the strips 2 and 3, as shown in figure 312 b.
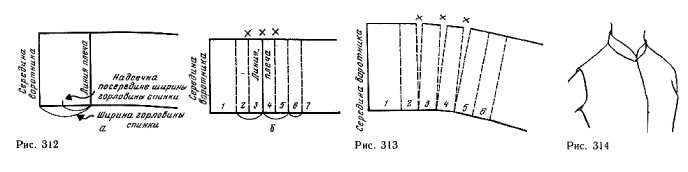
To the right of the shoulder line, draw three same strip and itemize all the details.
To perform the necessary bending of the collar stand, do three extensions (0.4 cm each) along the lines marked by crosses (see figure 312 b and 313). Copy the extension to your template. The line of departure and the end of the collar draw, as mentioned above.
Collar two piece happens with most men's shirts. Drawing him is the same as the collar in the front, just need to carve out a separate stand and a separate flight.
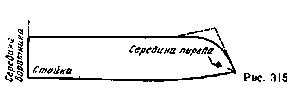
Stand-up collar. In the drawing the stand-up collar (figure 314) move the line and stand mid classic shirting collar type (see figure 309) and draw the remaining lines according to the model (figure 315).
Line posts should match the neckline. The height of the collar in the middle of typically 3-4 cm.