


")
The connection of the collar-type podborta differs from the connection piece collar front: here we can see a splice seam of the collar lapel a — line rascepa. This line should be straight. On the curve it is carried out on the line from the end of the collar to the inflection of the lapel.
The bodice pattern, specify the line polutanata and the location of the top buttons. For a classic cardigan with buttons diameter from 1.8 to 2 cm average width of polutanata equal to 1.5 cm.
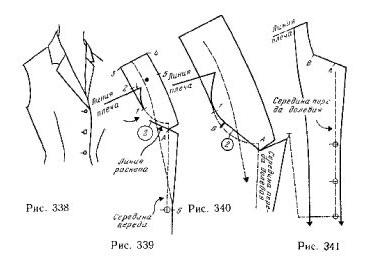
Draw a line stand collar as well as shift collar, but crossing the shoulder line at a point located at a distance of 2.5 cm from the neckline instead of 3 cm (figure 339). For products of small sizes reduce proportionally to this value as the shift collar.
From the notch 1 put a period equal to the length of the line stand collar (notch 2 and 3), then draw a line the middle of the collar, perpendicular to the line 2-3. Draw a fold line of the collar located from the neck at a distance equal to half the width of the collar minus 0.5 cm, and continue it down.
Fold the paper at the bend lines of the collar and the inflection of the lapel. Place the mold on the shape and outline - the end of the collar and lapel and rascepa. For simplicity of the drawing, place a line rascepa a little below the line of the neck base.
Put the mold on a plane and check the ends of the collar and lapel. In place of the connection, put nadziejko A.
The connection line of the lapel with the collar guide, continuing it over the crest line is about 2 cm (number 2 in figure 339 is placed in a circle). This is done in case the fold of the collar is scheduled on the curve, will move the product.
The position of the line of inflection lapel depends on the width of the collar, shape of lapel angle, slope of shoulder, thickness of fabric and padding. Therefore, its exact location can be installed only after the product is finished.
Line rascepa can have another position. Continue its 2 cm over the crest line and put nadziejko In (figure 340).
Will continue this line and connect with nadrezkoj 1 straight or slightly curved line. Do not move nadziejko 1 to the neck, as with a reduced neck collar fits worse.
Finish the neckline, starting from the notch, as shown in figure 340.
Building podborta is not difficult, because the collar is not part of it. Drawing podborta given in figure 341. Fractional thread direction of podborta must be in the same line mid-front. Mark on the fabric the notch A and B. They are necessary for the exact connection details.
High clasp double-breasted jacket with collar type causes a change in stand collar. In this case, the collar should be slightly expanded.
Move the line of the neck, shoulder, mid-front and collar from notch 1 to notch 4 of the drawing, is given in figure 339. Reproduce on a separate sheet of paper collar on the back, 8 cm high. Divide this part of the collar stripes and spread collar in five places.
The patterns make three models of collars and place them as shown in figure 342; A — classic collar; b, C and D — on collars obtained by pushing the strips respectively 0.4, 0.8 and 1.2 cm
Shorten the collar line of the mid to the amount of increase at the line of departure.
