


")
Sleeve fantasy model based on direct casting sleeve using the same techniques that are used for bodice and skirt. The sleeve ruching. Assembly is usually performed on the sleeves straight cut, but they can be used and sleeves another cut.
For sleeves with smocking at the top and bottom increase the width along its length.
Put on a sheet of paper based sleeves (for example, take the short sleeve). Note the notch On (figure 473). Select the desired amount of expansion. 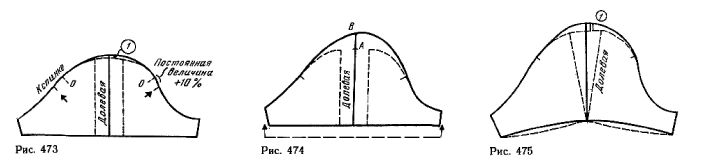
Cut the drawing along the line common thread and move it to another sheet of paper, pushing of the sleeve by a distance necessary for the Assembly (for example, 8 cm, dashed lines). The amount of expansion of the sleeves are different. For lightweight fabrics it can be 80-90 cm, and even more.
In the middle between the separated parts of the sleeve guide a new line of common thread. Guide the new line of lifts, lifting it in the middle 1 cm of the line of crown sleeves.
Measure to figure the area of the sleeve, which should be placed in the Assembly. They may be a portion between nasecki O. It is collected in the Assembly, bringing the length of the top part of the sleeve to the desired (e.g., 15 cm).
If the sleeve is wide, the build feature on a larger area (e.g., the distance between nasecki About 20 cm).
Below the sleeve line of the crown came to the armhole, add to the amount of movement of nasechek 10% of this value (for example: 2,5+0,25=2,75). Note new the notch (see arrow in figure 473), limiting the place of Assembly.
To get a more lush sleeve, it is necessary to increase the height of its crown (figure 474). To do this, from the top of the crown the foundations of the sleeve (nadechka A) continue the line of the grain lines up to the height needed for lush blouson (radseck). From the notch To guide the new line of crown.
To make the filling, you need to lengthen the sleeve from the bottom (see dashed line arrow).
For sleeves with ruching at the top of the slide on a sheet of paper based sleeves. Cut the pattern common thread, then put it on another sheet of paper and spread (for example 6 cm), as shown in figure 475.
In the middle draw a new line common thread and specify the line lifts the shoulders. Such a sleeve is not necessary to move the notch, with the exception of the case when the sleeve expands to a considerable size.
Specify the line of the bottom sleeve, as shown in figure 475. Given that the line of the bottom of the sleeves has a significant curvature, obtachku for the treatment of NCDs need to carve out separately.
Sleeve sotvorenie tails (Fig 476) combines the sleeve shown in figure 474 and 475; its extension at the top is the same as on the two, and down he expanded a bit. 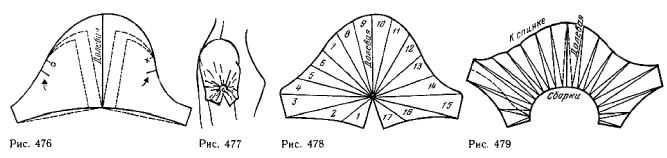
Extend the sleeve bases by the same amount from the bottom to the top. This value will be a necessary extension sleeve at the bottom.
Cut the pattern along the lines of common thread, extend it even at the top and draw a line common thread in the middle of the expansion.
For receiving the inlet sleeve will continue to push common thread to the desired height and draw a new line crown. Move the notch on the provided quantities (see figure 473).
Sleeve assemblies in the form of a fan. The top of the sleeve is smooth and from the hole in the center of the sleeves fan out Assembly (figure 477).
Put on a sheet of paper drawing short sleeves and carefully Refine it before making the mold of the sleeve. Place the mold on hand, guide the bottom line and the circle, which is a place of Assembly (Fig, 478). The diameter of the circle is 1 cm. draw straight lines from the circle to the line of the crown so that the angles formed by them, were the same.
Using a piece of tissue, determine the width of the sleeve required for Assembly (for example — 30-40 cm). Subtract from it the length of the drawn circle (about 3 cm) and divide the resulting value by the number of extensions (for example, one extension is 2 cm).
Draw a new line of shared threads (figure 479).
Starting from this line, draw one half of the sleeve, then the other. Line common thread is in the middle of the extension, denoted by dashed lines.
Piping for the sleeve down to find the patterns (curved dashed line).
Sleeve with cuff and pintucks at the bottom. Sleeve tight to the hand (figure 480), so it is build based on the narrow sleeves. 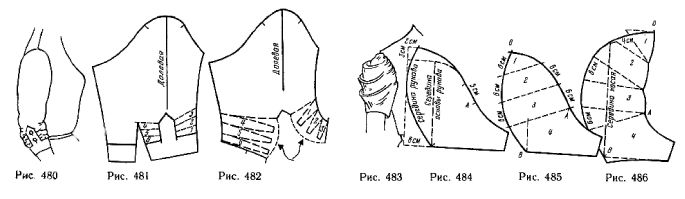
Put on a sheet of drawing paper sleeves with drawing 276 from the article Set-in sleeves. Draw lines the cuffs and pockets. The Pat is better positioned on the line of shared threads (figure 481).
Divide the collecting surface into strips and number them. Cut the cuff and cut a curve on the numbered strip.
Transfer the drawing to another sheet of paper (figure 482), pushing lanes 1, 2 and 3 (for example 2.5 cm). Then spread the strips 4, 5 and 6, continuing the notch to the elbow and closing the dart.
Along the outer lines of the strips 6 and 3 add half of the distance between the separated bands.
If you need a slouchy fit sleeves, guide curves, dashed lines, marked with arrows. Mark the notch, as shown in figure 482.
Cut out both parts of the cuff, stacking at the edge of the common thread, and add allowance for ACC.
For a solid cuff, it is necessary to cut on the auxiliary pattern with the addition of allowance for ACC.
Sleeve with drape. Drape to the sleeve (figure 483) carry out the same as on the bodice and skirt.
Sleeve drape should not fit snugly to the hand, so you should give allowance on the width. To determine the amount of the allowance. it is necessary to make an auxiliary pattern on the basis of the patterns of sleeve, shown in figure 174 in the article a Set-in sleeve, which is then transferred to the fabric.
Figure 484 Dan drawing half of the sleeve, with the dimensions required for its construction. The figures in the drawing, can be used to perform the draped sleeves of any model.
Put on a sheet of paper separately both parts of the sleeve.
In every part of the sleeves, make the following changes: in accordance with the values given in figure 484, swipe, starting from the lower end of the middle bases of the sleeve, the convex line of the middle seam of sleeve from notch to notch (figure 485).
Starting from the notch guide On the new line of crown sleeves. Put a new nadziejko And 5 cm below the reference. Determine the length of the land with the assemblies (e.g., 24 cm, i.e., from one notch to another And should be 24 cm).
Swipe the direction of the folds of the drapery, as shown in figure 485, delay from nasechek About and And 6 see Number of lanes.
Move the drawing to another sheet of paper, add the required extension (see the value of the expansion in figure 486). Update about the notch On the line of the middle of the sleeves, then change its curvature in the strip 4 (solid line).
Decline the bottom line is not perpendicular sleeve a-line mid sleeve. It is advisable to line the middle of the sleeves were the same length on both sleeves.
If necessary, reduce the size of the extension.
The norms of a conventional sleeve will have plenty of lining for the sleeves.
After fitting sew the middle sections of the sleeve and complete the Assembly. Then sew the lower sections of the sleeves and lining. Fold the sleeve and the lining, right sides inside, equalizing the sections of the bottom.
Vacate draped sleeve in the armhole. Then hem the lining by hand.
Put the sleeve on the arm. Lay pleats, pin them to the lining and secure with a few hidden stitches. The shim should be mounted manually, so that when ironed it can rip and re-sew.
A sleeve extended at the bottom. In figure 487 and 488 represented by two branches, cut from the same mold, only one of them hem assembled by a narrow cuff. 
Move the drawing basics short straight sleeves (see picture in article 174 Set-in sleeves). If the extension is necessary to keep unchanged the length of the top part.
Mark the area to be extended, and draw on it a line parallel to the equity, at intervals of 3 cm (figure 489). The extension can be build as across the surface of the sleeve and the upper part (level width of the chest to the level of the width of the back).
Cut the pattern, spread the strips in a desired width (for example, 2 cm one from the other). Align the bottom line, connecting all the strips, mark the notch x and o (figure 490).
Sleeve, extended in the middle (Fig, 491). Such a sleeve can be both short and long.
Level podraza having a slightly inclined direction, the sleeve is most extensive: along the hem of the sleeve is slightly expanded and assembled to the Assembly on the cuff.
Determine the required length taking into account inlet at the upper part. Toggle the drawing of single-joint sleeves (see picture in article 174 Set-in sleeves) the desired length (for example 32 cm). Guide lines of the side cuts parallel to the grain lines.
Mark the location of the relief on the sleeve (for example, 12 cm above the bottom of the sleeves). Divide the entire surface of the sleeve into strips with a width of 3 cm, number them and cut the pattern.
Put the mold on a sheet of paper, spread the strip, as shown in figure 492. Draw the contours of the sleeves and make a copy of patterns. 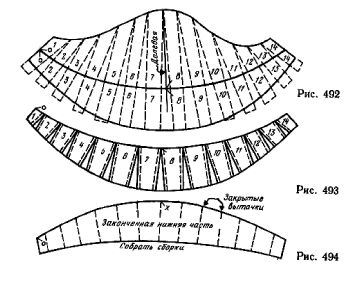
Specify the line of the terrain, wearing the sleeve on the hand (collecting the bottom of the sleeve in Assembly with tape and chips joint). Line elevation must be raised slightly in the middle top curves of the sleeve as a horizontal arrangement of the terrain adds visual weight to the sleeve.
Transfer the changes on the deployed pattern sleeves (see solid lines). Translate separately the lower part of the sleeve patterns, measure its width at the hem and define the unwanted extension.
Move over, closing Darts, as shown in solid lines in figure 493. Curve the bottom of the sleeve takes the form shown in figure 494.
Sleeve with a reduced crown. The pattern bodice a line of openings, foundations (figure 495, dashed line). Apply model lines, curving the line of continuation of the shoulder with a length of 2.5 cm. 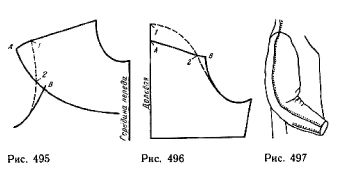
Measure the length of the armhole of the bodice between nasecki 1 and 2 and move that amount plus 10% on the corresponding part of the sleeve (figure 496, the notch 1 and 2).
Line common thread sleeve set aside an amount equal to the distance between nasecki 1 and A bodice.
Move from the drawing of the bodice to the drawing, the sleeve of the line model.
If the distance between nasecki and on the sleeve would be more appropriate of it to the bodice should fit on the sleeve or lay a small tuck through the middle of the sleeves.
The sleeve with a seam in the middle (figure 497). Relief, starting from the shoulder seam, creating a pronounced extension of the upper part of the sleeves and narrower at the bottom.
Based on the drawing of such sleeves take the drawing one-piece straight sleeve, so as to double seam the sleeve concave line of the front roll would reduce the expansion of the sleeve created by the topography.
Put a matching one-piece sleeve.
In the drawing, one-piece sleeves, starting from the highest point of the crown, draw a line of slices, as shown in figure 498. On the back of the sleeve this line down closer to the line common thread.
Measure the width of the sleeve at the bottom and draw a tuck in the elbow to remove excess width. To do this, select the location of the elbow on the double seam of the sleeve and parallel to the common warp, draw two lines as shown in figure 498.
Translate separately the two parts of the sleeve, cut it out, leaving a wide seam, and check the sleeve, wearing it on your hand.
Select your language