


")
Move the drawing half of the gusset (gusset is bisected by the line indicating the oblique direction yarns; figure 529, left).
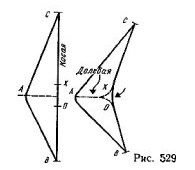
From nasechek In With, move to the line segments IN Oblique and CD with the drawing of the bodice. Fold the paper to form a tuck between nasecki A, X and About, leaving 0.2 cm between nasecki X and near the fold line. Translate newly acquired gusset and smooth its contours, as shown by the arrow in figure 529, right side.
Through nadziejko And spend a dashed line that indicates the direction of the grain lines. This direction can be different; we should not only put the equity thread on the lines AC and AB.
Poluectovich can be placed on any model of kimono requiring gussets on the front and on the back. This method has several advantages compared to the use of one-piece gusset.
1. The use of two poluectovich eliminates the need for pre-connection of the back bodice with the front along the lines of the side sections and lower sections of the sleeves. This is especially useful when processing thick fabrics, where the gusset to carry hard. Proactivity connect with relevant details (back and front), and then one line connects the front and back lines of the side sections and lower sections of the sleeves.
2. There is an opportunity to Refine the width of the garment during the fitting, if you make the necessary allowances for seams on lines Oblique (see figure 529, line SHOW).
3. Much easier to run the clasp in the side seam of the adjacent dress.
4. Ensured closer alignment with the sleeve shape of the armscye curve.
Short sleeve fantasy without gussets (figure 530) can build on the copy of drawing of the front surrounding a kimono.
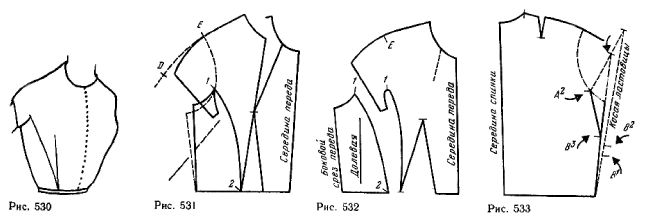
To do this, first correct the line of openings and tauste pattern on the line side of the slice, as shown in solid lines in figure 531. Draw the terrain from the notch 1 and draw a line of rotation of the sleeve, the slope of which is greater, the shorter the sleeve.
Draw a line of length (minimum) sleeves and hem line of the sleeves (here excluding allowance for ACC).
Required saugeye sleeve run top and bottom lines of the sleeve (solid lines).
Round the sharp corner of the notch 1 to prevent spreading of tissue (figure 532).
Pattern backless build in the same way, by coordinating the length of the top and bottom lines with the same lines on the front.
When creating drawings very short sleeves fantasies with proactivity should not be zawjati bodice in the region of the gussets to prevent spreading of tissue (e.g., knitwear).
In the drawing, the front or back promote the line of openings and move above the notch A2 and B2 (figure 533). After this little tauste bodice (solid Lines).
To reduce the size of proactivity put it on paper and put it on the incision, aligning the notch A1 and B2 (the line of the gussets combined with the line side of the slice, starting from the notch B3).
Move the gusset line of the new side of the slice and continue it upwards (top arrow). Further transformation of the gusset run, as shown in figure 529.
Line the bottom of the guide sleeve at a minimum distance of 2.5 cm from the notch A.
Kimono armhole fantazi shown in figure 534.
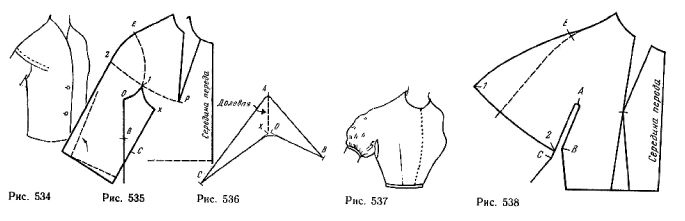
On the patterns (figure 535) draw a smooth line podraza through the point R and the notch 1 and 2. Clothing straight cut nadziejko 1 can be lowered through the openings by a further 0.5-1 cm.
When cutting out such a sleeve is necessary to comply with the direction of grain lines on its individual parts are the same as the one that remains tselnokrajnie bodice. To do this, apply a separate part of the sleeve part, tselnokrajnie bodice, combining their top of the line, and slide it on a line parallel to the middle of the bodice, which will specify the direction of the grain lines.
It should be borne in mind that in such models it is possible to eliminate the top seam, with a fold of fabric at the upper line of the sleeve.
Don't forget to move to your new templates the notch E , and .
To clarify the drawing, move the drawing proactivity ordinary proactivity, place it on the pattern with the armhole fancy mark on it cuts IN and CX. Make a tuck between nasecki A, X and O, and round a line of nasechek X and (figure 536).
In this prolactemia angle at the notch And sharper than usual (see figure 529). It depends on the location of the line of openings and the degree of rotation of the sleeve.
Extended sleeve kimono. The peculiarity of this sleeve is to construct the Gore.
To build patterns short sleeve slouchy cuff (figure 537) on the copy basic patterns kimono swipe the top line of the kimono, in accordance with the model, starting from the notch E (figure 538).
From надсечки1 draw a line to the bottom of the sleeve at a right angle to the line of the upper edge of the sleeve E1 and the line cut AC. Nadechka 2 should always be above the notch S.
Follow the same build at the back.
Toggle the drawing of the gusset Foundation and swipe it from the points And (figure 539) two straight, parallel lines Oblique. Put on them the segments equal to the length of the incision A2.
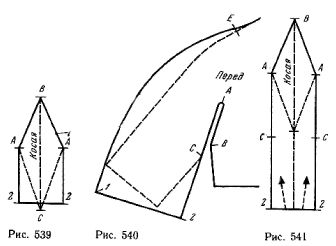
Specify possible width of the sleeve in accordance with the width of the fabric. If necessary, lengthen or tauste sleeve.
In long sleeve (figure 540) causes difficulty to the location of the gussets between two parallel lines extending from the notch And to the cuffs.
Continue the line AC down to the notch 2 at the level of the 3/4 length sleeves. From the notch E, draw a new line the upper edge of the sleeve in accordance with the model and the necessary width at the bottom (width of sleeve width of front plus rear plus a width of gusset, nadechka 1).
Line the bottom of the sleeve 1-2 is perpendicular to the lines of the sections of the sleeve.
Drawing the Gore run, as shown in figure 539, continuing a line as in a straight line (figure 541). Hem the gusset to make narrower, as shown by the dashed lines.