


")
The elegance bodice is largely dependent on the shape and location of the upper Darts and Darts at the waist line. Center solution tuck come usually in the region of the apex point of the breast. When transferring Darts on the need to maintain balance patterns.
Translation of the upper tuck a tuck at the waist. Figure 85 presents the adjacent shape bodice with a tuck at the waist line. 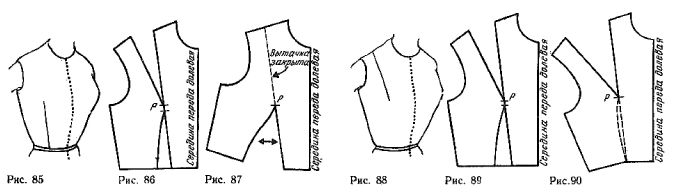
Turn the front bodice basic patterns on a sheet of paper, marking Darts and dashes, limiting their length (figure 86). Cut out a tuck at the waist line, i.e., cut the curve on both lines until the end, and then continue the incision to the point R. Close the top tuck. Tuck at the waist line with the increase in the value of the solution tucks top (figure 87).
When it comes to move top Darts, you can use the term "rotation" because it really revolves around the point P; therefore the point P can be called as the pivot point.
Translation of tuck at the waist line of the shoulder cut. Bodice, shown in figure 88, also adjacent, but tuck is aimed in the shoulder cut.
Turn the front bodice basic patterns (figure 89). Cut the top and close the tuck tuck at the waist with straight lines (figure 90). At the convergence of two lines tuck at the waist loses its straightness. New waist line should be held by the most long cut tucks (see arrow in figure 91). 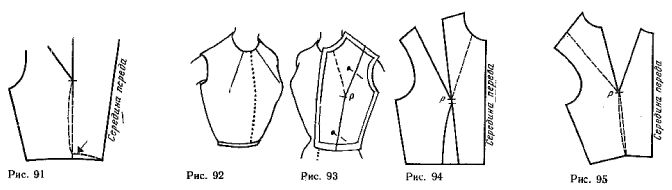
Translation of upper tuck in the cut of the neck. For obtaining the bodice, shown in figure 92, switch front bodice basic patterns on a sheet of paper. Cleave the two Darts in the bodice with pins. Clip the curve on the figure or mannequin and mark the new angled line from the neck, as shown in figure 93. Remove the pins, put the mold on the table and slide the ruler on the selected direction of tuck (figure 94). Again close both of the Darts. Cut the paper along a new line, drawn through the point R. the two edges of the slit move apart, forming the new dart, which will replace two closed tuck basic patterns (figure 95).
Translation top Darts products, straight cut. The translation of tuck in clothing straight cut (figure 96) is used, the base curve of the front bodice.
Put on a sheet of paper at the front of the bodice to the hips. Draw a line of the side cut in a straight line, cross out the unnecessary lines (figure 97). Draw a line of new Darts from the neck, as in the previous example (see figure 93). Cut the paper along this line to the point P and close the top tuck. 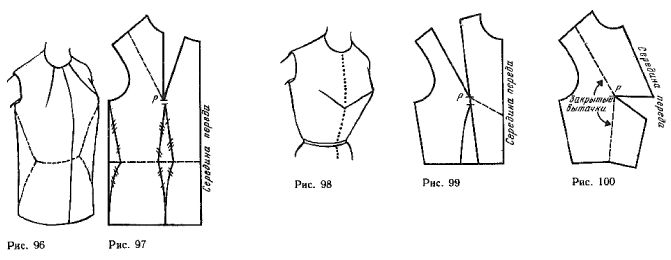
Translation of tuck in the middle of the front (figure 98). Put on a sheet of paper in front of bodice basic patterns. Close the two Darts in the bodice. Clip the curve on the figure or mannequin and mark the new line of tuck (dashed line in figure 99). Cut the pattern along this line to the point R (figure 100).
The location of the grain lines of the fabric must correspond to the selected model. Equity filament can be positioned on either of the two lines in the middle of the front starting from neck.
Translation of the top tucks into the side cut. The translation of the upper adjacent tuck bodice side cut (figure 101) uses the same techniques as in the previous examples.
Put on a sheet of paper, the base curve of the front bodice. Close the dart. Put the mold on a figure or mannequin and mark the new line of tuck (figure 102).
Cut the pattern along the drawn line to the point R, and then close only the top of the tuck (figure 103). New tuck should not reach the point R. It should be shortened in the following way. From point P draw a line limiting this tuck. The distance from the point P to this line is equal to the distance from point R to the end tuck at the waist line (figure 104). More clearly, shortening Darts is shown in figure 105. Line shortening mark the middle and tuck the resulting point connect straight lines with points of the solution tuck from the line side of the slice.
To clarify lines of the side of the slicer, close the resulting tuck and a ruler draw a straight line from the waist to the armscye curve by correcting the bending resulting from the transfer of the tuck (figure 106).
For better underline the shape of the breast it is recommended to use horizontal or sloping tuck from the line of openings, as it is almost invisible in the product, especially if it's a little shortened.
Tuck from the lateral slices in the sheath shortened to 1 cm greater than the distance between the point P and the top tuck on the waist line (figure 107). A tuck at the waist should also be shortened, since a high tuck gives the impression of a low-lying breast. 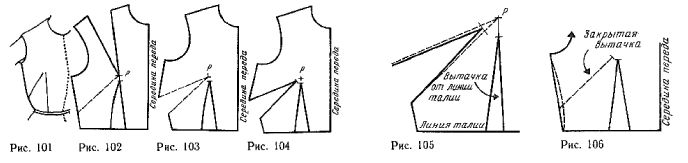
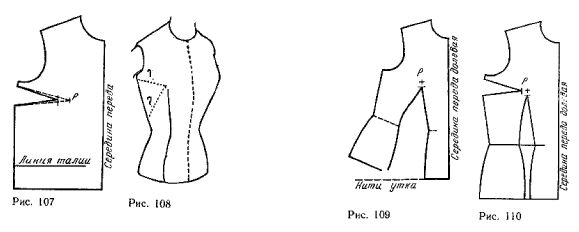 Translation of upper tuck in a product, not cutting at the waist. In figure 108 is shown attached to the bodice, do not cut at the waist line, with one dart extending down from the chest. Two dotted lines, about which there are question marks indicate the approximate direction of the second option (horizontal or inclined).
Put on a sheet of paper, the base curve of the front bodice to the hip line. Cut it on both line m tuck at the waist line to the point P, starting from the hips. Close the top tuck. Move the drawing to another sheet of paper and mark the top of the Darts at the waist (figure 109). The resulting curve corresponds to the model shown in figure 108, however, it is not suitable for cutting some fabrics (with a pronounced pattern, striped, etc.). It is therefore necessary to imagine what the product in finished form.
Set the pattern with figure 109 on a clean sheet of paper. Cut it out, leaving the edges except the neckline and the armhole, the seam allowance is 1 cm Tuck is not cut, connect the side bust Darts straight hem. Using colored pencil and rectangle swipe to a point P of the strip, indicating the weft thread. Close the tuck to secure it with pins. Place the pattern on the figure. Stripes on the side seams are slanted, the clothing is skewed. It is therefore necessary to make additional tuck (figure 110).
Tuck at the waist line can be formed without moving the threads of the fabric, while the upper tuck is the inevitable change of direction of the filaments; absence of upper tuck worsens the fit of the garment. No top Darts is valid for small size garments. If the breast is strongly developed, the lack of Darts leads to excessive tension of the tissue on the chest and the formation of wrinkles in the armhole.
Figure 111 shows a model of a bodice with a belt. The bodice is quite tight to the shape with the top of the Darts and tucks at the waist in the side cut (figure 112). This causes a change in the waist line and makes it impossible to perform the usual peplum as a continuation of the bodice. Therefore, in this model, there should be a seam at the waist line. If the bodice is tight enough at the waist, a tuck at the waist line should be retained in its place. In this case, the excess tissue can be distributed between two small Darts (see figure 80 in the article is the Reduction of the solution tucks on the front panel of the skirt) or leave it in the seam allowance, which is tightened with a belt.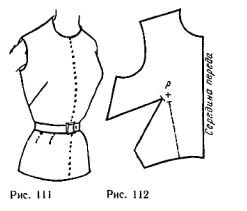
Select your language