")
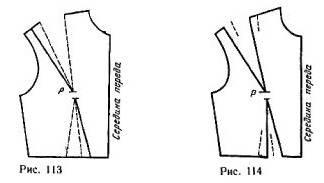
Place this template on the base, carefully aligning the contours. Stick the pencil both layers of paper at point P and rotate the top of the curve so to place a solid line of new Darts on line Darts in the basic patterns. Take the second line of upper tuck.
Remove the completed mold from the base. Close the new tuck and correct the shoulder line, connecting the ends with a straight line. Do the same with the tuck at the waist line. From the slope changes of this tuck elongates her first line and shorter second. Waist line should be corrected on the longer side of the tuck (figure 114).
The clothes are very adjacent silhouette to accentuate a slim waist you should move tuck at the waist, as shown in figure 115. To do this, move the sheet of paper in front of the basic patterns and mark a dashed line a tuck at the waist line. Across the top of the tuck guide the new line of tuck to the waist line (for example 2 cm to the right from the line of Darts in the main drawing). From the waist line will continue to push the Darts down along the line of the tuck Foundation.
Putting the resulting pattern on the base, pierce both patterns with a pencil in the point of intersection of the waist line with the end of the new line of tuck (arrow in figure 116) and turn the top of the curve so that the drawn line tuck is aligned with a similar line of basic patterns.
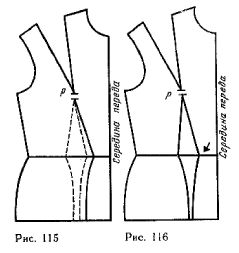
Translate basic patterns of the second line tuck at the waist line.
For cutting the moving bodice Darts at the waist line can be of a value much greater than 2, see If the bodice is not cut at the waist, moving Darts is very limited in connection with a change in the lengths of the sides of the new Darts.
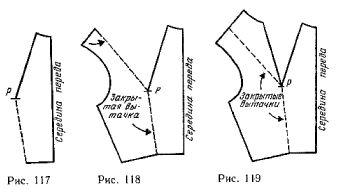
Replacing the two Darts on the front one tuck from the neckline. On the line of the neck base patterns draw a short dash. Put on a sheet of paper with the basic patterns of lines that do not require any changes. Draw the first line of a new tuck.
Mark touches the first line of the tuck at the waist (figure 117).
Close the first tuck on the waist line. To do this, stick the pencil to the paper at point P and rotate the top sheet of paper to align the dashed lines with the second line tuck at the waist line of the basic patterns.
Starting from the second turn tuck the contours of the second part of the bodice, which are not expected to change (figure 118). The second line of the tuck guide, the dashed line (arrow in figure 118). Again rotate the top curve around the point P to match the second line of the new tuck with the first line tuck basic patterns.
Other lines of swipe patterns, as shown in figure 119.