


")
The bird pendant (size 18x25x25 cm). Bird is one of the oldest mythological images of folk art. In the tradition of making has evolved and there are many ways of making hanging and standing bird. In the example below, we consider the sequence of manufacturing hanging poultry (photo 104). 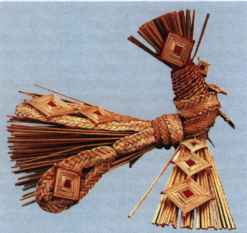
Thatch sculpture is made on the basis of binding and bending the tufts of straw — this is its peculiarity compared to other types of articles of straw.
Materials:
3 bunches of straw at 35 pieces in each of the middle part of the stem for the body and wings; the length of one straw not less than 38-40 cm, diameter 2.5—3 mm (you can take a straw from the top of the stem, removing her thin ends);
for decoration (making squares and tangles) - 70 long Solomin from the upper part of the stem with a diameter of 1.5—2 mm;
3 sticks of diameter 2.5—3 mm and a length of 12 cm for the manufacture of chains of rhombuses;
23 sticks with a diameter of 2.5—3 mm and a length of 6 cm for production of single frames of rhombuses and small diagonals of rhombuses chains;
20 cm of red ribbon with a width of 1 cm for the decoration of the middle squares.
-1m red thread with a thickness of 1,5—2 mm;
thread No. 10 color straw for ligation elements (better to take the reinforced cotton or linen).
You can prepare a thread of their own. Take the silk rope, dissolved in a separate thin twisted rope. In a glass of warm water to make aqueous solution of potassium permanganate is reddish, add 1-1. 5 tablespoon of white glue. Water beam the prepared string in the solution, then let them dry. Thus prepared the rope will be a wonderful material for ligation of the straw bundles. They are very durable, and thanks to the impregnation will not slip and stand out against the natural color of the straw.
scissors, PVA glue, rolling pin for rolling of the braids. Equipment:
twisted braid of 8 Solomin to complete the bird's head;
woven on the frame squares with inserts of fabric;
flat braid "herringbone" of the 7 Solomin.
Manufacturer torso of the bird.
1. Manufacturer torso of a bird, start with the head. Take the 1st bundle of straw intended for the body, align the ends of the straws with one end and tightly tie the bundle of thread, stepping back from the edge Solomin 5-6 cm the Ends of straws must fan out. Top short bundle of straws will be the crest on the bird's head (figure 5.74 a). 
2. Take a bunch of straws long ends up. Peel back the dressing along the perimeter 8 of straws from a bundle. Appetite section of the beam above dressings 5 cm twisted surround a network of 8 Solomin (figure 5.74 b).
3. Make another ligation of the beam under the base of the twisted braids, tied to the main bundle of straw which was woven braid. This ligation conditionally restrict the bird's head (figure 5.74 b).
4. Back away from the bird's head 5 cm further along the beam Solomin and bend it at a 90° angle, forming the breast of a bird. In order to position Solomin locks 10-12 straws which are located on the back of a bird, slightly tighten, and straw, which form the outer part of the breast, loosen. Due to the tension on the upper Solomin the bird's body to take a curved position. Fix Solomin temporary ligation, which are made immediately after the bending (figure 5.74 b). After fabrication of the wings you delete it.
5. For the manufacture of the right wing of the bird, take the second bundle of straw, prepared for the body. Align all the ends at one edge. Put the straw of the second beam, giving it a flat shape, on the back of the bird perpendicular to the torso. The aligned ends of the straws are to the right and stand on 15 see the Second part of the beam tightly Obratite breast birds in a clockwise direction and place the straw to the tail (figure 5.74 g). The straw protruding wings will be locked. Swirling the straw hold together with the bird's tail.
6. For making the left wing of the bird, take the third bundle of straw, prepared for the body. Align all the ends at one edge. Put the straw of the third beam, giving it a flat shape, on the back of the bird perpendicular to the torso. The aligned ends of the straws are on the left and on the 15 see the Second part of the beam tightly Obratite breast bird counterclockwise and place the straw to the tail (figure 5.74 a).
7. Tie the bird's tail just behind the wings. The second ligation of the tail make the distance of 2— 2.5 cm from the first (figure 5.74 b). All straw in the bird's tail and wings trim.
Manufacturer of decor.
1. Part of the provisioned thin Solomin weave 5 flat braided herringbone 7 straws of length 30 cm each. Braids laminate and trim the ends nastavljenih and ending Solomin.
2. Make of quality decorative items for birds. One twist Flex in the middle and make a circular loop, the ends of her tie. Two braided Flex the ends with a length of 9 cm and make a small loop by tying the ends to the weaving. The rest of the weave Express free.
3. Weave 4 single square of size 3x3 cm Crossing frogs do with a small offset so that the left piece of the frame, which can then be fixed in the netting. During the weaving of the squares in the middle put a piece of red ribbon. On the perimeter of the squares adorn red thread.
4. Weave 2 single square of size 2x2 cm to decorate the breast of the bird and one square of size 1x1 cm for the beak. In all the squares make a paste from red ribbon. Excess parts of the frames remove, leaving one section to secure the elements.
5. Weave 3 chains of squares. In each chain, place the squares in the following sizes: 3x3 cm, 2x2 cm and 1x1 cm (all the squares do with inserts). Behind the smallest diamond you should stay a small piece (1 cm) long frame for fastening elements on the bird.
Decorating birds.
1. Fasten the 2 red strings at the bottom of twisted braids and lay them along the neighboring turns of the weave on the bird's head. The threads attach to the top of the head, tuck the ends between the straws.
2. Take one of left braided "herringbone". Put it in the middle of the back of a bird, obvate criss-cross the breast. The ends of the netting tightly tie a thread in the site of the first ligation of the tail.
3. Tab on braids with curved loops of the squares. The braids with small loops tab one single square, braided, curved in a large loop, tab chain of 3 squares.
4. Secure the braids with loops on the tail of the bird. Large loop located in the middle of the tail, two small loops on the right and left of it. Loop tightly tie the thread in place of the second ligation of the tail.
5. The last left braid "herringbone" gently wrap bandaging of the tail, completely covering them. The ends of the netting tie up with a thread in the lower part of the body of the bird.
6. Crest birds adorn the sides of two squares measuring 3x3 cm Spout make from a square of size 1x1 cm, on the breast, place one above the other squares of size 2x2 cm squares pin the netting on the tongue part of the frame has been lightly lubricate it with white glue.
You can come up with your decor birds using the other weave by changing the decorative elements. Thread for hanging cable so that the bird could float in the air.
Bird on legs (size 22x25x16 cm). 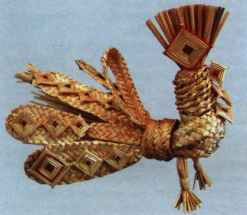
Materials:
55 Solomin uncircumcised one end of the kolentsi from the middle part of the stem with a diameter of 2.5—3 mm and a length of 38-40 cm each for the body;
2 bunches of straw for the feet of 35 pieces in each of the upper part of the stem, the length of one straw not less than 38-40 cm, diameter 2.5—3 mm;
for decoration:
60 long Solomin from the upper part of the stem with a diameter of 1.5—2 mm, for the manufacture of squares and narrow networks;
42 long straw from the top of the stem with a diameter of 3-3,5 mm wide networks;
2 sticks of diameter 2.5—3 mm and a length of 12 cm for the manufacture of chains of rhombuses;
22 sticks with a diameter of 2.5—3 mm and a length of 6 cm for production of single frames of rhombuses and small diagonals of rhombuses chains;
20 cm of red ribbon with a width of 1 cm for the decoration of the middle squares.
-1m red thread with a thickness of 1,5—2 mm;
scissors, PVA glue, thread, cotton or silk, impregnated with a solution of PVA glue and manganese for ligation of items, a rolling pin for rolling of the braids.
Equipment:
twisted braid of 8 Solomin for braiding the bird's head;
woven on the frame squares with inserts of fabric;
flat braid "herringbone" of the 7 Solomin .
Manufacturer torso of the bird.
1. Manufacturer torso standing birds let's start with the head. Take a bunch of straws 55, align the ends of all straws on the edge of the uncircumcised kolentsi and tightly tie the bundle with thread, stepping back from the edge Solomin 5-6 cm the Ends of straws must fan out. Top short bundle of straws with kolentsi will be the crest on the bird's head (figure 5.74 a).
Next, repeat steps 2 through 4 from the previous example.
5. For the manufacture of the right leg of a bird take one beam out of 35 Solomin. Align all the thin ends at one edge. Put the straw of the beam, giving it a flat shape, on the back of the bird perpendicular to the torso. The aligned ends of the straws are to the right and are approximately 10 cm in the Second part of the beam tightly Obratite breast birds in a clockwise direction and place the straw to the tail (figure 5.74 g). The speakers of the straw will be recorded. Swirling the straw hold together with the bird's tail.
6. For the manufacture of the left foot of the bird, take a second beam from 35 Solomin. Align all the subtle tips. Put the straw of the beam, giving it a flat shape, on the back of the bird perpendicular to the torso. The aligned ends of straws are left and are approximately 10 cm in the Second part of the beam tightly Obratite breast bird counterclockwise and place the straw to the tail (figure 5.74 a).
7. Tie the bird's tail is immediately behind the bend of the torso. The second ligation of the tail make the distance of 2-2,5 cm from the first (рисунок5.74 e). All straw in the bird's tail trim.
8. Located on the sides of birds, bundles of straws will be the basis for the feet — tie them tightly at the trunk and fold vertically down (figure 5.75 a). 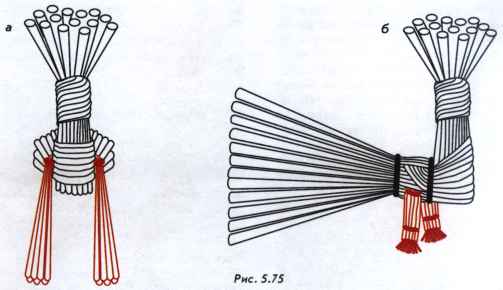
9. Start from the first dressings 3.5—4 cm and make a second ligation beam. Keep dressings on the right and left legs of the bird were on the same level (figure 5.75 b).
10. Third and last, the dressing of the feet keep расстоянии1 cm from the second (figure 5.75 b). Trim the straw legs for one length. Bird is leaning on the legs and tail to adjust its correct position on the plane is possible, cutting the loose ends of straws on his feet.
Manufacturer of decor.
1. From part trained to work Solomin with a diameter of 1.5—2 mm 7 weave flat braided herringbone 7 straws of length 30 cm each. Braids laminate and trim the ends nastavljenih and ending Solomin.
2. Associate of 4 woven round loops for the bird's tail (the length of one loop is 10 cm). Hinges a little vignette. The extra part of the netting cut off. The remaining 3 weave — free.
3. Of prepared to work Solomin diameter 3.5—4 mm 5 flat weave braided herringbone 7 Solomin length of 30-32 cm. Braids laminate and trim the ends nastavljenih and ending Solomin.
4. Make from 2 nettings round a loop length of 14 cm 3 braided Flex tips length 15 cm and make a small loop with a length of 6 cm, tying the ends to the weaving.
5. Weave 3 single square of size 3x3 cm for the decoration of tufted birds and feathers. Crossing frogs do with a small displacement, so that the left piece of the frame, which can then be fixed in the netting. During the weaving of the squares in the middle put a piece of red ribbon, 2 squares on the perimeter adorn the red thread.
6. Weave 4 single square of size 2x2 cm to decorate the breast of the bird and feathers and 1 square of size 1x1 cm for the beak. In all the squares make a paste from red ribbon. Excess parts of the frames remove, leaving 1 area to secure items.
7. Weave the 2 chains of squares. In each chain, place the squares in the following sizes: 3x3 cm, 2x2 cm and 1x1 cm, all the squares take with inserts from the tape. After the smallest diamond you should stay a small piece (~ 1 cm) long frame for fastening elements on the bird. The unnecessary parts of the frame remove.
Decorating birds.
1. Fasten the 2 red strings at the bottom of twisted braids and lay them along the neighboring turns of the weave on the bird's head. The threads attach to the top of the head, tuck the ends between the straws.
2. Take 2 from left braided "herringbone". Apply it consistently in the middle part on the back of a bird, obvate criss cross breast, first one twist, then another. The ends are woven tightly tie a thread in the site of the first ligation of the tail.
3. Tab one wide braid with a small loop on the end of a single square of size 3x3 cm wide For the remainder of the braids with small loops tab one single square of size 2x2 cm, braids, curved in a large loop, tab chains of 3 squares.
4. Tie braids with sewn squares in place of the second ligation of the tail in the following sequence: in the middle of the tail braid with a small loop and a square 3x3 cm on the right and left of her braids with small loops and squares 2x2 cm, forth, right and left, rounded hinges of the woven chain squares.
5. Tie a loop of narrow woven "herringbone" to the tail of the bird, arranging them like a fan.
6. Latest braid "herringbone" gently wrap bandaging of the tail, completely covering them. The ends of the netting tie up with a thread in the lower part of the body of the bird.
7. Crest birds adorn the sides of two squares measuring 3x3 cm Spout make from a square of size 1x1 cm, on the breast, place one above the other squares of size 2x2 cm squares pin the netting on the tongue part of the frame, pre-greased with white glue.
Based on the examples of birds you can come up with their own versions, changing the dimensions of the elements and decor.
Bird on the basis of the composite frame (size 23x16x8 cm) (photo 106). 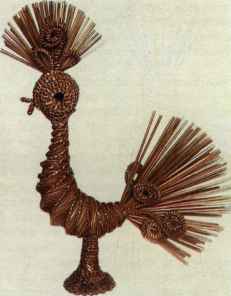
In the above examples described the traditional technology of birds based on bundles of straw. Belarusian masters in 1970-e years the developed technology of decorative frame sculpture. It has determined the development and the development of new ornamental design methods, helped to create a straw sculpture of various sizes. Previously the size was limited by the length of straws in the associated beam.
There are several technologies to perform frames. Every artist who works with sculpture, brings about more changes and additions to already known techniques. Below are the most common manufacturing techniques of frames.
Materials:
50-60 Solomin split from the middle and lower part of the stem with a length of 17-20 cm, each frame of the torso of a bird (for the manufacture of the frame can be used the straws are of low quality and cropping);
20 split Solomin from the middle part of the stem with a diameter of 3-4 mm and a length of 17-18 cm for the frame legs of the stand;
90 Solomin from the upper part of the stem with a diameter 1-1,5 mm and a length of 12 cm for the tail of a bird;
30 Solomin from the upper part of the stem diameter 1.3—1.5 mm for braiding frame body;
55 of straws from the top of the stem diameter 0.8—1.2 mm and a length of 7 cm for crest poultry;
20 Solomin from the upper part of the stem with a diameter of 1.5 mm and a length of not less than 25 cm for the decorative elements of the tail and the head;
16 Solomin from the middle part of the stem with a diameter of 2 mm and a length of at least 30 cm to perform the tangles of heads and legs;
40 strips split straws with a width of 2 mm and a length of 25-30 cm to perform the delicate "catfish" on the stand and the neck;
1 m cotton fabric or bandage with a width of 1.5—2 cm for the taping of the frame;
soft wire diameter 2.5— 3 mm and a length of 16 cm for the base of the frame body;
a piece of cardboard 5x5 cm for otkleivanie stand;
thread, PVA glue, pins, needle.
Equipment:
twisted braid of 6 Solomin;
braid "chain" of 2 Solomin;
flat braid "catfish" with an openwork edge.
The manufacture of the frame with birds.
1. Take the wire and gently bend it, giving the line of the torso of a bird (figure 5.76 a). Around the wire lay splintered sticks for the frame layers, forming the basis of the body. Each layer tightly fix the thread. 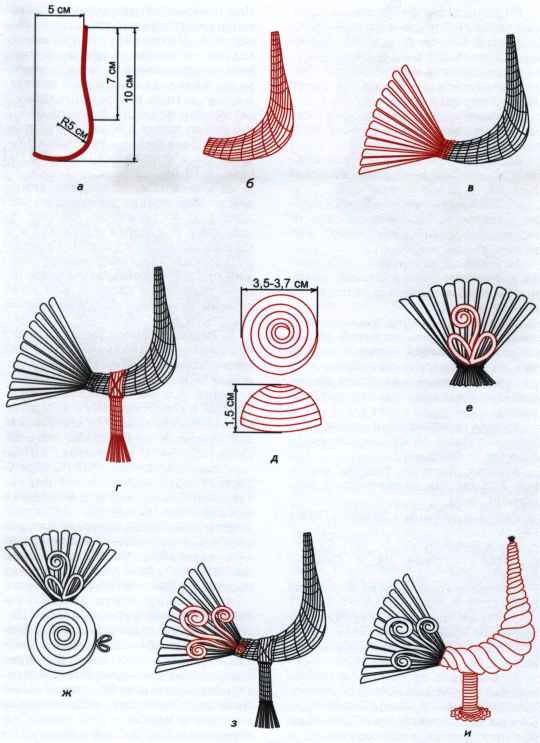
For the strength of the straw frame, you can sew the thread comes in a needle. Start building the frame of the torso from long Solomin, gradually moving to short, making the thickening of the frame. The frame should have a teardrop shape: the smallest diameter (0.7— 0.8 cm) in the neck of a bird, the largest in the breast (3— 3.5 cm) and in the area of the tail (1.2—1.5 cm) (figure 5.76 b).
2. The straw designed for the bird's tail, spread evenly around the perimeter of the frame body with an overlap of 2.5—3 cm and tie tightly with string. Twist ties make a, the ends of straws from the tail are integrated with the body frame. The tail needs to go in large numbers (figure 5.76).
3. Take a bundle of split straws designed for leg support. Fold it in half, through the frame body at a distance of 2.5 cm from the bird's tail. The ends of the beam connect and tie tightly around the torso of a bird. Additionally, tape bend the beam to the body with thread, laying them crosswise. The frame legs of the stand and the frame body should be connected still. Straw foot-stand wind thread on 3 cm long and make another tight bandaging. The free ends of straws for Express registration stand (figure 5.76 g).
4. The bird's body together with the stand and spread with PVA glue and wrap a strip of cloth or bandage (to start the winding of the better from the bottom of bandaging of legs). Wrapping hides the irregularities of the frame and locks the position of the legs of the stand and the torso. The tissue wrapping may cover the frame in 1-2 layers. Mix water, PVA glue and top again programsuite fabric. Put the frame to dry.
Execution of head and decorative elements.
1. Weave 8 long straws with a diameter of 2 mm 4 braided "chain" of 2 Solomin.
2. Stitch from "chains" 2 of the hemisphere, which will be the halves of the head of a bird. For one hemisphere, you will need the 2 "chains." Stitching "chain", lay them in a spiral. In the middle leave a small hole with a diameter of 5-6 mm — eye birds. In the coils of the chain connect the flat faces to avoid twisting. Stitches connecting the coils, apply often at a distance of 2-3 mm from the inner side of a shield, there's also hemming the ends of the weaving. The outer diameter of the bird's head is 3.5—3.7 cm. Twin billet head must have the same dimensions (figure 5.76 a).
3. Weave 10 "chain" with a length of 20 cm from a thin straw with a diameter of 1.5 mm for the decorative elements of the tail and head.
4. Run of 6 "chains" swirls with a length of 5 cm and a diameter of 2.5 cm, with 2 "chains" curls length 6-6,5 cm and a diameter of 2.5 cm. Each curl has 3 spiral curls. Form curls and secure with pins and thread hem so they don't flatten. After drying, the pins remove. Of the remaining "chains" make 4 round loop with a length of 3 cm.
5. Tie the strips to crest birds in a tight bundle, the ligation of the run on distance of 1-1,5 cm from the edge of the straws Spread the straw in the beam fan. From both sides of the crest tie decorations from one curl length of 5 cm and two small loops (figure 5.76).
6. Prepare 2 small loops with a length of 1 cm from a braided "chain" for the bird's beak.
7. Connect 2 of the billet to the bird's head using safety pins.
Between the blanks, place the crest of a bird and eyes of the beak. All parts are tight stitch, stitches are put in the hollows of the weave. Instead of thread you can use the line below to hide the stitches. In the lower part of the head (in front of crest) leave unsewn hole approx 1.5—2 cm At this point, the head will be attached to the torso (figure 5.76 g).
8. On both sides of the tail tie composition of two short and one long curl (figure 5.76 W).
The design of the legs and stand.
1. Left the loose ends of straws at the foot of the stand is wet and the laminate with a needle on a narrow strip of width 1.5—2 mm, starting from the lower ligation. Split, spread straw evenly in a circle, like a snowflake. Press it onto the horizontal surface of the press and allow to dry.
2. From a piece of cardboard cut out a circle with a diameter of 4 cm. Smear it on one side with white glue and stick the split straw feet on the cardboard. Install the frame of the bird on a horizontal surface, fix the foot-stand, pressed glued straw, and allow time to dry.
3. Procured from moistened strips of straw, a width of 2 mm weave about 25 cm flat wicker "catfish" with an openwork edge. From a long Solomin middle part of the stem with a diameter of 2 mm weave 3 long braids "chain".
4. Cut in a circle advocating a cardboard stand split ends Solomin. Oil the surface of the split straws glued on the base with PVA glue. Starting from the edge of the circle, put a braid "catfish" in a spiral, covering the entire surface of the circle stand. The coils apply a small overlap on each other and secured with pins through every 1-1. 3 cm. If necessary, lubricate under the coils of the adhesive. The excess of glue remove the speaker.
5. At the top of the legs, the torso, secure the network "chain". The surface of the leg spread with glue and wrap in a spiral pattern, the coils lay close to one another without gaps. The last 2-3 round put on a stand on top of the "catfish", causing the braids between the adhesive and fixing the position of the chain pins (figure 5.76).
The design of the torso.
1. At the base of the tail to the winding of the tie over the thin end around the perimeter of the body 6 long straws from the top of the stem with a diameter of 1.3—1.5 mm. Tied the ends of straws are directed from the tail to the side of the body. Appetite frame torso twisted braid of 6 Solomin. Braid should be tight-fitting frame, with no gap between turns. About a foot of the straw bend, hugging the leg tightly from both sides. After netting in the upper part of the neck tie the straw in a bun and short cut (figure 5.76).
2. Insert the top of the neck for the length of 1-1,5 cm in left unsewn hole on the prepared head of a bird. Fix the position of the head with pins and sew the head to the body of the bird.
3. Weave of split strips of straw, a width of 2 mm to about 6 cm wicker "catfish" with an openwork edge.
4. Cover the border of attachment of the head and body with glue and attach the "catfish" around the neck of a bird. The position of the braids until the glue dries secure with pins. The junction of the brim, place on the back of the bird.
Left dry job cut at the rounded lines of the straw tail and crest.
On the basis of the framework, you can develop all kinds of birds, changing their proportions and decoration. Instead of twisted braids torso can wrap Cotroceni loops or cut straws to change the design and shape of the crest, tail and legs of the stand, to introduce new decorative items: wings, beard, etc.
Select your language