


")
1. SLEEVE "KIMONO" FROM WAIST
Knitting sleeves is made together with the front and back. Take measurements and do the calculation on vyvazhivanie sleeves.
Measurements:
Sleeve length from the neck across the shoulder line to the wrist (make the measurement at the back of the 7th cervical vertebra);
back length (from the 7th cervical vertebra down to the waistline and from waist to hips);
the volume of the thighs;
sleeve width at the wrist;
circumference of the neck.
Build pattern:
Put the point A. From point A, a straight AR lay off the sleeve length.
From point A down-delayed length of back to waist and from waist to hips, put the point TN.
From point R delayed cut PC sleeve width at the wrist.
From point N lay off the right 1/4 of the hip measurement and set point O.
From the point T to the right lay off 1/4 of the waist measurement and set point O1.
The point O1 is connected to the point With a straight line.
From point A the right put off 1/4 of the circumference of the neck, put the point A1.
From point A down to postpone the notch depth-to-measure and set point A2.
Got a drawing of the front of the pattern.
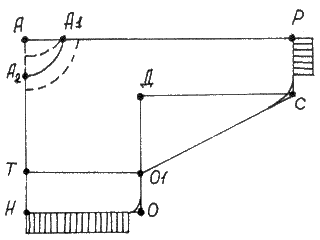
Figure 447. Construction drawing patterns with sleeves "kimono" from waist
The rear part is constructed similarly, sprout do. The line of sleeve "kimono" drawn from the point O1 to the point S.
Count the number of loops on the segment DS and the hinges for additions on the line "kimono" (cut О1С). Next, the calculated series on the interval О1Д. Knowing the rows and loops, we expect the frequency of additions through the ranks.
Begin knitting with gum. Linking the gum in style, go for knitting products from the thighs to the waist. In the first row, after vyvazhivanija gum, do an addition every 5 loops (promazyvanie additional loops between loops, purl rows - loop crossed).
From the point O1 go to "kimono". The addition can be done in groups of loops at the edge of the product. When he reached the line of DS, knit from point C to point R, the main pattern without additions.
ATTENTION! Working on the product, don't forget the neck and the germ (the configuration of the neck and sprout depends on style model). Calculation of Rostock and openings provided in the lesson above.
Extreme closing the loop on lines PA1 "string," not too tight. For the closure use a needle of larger size. The working needle is not changed. Attaching items to the pattern, ironed through a damp cloth (figure 448 A, B). Products with elastic bands and covers are not ironed.
Staple seam "needle forward" sleeve, from top to turn to the elastic cuff. Cuffs do any elastic, suitable to the style and pattern. Elastic gathers the cuffs and the shelves should be the same. After the elastic band, sew the sleeve along the line of the kimono.
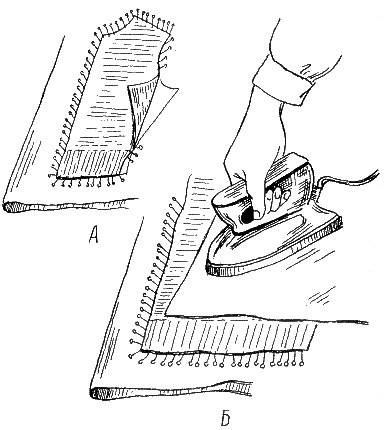
Figure 448. Iron parts
2. SLEEVE "KIMONO" FROM THE HIPS
Fit the same as a kimono from the waist line. The calculation of loops in the pattern. The addition produced by the groups of loops at the edge of the product.
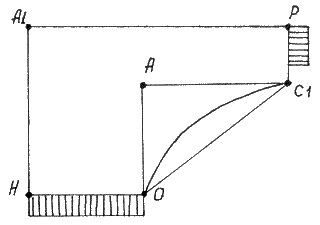
Figure 449. Construction drawing patterns with sleeves "kimono" from the hips
3. SLEEVE WITH SMALL COLLAR
Depending on the style the depth of the armhole and the top part of the sleeve can change. Their calculation is shown above.
Figure 450. Drawing front and back
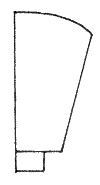
Figure 451. Drawing sleeves
4. SLEEVE WITHOUT CROWN
This sleeve is quite common in knitting. Line of the armhole on the shelves is missing. On the line of the top part of the sleeves is knitted straight. The calculation of the sleeves do the above calculation. Shelf smooth knit fabric from the elastic to the shoulder cut. The shoulder line is too smooth. The sleeves increase from the elastic to the shoulder produced by calculation.
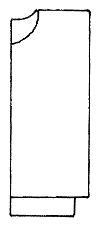
Figure 452. Drawing front and back
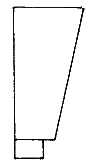
Figure 453. Drawing sleeves
5. SLEEVE WITH "RING"
Ornamental patterns along the sleeves and the shoulder strap, give beauty and aesthetics related models. Depending on the applied ornament and the model type change the width of the ring. Unlike the patterns of this model from the previous one consists in the pursuit. Epaulet is part of shelves and back of the product. The sleeve is calculated in the same way as the previous one.
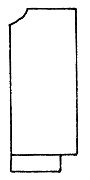
Figure 454. Drawing front and back
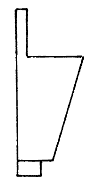
Figure 455. Drawing sleeves
6. USEFUL TIPS
Sleeve without line of crown is more common in modern models of children's clothing.
Sleeve Dolman convenient because it does not restrict movement. On this basis it is convenient to place the horses, or the insertion of any shape.