1.1. Promazyvanie two loops together.
(see lesson 2, "Pinning hinges").
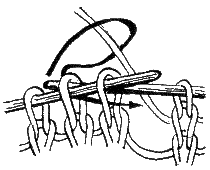
Figure 50. Promazyvanie two loops together.
1.2. Promazyvanie two loops together.
(see lesson 2, "Pinning hinges").
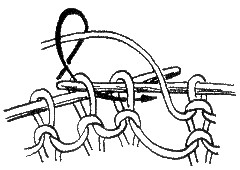
Figure 51. Promazyvanie two loops together.
1.3. Promazyvanie three loops along front and back
(see lesson 2, "Pinning hinges").
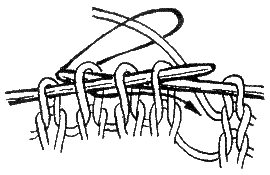
Figure 52. Promazyvanie three loops together.
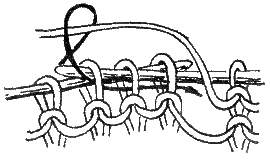
Figure 53. Promazyvanie three loops together.
2. THE DECREASE OF LOOPS ON THE EDGE OF THE PRODUCT
Used when vyvazhivanii sleeves "Raglan". With the decrease of loops in a triangle is used in two ways: gradual and rapid.
2.1. A gradual decrease
With the gradual decrease of the hinges it is necessary to strengthen the line of the bevel. On the face of each of a number of promazyvayut two loops together. Loop promazyvayut back. On the reverse side of the work to purl at the beginning and at the end of the row for 2 loops together. At the end of a number 2 stitches together - purl. Using this method, in each row decreases by 2 hinges.
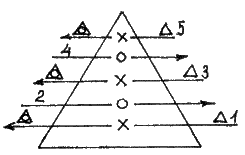
Figure 54. The decrease in each front row
2.2. Quick decrease
In order to decrease without a strong slant, through each series of loops diminish in the same manner as in the method described above.
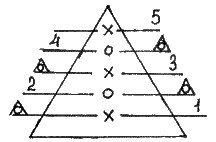
Figure 55. The decrease in the 2 stitches at the end of each front row
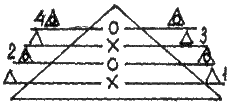
Figure 56. The decrease in the 2 stitches at the end of each of front and rear row
3. PROMAZYVANIE TWO LOOPS ALONG THE WAY PARECIDA
The method is used to remove loops. The first loop on the left needle is removed for front wall movement of the knitting needle from left to right not promazyvaya. Second, knit the front loop over the front wall, and then removed the noose, flicking through the second, picking up her left spoke. This decrease constitutes a slope from right to left.
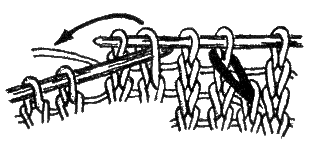
Figure 57. Promazyvanie 2 hinges together by way of peracid
4. PROMAZYVANIE TWO LOOPS TOGETHER AT THE FRONT WALL
To get the slope of the loops from left to right, you need to purl the two loops together at the front wall. Enter the right needle into the two loops from the second on the left needle and the front are finished.
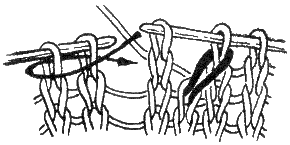
Figure 58. Promazyvanie 2 loops along the front wall
5. PROMAZYVANIE THREE LOOPS ALONG THE WAY PARECIDA
To purl 3 stitches together way of peracid should the 1st loop, not promazyvaya, to remove the top wall from the left needle to the right, and the next 2 loops, the 2nd and 3rd, together knit into the front of the front wall. Then with left needle pick up the first beveled loop and throw her over the 2nd. Thus diminish just 2 loops.
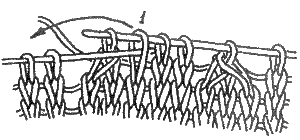
Figure 59. Promazyvanie 3 loops along the way parecida
6. THE ADDITION OF LOOPS
6.1. Pulling loops from the gap between the loops
When knitting items using the technique of adding invisible hinge in the middle vyvazhivanija fabric. For this there is a method of pulling the loop from the gap between the loops.
After removing edge loop, enter the right needle under the thread lying between the extreme and the first loop and grab the working thread, pulling a new loop. With this addition formed a small hole, but this method is not very popular.
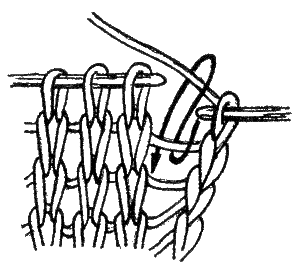
Figure 60. Pulling loops from the gap between the loops
6.2. Vyvazhivanie of the outer loop two
More convenient to add is a method of vyvazhivanija of the outer loop two. It could be used in middle of a cloth binding, and the end of the row (figures 60, 61).
After removing edge loop, enter the right needle under the thread lying between the extreme and the first loop and grab the working thread, pulling a new loop.
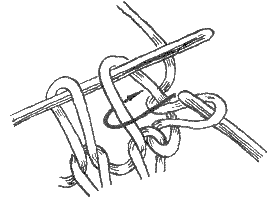
Figure 61. Vyvazhivanie of the last two loops in the beginning of the series
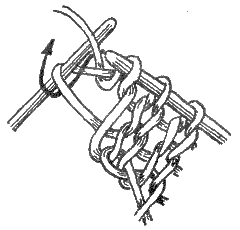
Figure 62. Vyvazhivanie of the last two loops at the end of the series
6.3. Air loop (see lesson 1, figures 23, 24).
To increase the number of loops often use air loop. The thread from the ball making the needle loop and tighten. So recruit all subsequent loops.
Used in the manufacture of shift kimono sleeves, pockets, buttonholes and finger holes in the mittens and gloves. To set the initial number to use the aerial loop is not recommended, as they are not strong.
6.4. The addition of the loop of the previous row
This method is applied to the extension leaf in the middle of the product. It is used for the more convex mating.
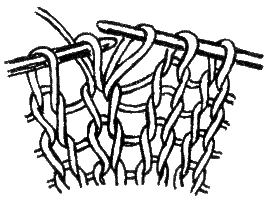
Figure 63. The addition of the loop of the previous row
7. USEFUL TIPS
Promazyvaya 2-3 loops along the way parecida, you should look in what direction, left or right, it is peracid. Error can lead to incorrect location of the loops in the figure.
In the process of knitting should always check the knitting books.


