


")
Gloves perform in a circle with five spokes, starting from the wrist. Their tight knit and crochet patterns, knitting socks with designs or colored stripes. Yarn consumption is approximately the same as for mittens: from 40 to 130g.
Familiarity with the technique of knitting gloves is better to start with a simple version, when they run hosiery knitting. For training associate left glove on a woman's hand.
Getting started, first of all remove the measurements:
circumference brush - 19 cm;
brush length from the wrist to the base of the thumb is 6 cm;
brush length from wrist to base of little finger - 9 cm;
brush length from the wrist to the base of the index finger 10 cm.
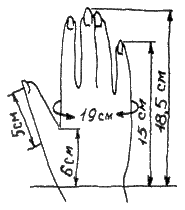
Figure 348. Taking measurements (length and circumference of the brush)
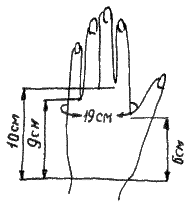
Figure 349. Taking measurements (length of palm to base of fingers)
Calculation
Tie on the spokes №2 hosiery knitting control sample and define on it the density of knitting, for example, 3.2 loops in 1 cm Now count the number of loops to get started: p. 3,2 x 19 cm (circumference of wrist) = 60.8 loop.
The result is rounded to the nearest whole number downwards (60 loops) and check whether it is divisible by 4 (number of spokes). In this example, each spoke has 15 loops. If the number is not divisible by 4 without a remainder, it must reduce to a multiple of 4.
Beginning knitting
Knit clockwise around the outside of the circle of gum 1x1 (2-9 cm).
Vyvazhivanie wedge for the thumb
On the left glove wedge features on the 4th pin, on the right side on the 3rd. Start it immediately after the gum or povezav a little basic pattern. Perform wedge by adding the loops.
First do the addition, linking loop on 4th needle: tie all the loops except the last, then do the yo, proverite the last loop of the front and again yo - on the 4th pin has increased by 2 hinges. Starting a new circle, stick yo finger, he slips from the needles. The next 3-4 round knit without additions.
The second addition do not dawasa last 3 loops, located on the 4th cog: before them and after them, throw in by nakida. On the spoke of a herd of more than 4 loops. All of the following additions follow every 3-4 circle, whenever not tavaziva an odd number of loops: 1-3-5, etc.
When the height of the wedge reaches the base of the thumb (6 cm), the addition of discontinue, on 4 the spoke tie the loops before the loops of the wedge hinge wedge peresnimite on 2 pins, and over these type of an air loop. There should be half of what it is on the same pin (it is better to gain an even number).
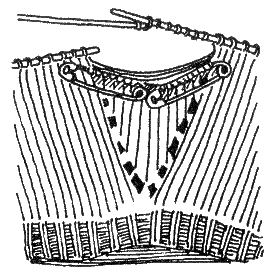
Figure 350. Loop wedge on the pin and a set of loops
Tie one round, and next start the decrease on the 4th needle: promazyvaya 2 loops along the front edges of the hole. Keep working, making the decrease through the series, while the 4th pin will not stay 15 loops, i.e., the initial number (figure 351).
Then tie the glove to the base of the little finger, and divide loop knitting fingers.
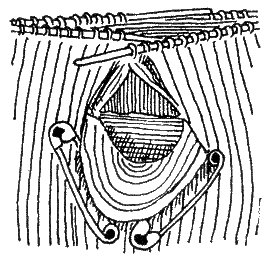
Figure 351.
The distribution of loops 4 fingers
The most simple method - the division of the hinges of the glove into 8 parts: 60 AP : 8 = 7 ( 4 loops left over).
For each finger - 2 parts: 1 for the top rugs, the other for the bottom (7 p. + 7 p = 14 p.). The remainder is distributed evenly, adding to the loops of the upper halves, 7 p. + 1 p. = 8 p. Now for each finger you have 15 loops. If the remainder is less than 4 units, it is added to the loops of the fingers starting with the index. Further, in the knitting process form between the toes of the jumper of the 4 loops. The result is applied to the diagram and knit, focusing on it (figure 352).
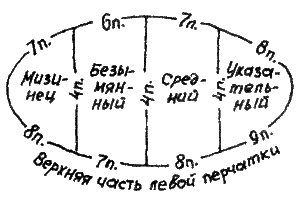
Figure 352. The dividing circuit loops
The hole for the little finger
Loop a finger is located partially on the 2nd, and partially 3rd needle (figure 353).
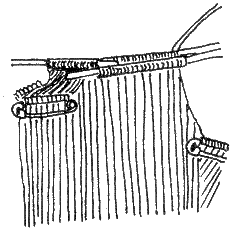
Figure 353. The location of the loops of the little finger
Tie the loops of the 2nd spoke to the hinges of the little finger and remove 8 nepovezane loops on the pin. On another safety pin put 7 loops with 3-spokes. After that throw on 2nd needle, 4 air loop and with it tie the remaining loop on the 3rd needle. Knitting was on a 3-spokes 4 - working. Tie 3-4 laps to the base of the index finger.
Knitting index finger
First knit the index finger (figure 354).
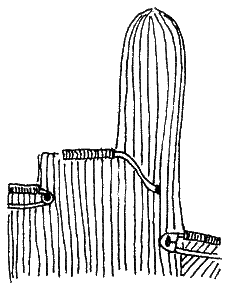
Figure 354. Knitted forefinger
It loops located on the 1st and the 4th pin is only 17 loops. After the formation of the bridge the number of loops is equal to 21 (17 p. + 4 p. = 21). Perform a finger on 3 needles (4-I - working), so the number of loops divided by 3 - to 7 stitches on each needle.
Provarite the first 9 stitches on 1st needle, and all loops that are on the rest of the spokes, except 8 last, turn on the auxiliary thread. The last 8 loops relating to the index finger, divide equally and put on 2 spokes. For being easy to work with loops 1st spokes divide into 2 parts: the first 7 loops put on a new needle, and the last 2 leave. Spoke with two hinges type 4 air provarite loops and 1 loop on the next needle - each needle was at 7 loops. Now tie in a circle to the middle of the nail and then do the decrease: promazyvaya a row, the last 2 loops on each needle knit together the front over the rear wall, until the spokes will not appear at 2 loops. Tear off the thread end pass the needle, remove the knitting needle, sew the loop and pull tight. The thread end hide in the inside out.
Middle finger
It is knit after the index (15 p. + 8 p. two jumpers = 23). On the spokes of the loop should be placed so: 8+8+7. Move the thread to the 1st needle 9 loops with the top half of the gloves and on the 2nd needle and 7 loops from the bottom. 3rd needle, type 4 loop jumper from the index finger and provarite 4 loops of the upper half. Enter the work of the 4-th spoke, proverite remaining on the needle (top half) 4 loops and add to them 4 air. 3 spokes were 23 loop (8+8+7). Follow finger the same way as the index.
Knitting the ring finger
Loop the thread loop on the knitting needle, starting with the top half: 7+7+3. Spokes, which are 3 loops, type of loops from the jumper of the middle finger and then knit in a circle in the same way as the other fingers.
The knitting of the little finger
Loop pins from the loop 2 knitting needles. 3rd needle dial 4 loops from the jumper ring finger - knitting was 19 loops. Distribute them as follows: 7+6+6. Then knit the thumb as everyone else.
Thumb
Do it like this: the hinge pins, turn on 2 spokes, and the 3rd dial from the upper edge of the hole the same number of loops, how much was the air. Now tie your finger in a circle to the middle of the nail, and then do the subtraction in the same way as in other cases.
2. USEFUL TIPS
If the picture is displaced in the upper and inner sides, then all odd rows knit as they are given in the diagrams. 2nd number read from right to left, but knit front purl, purl instead of the front