Mittens, socks, gloves are knitted on 5 needles. Knitting on 5 needles called tubular or circular. In circular knitting the front loop is always knit in front of the wall. On the 4 spokes are loops, and the 5th needle to knit. For knitting on 5 needles vivaselecta control sample. Counts the number of loops per 1 cm, the resulting number of loops multiplied by the length of the brush to the wrist. For example, in 1 cm 3 of the loop multiplied by 19 cm: 3x19=57 loops.
The resulting number of loops to be rounded to a multiple of 4, in the direction of decreasing (in this example, we get 56 loops), and then the obtained number is divided by 4 (spokes). For registration mittens can apply the patterns learned previously.
ATTENTION!
In the patterns where used "thread waste", "checkerboard," the odd-numbered rows are finished twice, i.e. like watching a loop.
In patterns that use elastic bands across the row purl and knit facial loops.
2. MITTENS
Begin knitting mittens with cuffs.
Recruited 56 of the loops and distribute on 4 needles by promazyvanija and the introduction of 1, 2, 3 and 4th needles, 14 stitches on each. Elastic knit 2x2. To the 1st pin will fun pin. It will guide the work. Loop the upper part of the mitten are on the 1st and 2nd needles. Loop the lower part of the mitten (the palm) on the 3rd and 4th needles. Knitting closable in a circle, connecting thread from the ball end from the remaining set of loops, tying them in a bundle. From this moment on, begin knitting in a circle clockwise. Elastic knit 2x2 6-9 cm and then 5 cm stocking viscous to the base of the thumb.
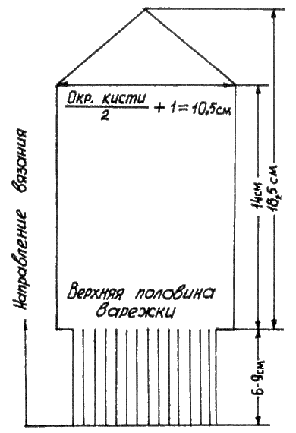
Figure 340. The construction of the upper part of the pattern
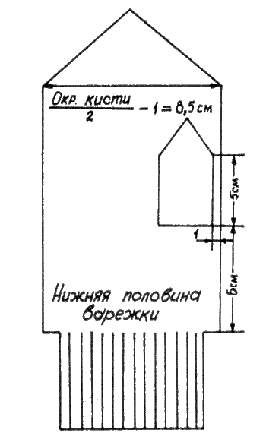
Figure 341. The construction of the lower part of the mitten pattern
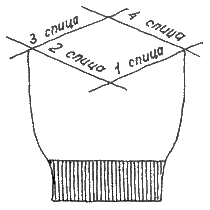
Figure 342. The distribution of the needles when knitting
For the right mitten hole formed on the 3rd needle, for the left - on the 4th. Below is a look at vyvazhivanii the right mitten.
The width of the opening for the finger is equal to 10 loops. For the hole for the 3rd pin are finished the first 2-3 loops facial, and then 10 loops finger holes, remove the pin, and on the 3rd dial needle 10 loops (figure 343).
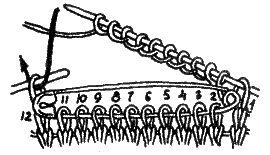
Figure 343. The thumb hole
Then dokazyvaet remaining on the left needle loop and move on to knitting stitches on the 4th needle and knit in a circle the front loops of the working yarn. Next are finished mitten to the end of the little finger.
There is another way of the hole for the thumb. Hole formation start on the 3rd needle. Are finished the first 2 loops, the remaining 10 loops are finished with a colored thread (figure 344).
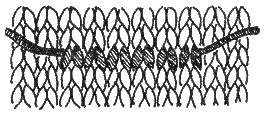
Figure 344. Color stroke
Returned knit loops of colored thread on the left needle and again are finished working thread.
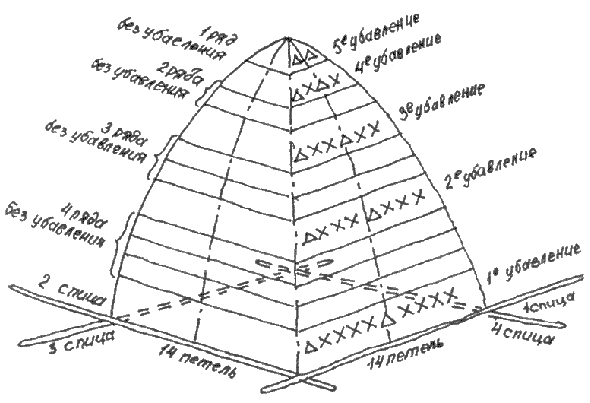
Figure 345. The decrease of the loops at the end of the mittens
There are several ways to remove loops:
1st method (spiral) - on each spoke are finished 2 loops together over the top of the wall. So diminish as long as each needle will remain at the 2 loops. Then the thread is torn off, devem a needle, strung the remaining loops on the needle, tighten and fasten on the wrong side.
2nd method (the decrease of loops on the edges of the palm) - this decrease the end of mitten forms the shape of a triangle. On the 1st and 3rd needles for the first 2 loops are finished along the front over the back wall. On the 2nd and 4th the last 2 loops along the front over the back wall. Do the decrease every row or across a number depending on the size of the gloves or finger length. When each spoke will be 2 loops, loops translate into 2 spokes and do the decrease until, until there are 2 loops. After that, the thread breaks, the loops extend one through the other and tighten. The end of the thread devem a needle and fasten from the inside.
3rd method (rounded decrease) - in this method, the 2 together are finished at the front behind the front or back wall in the middle and at the end of the canvas on each needle.
Knitting thumb
The 1st method. Remove the hinge pins and put on the needle, and from the edges formed by the set of loops, vivasyan new loops. The number of loops must be divisible by 3 (for 3 spokes are vyvazhivanie thumb, 4th working needle). Knit in a circle to the middle of the thumb nail, and then start to decrease. When the needles will remain 4 loops, collect them on a string and fastened on the reverse side.
The 2nd method. Gently pull the thread color of the stroke, open loop collect on 3 spokes. Then knit as described in the 1st method.
Left mitten knit similar to the right, with the exception of the thumb. (Vyvazhivanie his left thumb mittens see above in the section about the thumb hole). The finished mittens iron through a damp cloth. Cuff Ironing is not recommended
3. MITTENS WITH ORNAMENT
One pair of mittens requires 100 g of wool. Knit on five needles № 2,5.
Measure the circumference of the brush and add 1.5 cm. Calculate the number of loops and distribute them on four spokes. Prior to the formation of the thumb hole knit hosiery knitting exactly performing according to the scheme of ornament.
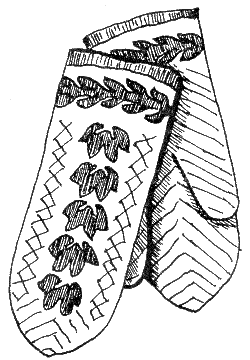
Figure 346. Mittens with ornament
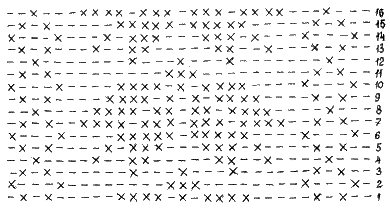
Figure 347. The pattern for the mittens
ATTENTION! Please note that when knitting in a circle the front loop knitted for the front wall.
Loops 1st spokes pin mark. For the right hand the thumb hole form on the 3rd pin, and to the left - on the 4-th (the account of the lead spokes clockwise). For this provarite on the 3rd bar 1-th loop of the main thread and the following 10 additional loops and return them to the 3rd needle; now these loops provarite the main thread. Next knit in a circle until the end of the nail of the little finger, then proceed to decrease the loops in the following way. In each row provarite at the beginning of the row on 1st and 3rd needles 2 stitches together back, and in the end of the row on the 2nd and 4th needles - the last 2 loops along the front wall, the last loop mittens secure. Now otplatit secondary thread, slip the open loops on three needles and knit the thumb the desired height.
4. USEFUL TIPS
In circular knitting it is not recommended to knit the inside of the circle.
When you run of cylindrical products you can use pictures flat knitting. The diagram is read from right to left, perform the odd-numbered rows exactly according to the scheme, and even changing the loop: to perform the front purl, and purl - facial loops.


