For gloves use a thin wool yarn, wool or cotton thread. For a pair of gloves, you need 50-75 g of yarn (figure 355).
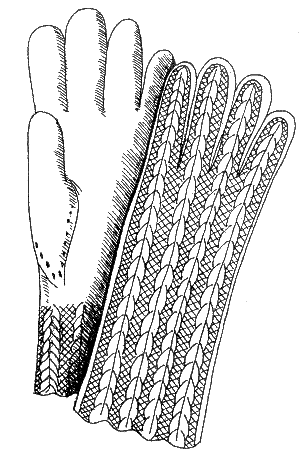
Figure 355. Fishnet gloves
Gloves should fit snugly to the hand. So first take measurements of the wrist. Yarn, knit the sample and lightly steamed. Then determine the number of loops in 1 cm and multiplying it by the measure of the wrist. Get the number of loops gain on 4 spokes.
The sequence of the knitting of the gloves is as follows: start with the eraser. Followed by a set of wedge for the thumb. You then knit the hand: the decrease and video part. Then form the fingers, and at the end of the thumb. Eraser knit gloves with a length of 6-7 cm, or approximately the same number of rows, how many loops on the 2-3 spokes. Eraser can perform a rubber band, displaced loops or open knit and colorful patterns.
For example, should get to 64 loops. Each spoke for 16 loops, which promazyvayut the pattern (figure 356).
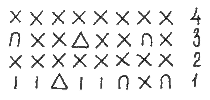
Figure 356. The scheme of the eraser
Because the gloves should cover the hands, and thumb palm bulkier compared to the wrist before the thumb form a wedge.
When the eraser is connected, the upper part of the glove continue open knit, while the bottom facial surface. After the eraser promazyvayut so many rows, how many stitches on half of the spokes. Then proceed to set the wedge. For the right glove thumb form on 3rd needle, for the left - on the 2nd pin counting from the beginning of the connection circle. Recruitment form: on the right glove the first 3 stitches on the 3rd needle promazyvayut front loops of next 5 loops - purl, the rest of the loop - front. In the next row the first 3 loops facial, 1 purl, 1 front, 1 yo, 1 front, 1 yo, 1 front, 1 purl. The rest of the loop - front. After each set of set of 2-3 rows of face loops (figure 357).
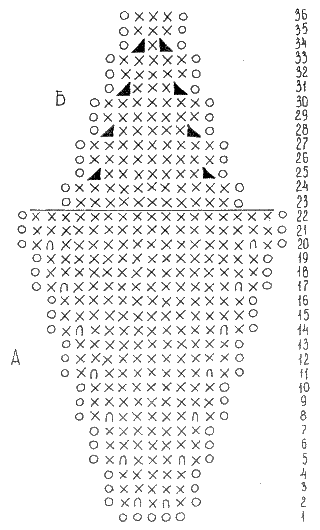
Figure 357. A diagram of the wedge for the thumb
The reverse loops at the edges of the set to perform the finger. The number of rows of the set of wedge should be equal to half the number of stitches on a needle or be slightly smaller (7 this time). The total number of 14 loops. After the last set promazyvayut 2-3 rows facial hinge. Set for right glove form after 3 front stitches on the 3rd needle, and to the left glove at the end of the spokes before the final three loops.
Then proceed to the definition of the thumb. Dialed loop + 1 loop, which is located between sets of the first series, take off on an extra needle, i.e. remove 15 loops. Spoke to re-gain 3/4 shot of the loops, as the volume of palms this place less. Set of doing a single thread, forming a loop.
Then knit the palm. The volume of the palm is equal to the volume of the wrist, so the glove better fit, knitting should be abated. The decrease continues the pattern of a wedge, while the spokes are not restored to the original number of stitches (64 loops).
After a set of new loops 2 rows promazyvayut facial loops without subtraction. In the 3rd row start to decrease: after the inside loops of next 2 loops provyazat with removal (figure 358).
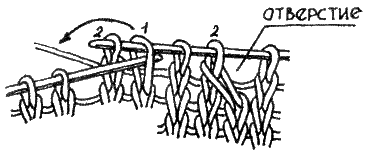
Figure 358. The two loops together
The last two loops before the reverse loop provyazat along the front. Repeat the decrease every 2 rows (figure 357).
Subtract as long as between the reverse loops remain a 3-4 front loop, i.e., while the spokes are not restored to the original number of loops. After subtraction promazyvayut is the number of rows that is equal to 3/4 the number of stitches on the needle, ie 11-12 ranks.
Palm usually knit to the little finger and leave there thread. Then all the loops distributed on 2 of the spokes equally. To knitting from all sides encircled the fingers, between the gain loop (figure 359).
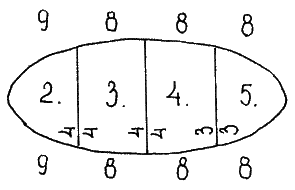
Figure 359. The scheme of distribution loops
Between the little finger (5) and ring (4th) finger to form 3 new loops and pick up 3 loops - 6 loops together. Between the ring (4) and middle (3) finger 4 to form new loops and gain loops 4 - 8 together. Between the middle (3) and index (2) fingers makes 4 new loops and gain loops 4 - 8 loops together. In sum: 6+8+8=22 loops. On each needle loop is now 32. In total, all 4 fingers should be 33 (one loop selected) + 32 + 22 = 87 loops.
It should be noted that the volume of the fingers is uneven. It is accepted that when knitting gloves, made of yarn of medium thickness ring finger on 3 loops is larger than the little finger, the middle one is for 5 loops more pinky. We could sum up get 11 loops.
Of the required number of loops take these 11 loops (87-11=76 loops). The remaining number is divided into 4 parts and count the number of stitches for the little finger: 76:4=19. So, Littlefinger needs 19 loops for the ring - 22 loop, mid - loop 24, index - 22 loop. For pinkie - 19 loops, 3 of them recruited between the little finger and ring finger, the other 16, take off the spokes (figure 357).
The fingers are knitted on 4 needles. First vymazat little finger, it lies below the other fingers. Promazyvayut so many rows, how many stitches on 2 needles. In this case, 32 rows. Then binding finger lower, promazyvaya at the end of each spoke 2 loops along the front. Lower, while the spokes remained for 2 loops. Then the thread is cut off, threaded through the remaining loops on the wrong side fix.
Pick up 3 loops of the chain, which was formed after the addition between the pinky and ring fingers, and promazyvayut across the glove 2 series - rest of the fingers are located slightly above the finger.
For the ring finger loop 22 is required. 3 of them recruited from the gap between the little finger and ring finger, 4 again form between the ring and middle fingers, so the spokes should take a 22-7=15 loops. One of the spokes take the 7 loops, on the other 8 (figure 357). For the ring finger promazyvayut the same series, as was the little finger plus the 5 series. Subtract the same way as pinkie.
For the middle finger is required 24 stitches. Of the gaps formed by 4 loops - 8 loops together. With spokes take a 24-8=16 loops. Each of the spokes take 8 loops. The number of rows of the middle finger 8 more than in the little finger. Subtract the same as the previous finger.
For the forefinger 22 of the loop. Of period gain 4 loops, with spokes 22-4=18 loops. So, each of the spokes take 9 loops. The number of loops of the index finger on the 5th more than the little finger.
Thumb take all the loops with extra needles and loops of chain set. (In the example 11 loops.) On the sides of the thumb was not formed holes, the spokes are gaining 1-2 broach that promazyvayut crossed. Thumb loops for 6 more of the little finger, i.e. promazyvayut 25 loops. Extra loops lower. Knit one row without subtraction. In the second row on the sides of the lower loop, provyazat 2 loops along the front. 3rd row without subtraction. In the 4th again subtract from the sides of the loop. When it reached the required number of loops, promazyvayut without subtraction of the same number of rows as in the little finger. Subtract the same way as the other fingers.
2. USEFUL TIPS
Loop when knitting is more convenient to remove the safety pin and not on the additional needle.
Knitting on the inside of the circle is inconvenient and time consuming.


