")
There are a few rules when embroidering ribbons:
- the stitch length should always do more of the width of the tape, as it will not straighten out and not get the desired figure;
- stitches can not be tightened, otherwise the pattern will not bulk;
- the tape when the need to maintain a free hand that she twirled and confused;
- stitch that did not work, you can always close the top with another stitch.
Below you will learn the basic types of stitches used when embroidering with silk ribbons.
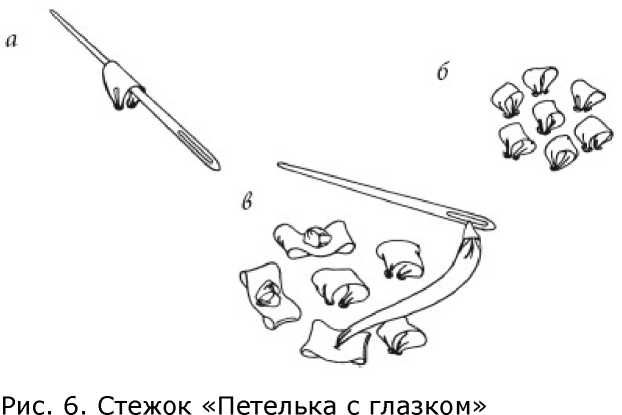
STITCH "POLUMETALLY WITH PRICIPLE"
The needle with the ribbon should pull there and stretch to the left and up, make a small loop. Then perform the puncture slightly to the right of the first, holding the loop with your left hand.
This seam can be carried out both horizontally and vertically. They often sheathe the edge. To run it you can use tape width from 0.2 to 0.8 cm
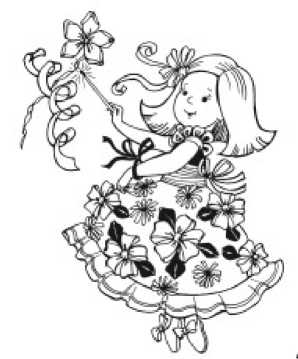
Bring the needle and ribbon on the front side in the center of polumetally (Fig. 2A). Polypetala to fix small priciple, throwing the ribbon through the eyelet (Fig. 2B). Then bring the needle on the front side to the right and upward to perform the second stitch (Fig. 2B).
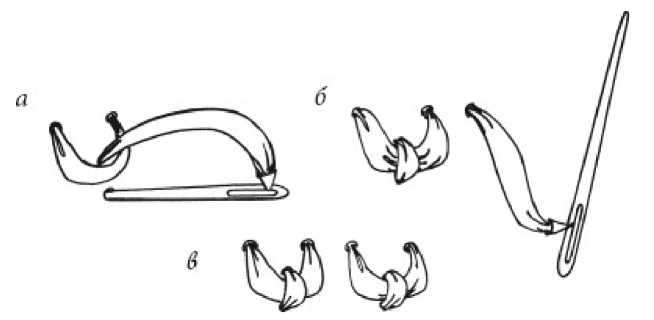
Fig. 2. Stitch "Polumetally with priciple"
STITCH "LOOPS IN A CIRCLE"
These stitches embroider many different flowers. Pull the needle and ribbon on the front side and to make the puncture very near the place of exit of the tape. Stretching her on the wrong side. In the formed loop to insert a peg or pencil (Fig. 3A). Then pull the needle and ribbon on the front side near the first eyelet. The first loop to secure the pin to the second insert a peg or pencil. To make the puncture on the underside near the site of release (Fig. 3b). In the same way to fulfill all the loops in a circle (Fig. 3b).
The middle you can arrange a bead or French knot.
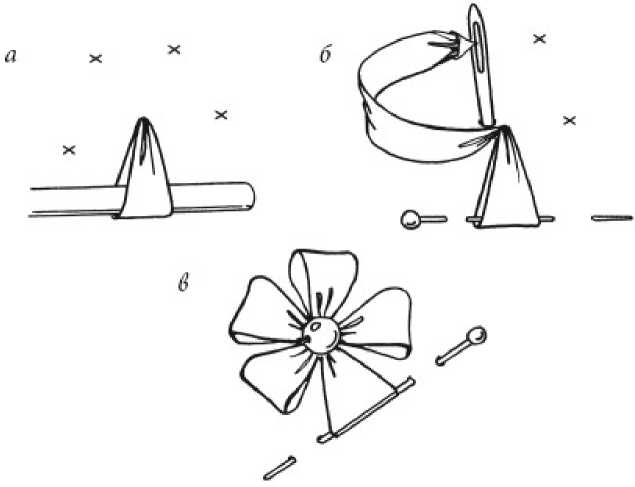
Fig. 3. Stitch "Loops in a circle"
STITCH THE "LOOP WITH PRICIPAL"
The needle with tape pull on the front side and to make the puncture on the wrong side. A needle to withdraw there is a slightly higher output tape and get it over the needle (Fig. 4A). Make a loop and secure it a little priciple (Fig. 4B). Loop with pricipal (Fig. 4B).
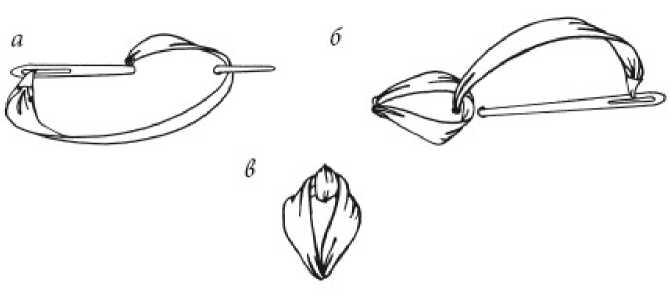
Fig. 4. Stitch the "Loop with pricipal"
Stitch the "Loop with pricipal" is a variation of chain stitch and is applied only when embroidering ribbons. This seam can arrange leaves, flower petals.
The tape with the needle display on the front side. To do the loop counter-clockwise and press it against a finger of the left hand (Fig. 5A). To make the puncture needle on the wrong side just to the left of the exit of the tape and bring in the center of the loop (Fig. 5B). Tighten the ribbon and make a small prakrama (Fig. 5B).

Fig. 5. Stitch is the "Twisted loop"
STITCH THE "LOOP BOXES"
These stitches fill the base of embroidery, embroider flowers. The needle with the ribbon should be displayed on the front side and to make the puncture on the wrong side of very close to the place of exit of the tape.
This seam it is possible to do embroidery on bed linen and underwear, clothing. The seam is very sturdy and is attached to the underlying tissue additional stitches.
To form a loop and spread with a needle (Fig. 6A). To run a few more loops on the same technology (Fig. 6b). Then insert the needle into the ribbon of a different color and put it on the front
side in the center of the loops. To perform a "French knot" by pushing a loop with the thumb of the left hand (Fig. 6b).
Similarly, to make eyes at other eyes. On a narrow strip of "French knots", you can thread floss.
STITCH "POLUMETALLY WITH PAKRACANI ZIGZAG"
On the front side to perform polypetala with priciple. Pull the needle and ribbon on the front side to the right and slightly below the first polumetally and make a second polymetalic with priciple (Fig. 7a). Next loop to run to the left of the previous one. The fourth on the right. So make polumetally the right and to the left alternately (Fig. 7b).
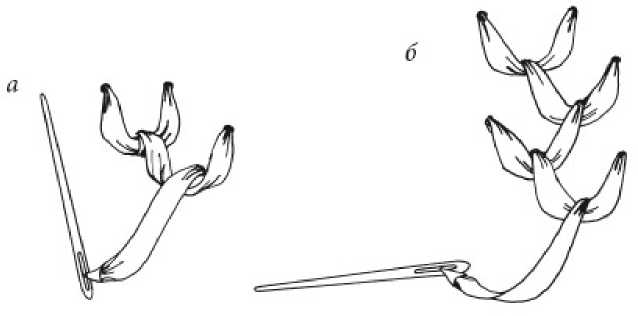
Fig. 7. Stitch "Polumetally with pakracani zigzag"
This seam is used in various types of embroidery. Bring the needle and ribbon on the front side and to make the puncture on the wrong side at the exit point of the tape. Then connect the needle with tape on the stitch length on the front side inside the resulting loops (Fig. 8A). Then follow the rest of the loops are exactly the same as the first. You should get a chain of loops (Fig. 8b).
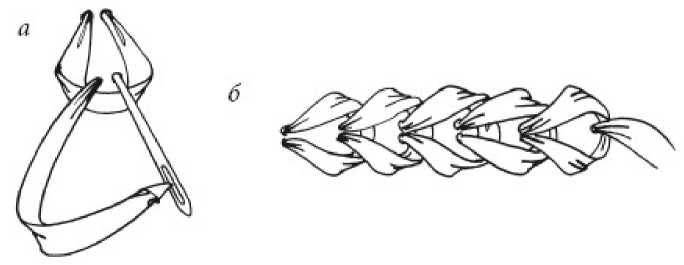
Fig. 8. Chain stitch
STALK STITCH
Is one of the basic stitches in embroidery. A needle with a ribbon to pull on the front side and make a stitch (Fig. 9a). Then carefully pull the needle with the ribbon on the wrong side, holding the tape with the other hand. To do on the front side of a puncture in the middle of the stitch, and then perform a second stitch in the same way as the first (Fig. 9b). Tape during the implementation of the stitches should be straightened and straight, and the needle needs a little tilt. In this case, the seam work is very voluminous (Fig. 9b).
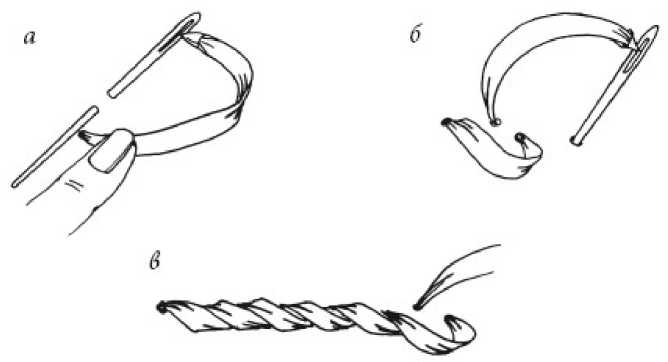
Fig. 9. Stalk stitch
Stalked seam can bind the contours of the motif, to create a deck, as a basis for other stitches. In addition, it can be used to create stems and various curls.
STRAIGHT STITCH
This is one of the most common and versatile stitches. It is used when embroidering the petals, leaves and stems; used in sewing. A needle with a ribbon is required to pull on the front side. Then skip the ribbon with the needle on the wrong side, departing the desired length and hold the left hand tape, so that it is not entangled (Fig. 10). You need to fill in this stitch the entire pattern.
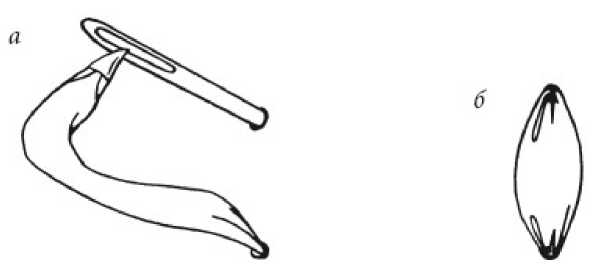
Fig. 10. Straight stitch
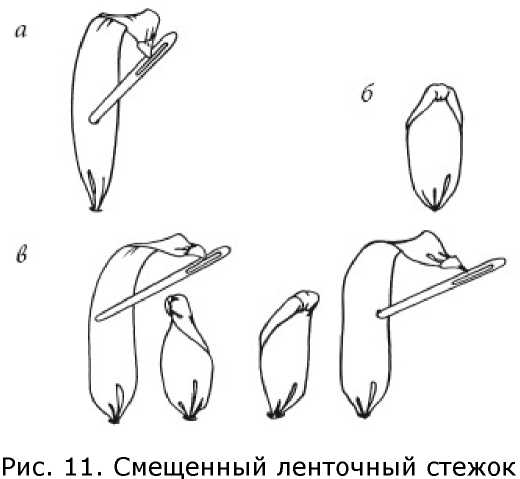
The needle with the ribbon should display on the front side. His left hand straightened to press the tape to the fabric.
Stepping back to the correct length, it should be pricked with a needle tape and the fabric and stretching the tape on the wrong side (Fig. 11a). This is not too much to tighten the tape, otherwise the stitch will turn out ugly (Fig. 11b).
Puncture can be offset left or right. The stitch will change slightly (Fig. 11b).
 ELONGATED TWISTED STITCH
This stitch is usually performed by the stems. A needle with a ribbon to pull on the front side. The tape to twist several times and pull to wrong side (Fig. 12A). Stitch tightly (Fig. 12B).
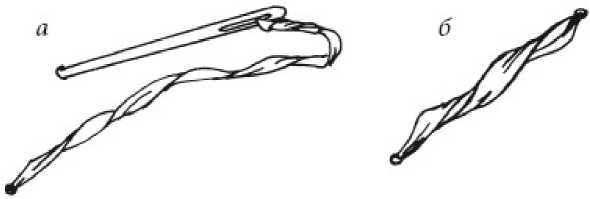
Fig. 12. Elongated twisted stitch
TWISTED STRAIGHT STITCH
Pull out the tape on the front side and make a straight stitch. Then bring the needle and ribbon in place of the first puncture and hold the needle top to bottom under the straight stitch. The fabric is not to capture. Pull the tape until, until it is completely wrapped stitch (Fig. 13A). Then the needle again passes under a straight stitch from the top down and pull the tape. So to wrap ribbon all the stitch (Fig. 13B). The needle with tape to bring to wrong side and fasten the tape. Twisted straight stitch is ready (Fig. 13C). You can also twist several stitches. For this we need to perform a series of straight stitches. Then return to the beginning of the seam and wrap each stitch ribbon, by entering the needle under the stitches from the top down (Fig. 13 g).
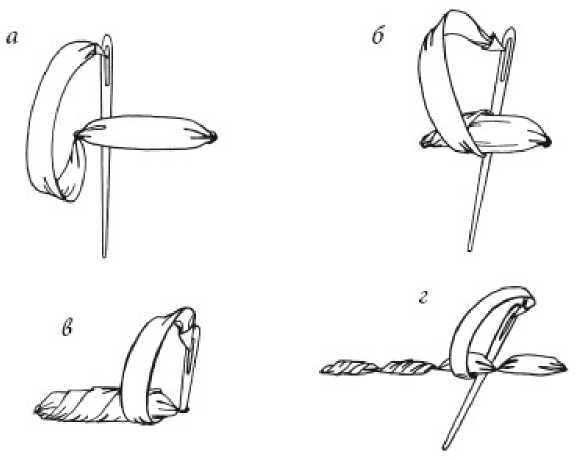
Fig. 13. Twisted straight stitches
BASTING ZIGZAG
With this seam allows us to do a floral arrangement by adding stems and leaves. You should cut the tape to the necessary length and draw on it with tailor's chalk or pencil zigzag. Thread floss the same colour to carry the stitch "Forward a needle" on the planned line (Fig. 14a). Pull the string and pull the tape. Get a corrugated strip (Fig. 14b). I folded the short side of the ribbon and sew them into the ring. Then sew the resulting flower on the base. The middle to make beads or French knots (Fig. 14V).
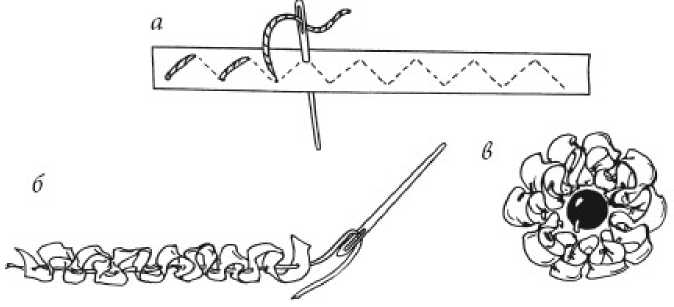
Fig. 14. Basting zigzag
BASTING, STRAPPED ON CENTER
This seam you can run into little roses or make a beautiful frame. Thread floss the same colour as the tape, you need to lay stitch "Forward a needle" in the middle of the tape along the entire length (Fig. 15A). Then gather the ribbon pleats by pulling the thread, and sew the short sides, forming a circle (Fig. 15B). Ready to sew the rosettes to the base. In the center to make a French knot or sew the bead. Rose can be made from two strips of different widths. For this narrow band it is necessary to impose broad so as to coincide one edge (Fig. 15V).
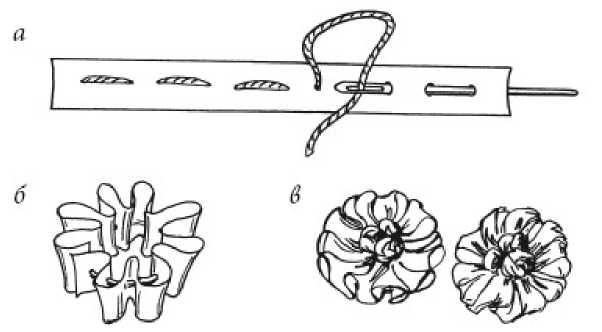
Fig. 15. Basting, strapped on center
This stitch can be performed on tissue. For this, a needle with a ribbon pull on the front side in the marked place and make the outline. Then apply one edge of the tape on the other and pull it on a string. Get folded flower.
STITCH "FRENCH KNOT"
French knots make the middle of flowers or fill an empty space in the motif. The needle with the ribbon to pull on the front side.
Pull the tape with left hand and Previti her needle two or three times so that the coils do not overlap each other (Fig. 16A). Then stick the needle into the fabric very close to the site of the first puncture and pull on the wrong side, all the while holding the tape, so as not to form nodules (Fig. 16B). Much tape to pull the impossible, otherwise the whole stitch will not work. Each knot should be fixed separately (Fig. 16B).
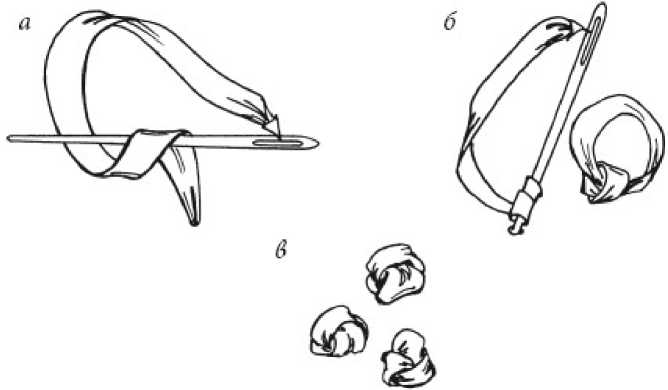
Fig. 16. Stitch "French knot"
You can also use a French knot to make the pistil and stamens. For this it is necessary to pull on the front side of the needle with the ribbon, twist it. Then entwine the tip of the needle with tape as if you were doing the French knot, and make the puncture on the wrong side, carefully smoothing the tape to avoid unnecessary knots. Then return to the beginning of the pattern and repeat all steps (Fig. 17).
Fig. 17. French knot with a twisted stitch
COLONIAL KNOT
The needle with the ribbon you want to display on the front side. The ribbon spread and press to the fabric.
The colonial knot is a little similar to the French knot. The difference lies in the fact that the tape when it runs around the needle
wrap eight. It can be done with thread or tape. Too wide the tape should not be used for this stitch, otherwise the knot will get very massive and ugly.
Hold the needle at a slight angle to the fabric, it is necessary to hold the tip under the ribbon close to the place of its release (Fig. 18a). To twist the tip of the needle with tape on the bottom and on top and slightly tighten a loop (Fig. 18b). To make the puncture needle on the wrong side as close as possible to the place of exit of the tape (Fig. 18V). Pull the tape from the reverse side, tightening the knot. In this case it is necessary to maintain a finger of the left hand, so he is not confused. The colonial knot is ready (Fig. 18 g).
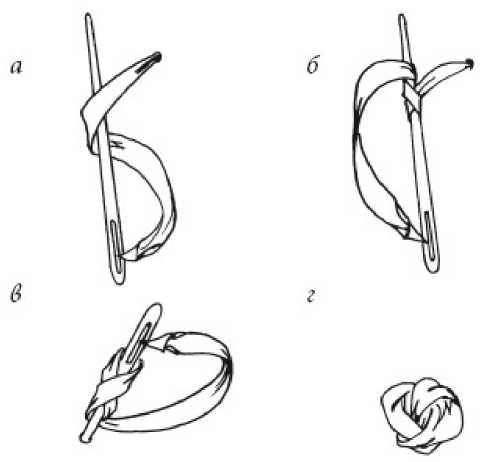
Fig. 18. Colonial knot
ELONGATED STITCHES
On the front side is required to lay a single vertical elongated stitch and back through the underside to the beginning. Puncture to do a little up and to the left (Fig. 19a). To perform the stitch so that it ended right under the first stitch and back through the underside on the front side, making a puncture a little to the right and up. To perform the stitch, which should end just below the second stitch. This is the beginning of the paper (Fig. 19b). The following two patches should start exactly under the vertical stitch in the middle. One stitch to channel upward to the left, second - right up (Fig. 19b). Then just below to do two more stitches left and right. Between them lay a vertical stitch and two stitches on each side - left and right (Fig. 19 g). The latest to make a long vertical stitch right in the middle of the seam. It is the petiole of the leaf (Fig. 19D).
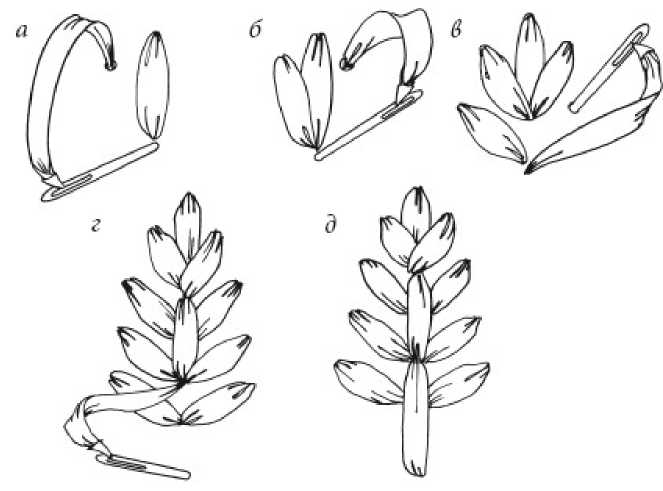
Fig. 19. Seam "Extended stitches"
THE SEAM "STRAIGHT STITCH WITH PAKRACANI"
On the front side of the needle with tape to make a straight stitch in the right direction and the required length. The tape must lie on the fabric firmly and evenly. Then back to the front side in the beginning of the stitch (Fig. 20A). On top of it to make prescripci at the same distance from each other, securing the first stitch (Fig. 20B). At the end of the tape mounted on the underside.
Precripti on this seam you can run a ribbon of a contrasting color. Usually elongated stitch edging with pakracani work or trim with initials.
SEAM GRID
A needle with a ribbon to pull on the front side and to perform the vertical stitches filling a desired surface. Then connect the needle with tape on the reverse and the tape (Fig. 21A). Then a needle with the ribbon to pull on the front side and to carry out the horizontal stitches holding it first over the vertical stitch, then under him, then again over the tape (Fig. 21B). Bring the needle and ribbon to the beginning stitch on the front side and perform the following horizontal stitch, bringing the ribbon under the vertical stitch, then over it and back under it (Fig. 21V). So twisting all the vertical stitches to form a network (Fig. 21 g).
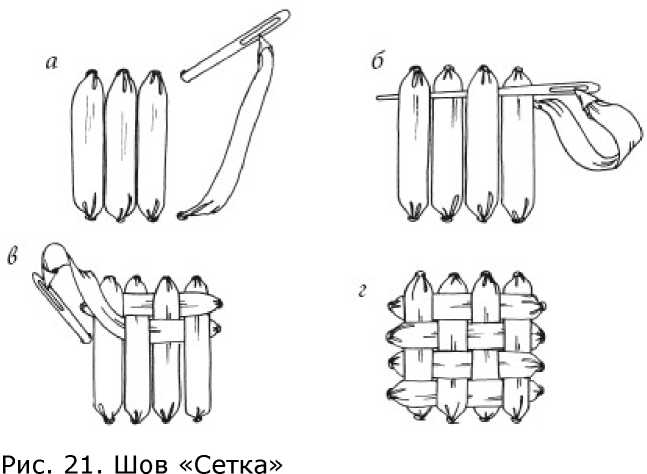
This seam is very simple. It is sometimes called decking. They are often filled with background embroidery, big motifs. It can be used with
the embroidery house, baskets, fence or just perform some free places for the overall effect.
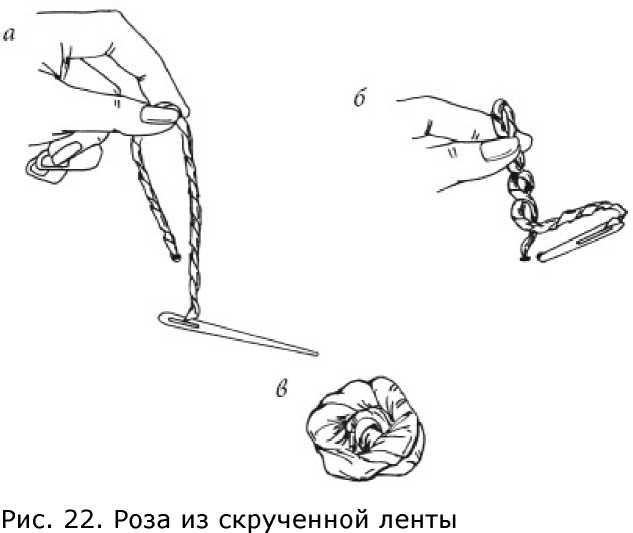
A needle with a ribbon to pull on the front side and guiding the tape parallel to the base, twist it into a tight spiral (Fig. 22A). Then make a loop by taking a strip at a distance of 3 cm from the beginning of the stitch. Releasing the middle of the loops, placing it parallel to the fabric. The ribbon will immediately curl and forms a double helix (Fig. 22b). Needle it is necessary to make a puncture on the underside very near the place of outlet of the ribbon without releasing the resulting spiral. The tape gently pulling on the wrong side. Spiral twist in a rosette. Thread floss the same color as the tape, invisible stitches to consolidate rosettes in the centre (Fig. 22V).
 PRINTED ROSEBUD
A large bead to sew on the fabric. The needle with the ribbon width 0.7 cm to pull on the front side at a small distance from the beads and cover it bead (Fig. 23a). Then run ribbon stitch, making a puncture at the distance of 0.3 cm from the beads. The needle with the ribbon to pull on the wrong side (Fig. 23B). Thereafter the needle with the ribbon to put there in place of the first output tape. Entwine ribbon bead from the left side and finish the stitch at the end of the first stitch (Fig. 23V). On the right side of the beads to perform the same stitch. The tape on the wrong side. Ribbon width 0.4 cm repeat the last two cable stitch, made on the sides of the beads. Then bring the tape to the wrong side and pin it (Fig. 23 g). Green ribbon to embroider the sepals tape the seam on both sides of the beads. Printed rosebud ready (Fig. 23д).
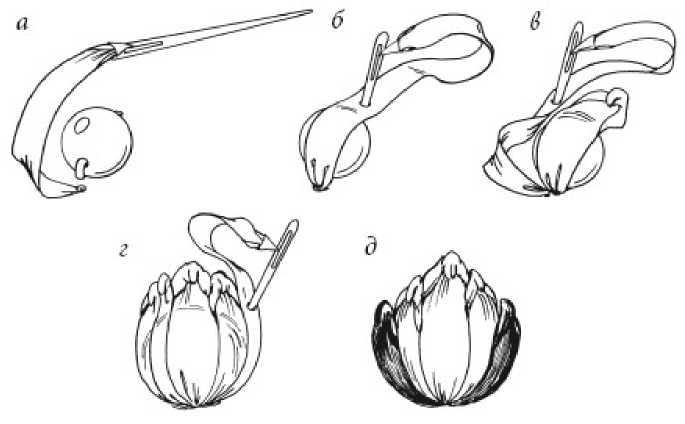
Fig. 23. Printed rosebud
CONVEX BUD
Bead sew on to the fabric using a thin needle. The needle with the ribbon displayed on the front side at the bottom of the beads and make a ribbon stitch, covering bead (Fig. 24A). Then using inside out return to top stitch and make one ribbon stitch slightly to the right of the first. Stitches should be slightly close to each other (Fig. 24B). Then make a ribbon stitch in the same way as the second, but on the left side. The following two stitches to do a little longer than the first. Then run down the Cup of the flower stitch with capture. The stem is to sew a long straight stitch, leaf - ribbon stitch (Fig. 24).
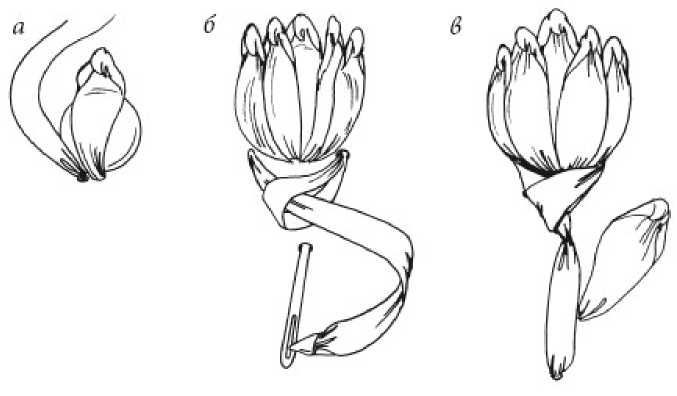
Fig. 24. Convex Bud
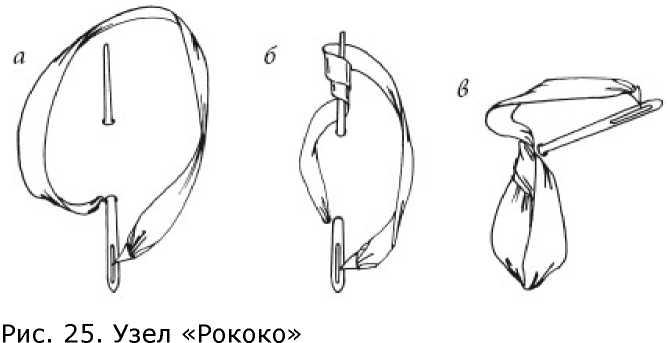
THE HOST OF "ROCOCO"
The needle with tape pull on the front side and to bring her again on the wrong side in the place of the first puncture. On the reverse side to make the stitch (Fig. 25A). The tape to get under the needle point from left to right and perform several turns around the needle, after each round of tape a little to tighten (Fig. 25B). Then the needle with the ribbon to pull, gently holding the formed knot with the left hand. The needle with tape to get on the wrong side and fasten it there (Fig. 25V).
 DIRECT VOLUMETRIC STITCH
Securing the tape on the wrong side, should withdraw the needle there and make a straight stitch, not to tighten the tape. Then pull it out
the needle with tape on the front side a little above the first output tape (Fig. 26a). And make another straight stitch, covering the first (Fig. 26B). Stitch is ready.
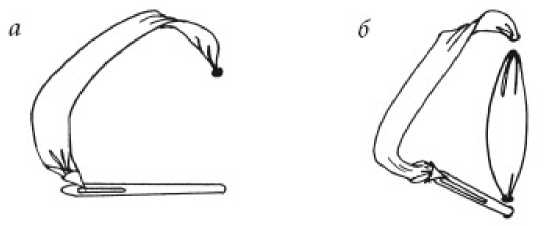
Fig. 26. Direct volumetric stitch
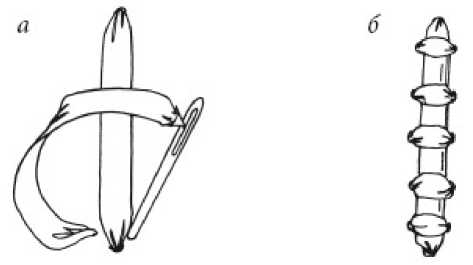
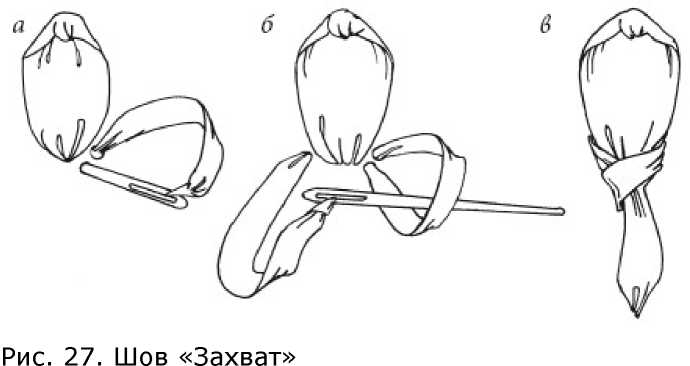
SEAM "GRIP"
Ribbon of the same color you want to run the ribbon stitch. Bud is ready. The tape of another color to put in the needle and pull on the front side at the base of the Bud (Fig. 27A). Then bring needle to wrong side, making the puncture close to the entrance of the tape. On the front side to leave a small loop. The needle with the ribbon to get there is on the other side of the Bud (Fig. 27B). The needle with the ribbon pushed through the loop and tighten the knot. Then make a straight vertical stitch down. End of tape mounted on the reverse side. Suture Capture ready (Fig. 27V).
The needle with tape to the front side and complete the loop with pricipal. Then withdraw the needle with a ribbon near the beginning of the loop and implement the straight stitch slightly to the left and down from the loops. Using the wrong side to return the needle with the ribbon there on the right side of stitches and make a second straight stitch to the center of the motif (Fig. 28a). The tape mounted on the underside. Loop with pricipal and with a straight stitch (Fig. 28B).
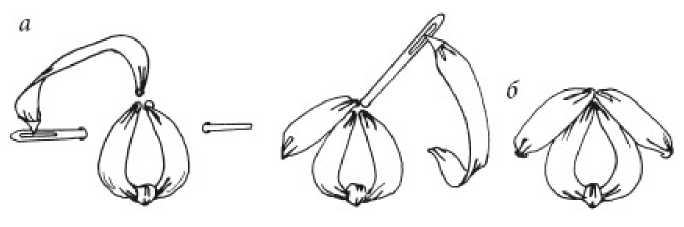
Fig. 28. Loop with pricipal and with a straight stitch
This double stitch, consisting of direct and loops with priciple, can be used in the manufacture of colors. The middle stitch you can fill in with French knots.
BUD
Tape the base color must be pulled to the front side at the base of the Bud. To twist it and make a twisted loop. The tape mounted on the underside (Fig. 29A). This is the core of the Bud. Petals to embroider a strip of lighter shade. For this bright ribbon display on the front side right and slightly above of Bud and make a stitch on top of the Bud, crossing it diagonally (Fig. 29b). Making a stitch on the purl side, bring the needle and ribbon in front of the first petal on the left and a bit at the top of the Bud. To perform the second petal is exactly the same as the first, covering the Bud the petal and the first diagonal stitch (Fig. 29b). Green ribbon to embroider the sepals by two cable stitch. Each stitch starts at the base of the Bud and ends in mid without closing petals (Fig. 29 g). The light green embroidery floss to embroider on top of the Bud with two straight stitch, starting from the base and ending at the edges of the sepals. One more straight stitch to run to the middle of the Bud. Bud is ready (Fig. 29д).
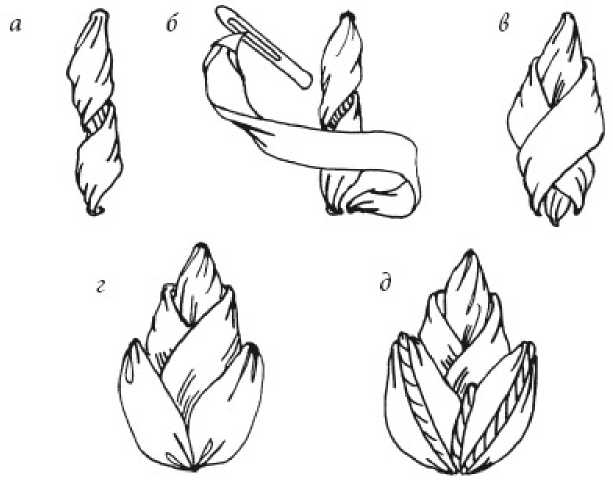
Fig. 29. Bud
SLIP STITCH
Pull the needle and ribbon on the front side and run a few straight stitches; the distance between them should be equal to the width of the band used. Then secure the tape on the underside (Fig. 30A). A ribbon of the same color or a contrasting display on the front side very close to the beginning of the first straight stitch to hold the needle with the ribbon under the stitch from left to right, not piercing the fabric. Then hold the needle with the ribbon under the second stitch from right to left. So twisting all the stitches with tape. Then fasten it on the underside (Fig. 30B).
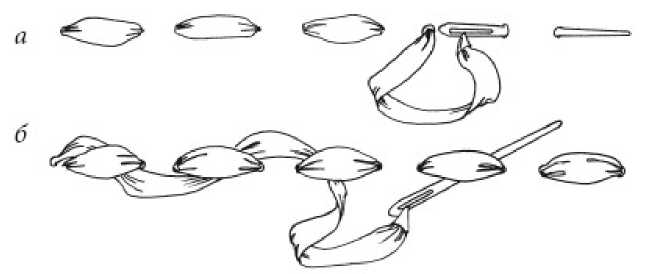
Fig. 30. Slip stitch
Slip stitch is used in different types of embroidery. It is good to identify the stems of plants, the vine or the outline of the pattern. Can be combined with other stitches.
SLIP STITCH WITH A COLONIAL KNOT
Pull the needle and ribbon on the front side and perform a colonial node at a distance of 5 cm from the tape (Fig. 31A). Then puncturing with a needle the ribbon near the knot and make a few straight stitches with a length of about 0.5 cm towards the place of exit of the tape (Fig. 31B). To make the puncture on the wrong side of very close to the place of exit of the tape. To move it to the fabric, securing the knot and pulling on the wrong side of the needle with the tape (Fig. 31v).
On the front side to form the folds of the petals with knot in the center.
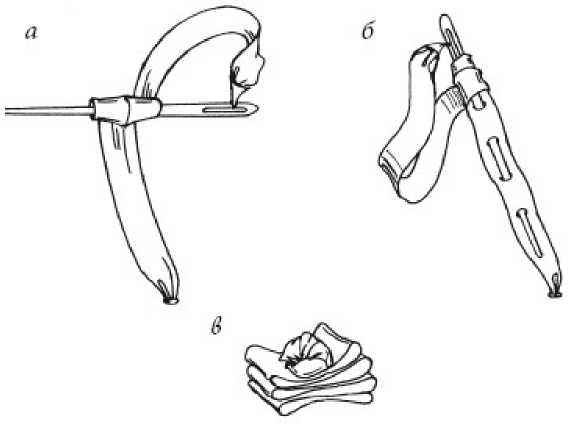
Fig. 31. Slip stitch with a colonial knot
FLOWER EYELETS
Stepping back from the edges of the tape 1 cm, make a loop the desired length and secure it with a needle and thread (Fig. 32A). Then run two more loops of the same length, fixing them invisible stitches (Fig. 32b). Cut off the ends of the tape. Flower eyelets ready (Fig. 32V).
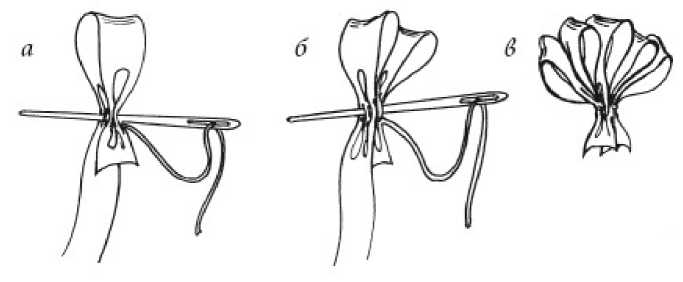
Fig. 32. Flower eyelets
STITCH "BOW"
Pull the needle with tape on the front side, forming a loop, make a straight stitch. The tape must not bend. Pressed her finger into the middle of the stitch (Fig. 33a). Withdraw the needle with the ribbon in the center of the first stitch, not cutting the tape and make prakrama in the middle of the loops (Fig. 33b). Pull the tape, smoothing the bow and making sure that he was smooth. Stitch "Bow" is ready (Fig. 33b).
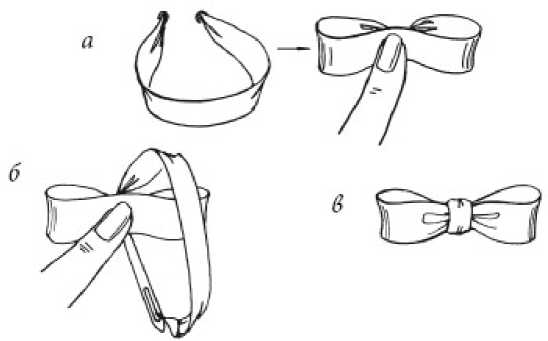
Fig. 33. Stitch "Bow"
This is one of the easiest stitches. It is recommended to use in the decoration of a bouquet of flowers, or any figures. It can run in any direction and with ribbons of any width.
STITCH KOLOSOK
Pull the needle with tape on the front side and perform a direct stitch. Then bring the needle with the ribbon slightly to the right of the beginning of the first stitch (Fig. 34a). Then make another straight stitch to make the area, and bring the needle with the ribbon a little below the second stitch (Fig. 34B). Then stretch out the needle with the ribbon under both stitches, not touching the tissue (Fig. 34V). To form a loop and to perform a puncture on the underside near the beginning of the loops. Withdraw the needle with the ribbon slightly to the left and above the end of the first loops (Fig. 34 g).
This stitch is best in the ribbons with a width of 0,2, 0,4, 0,7, see It can be done in a row. In this case the seam is, which resembles a wheat stalk. You can do single stitches.
Then perform a straight stitch, returning to the end of the loops and withdrawing the needle with the ribbon on the right side of the loops (Fig. 34д). Make a straight stitch, ending it near the top of the first loops. Then, by a stitch on the purl side, bring the needle with the tape there is under the end of the last straight stitch and complete the loop, with the third and fourth stitches. Continue to stitch the "Spike" and in the end execute a long straight stem stitch (Fig 34е).
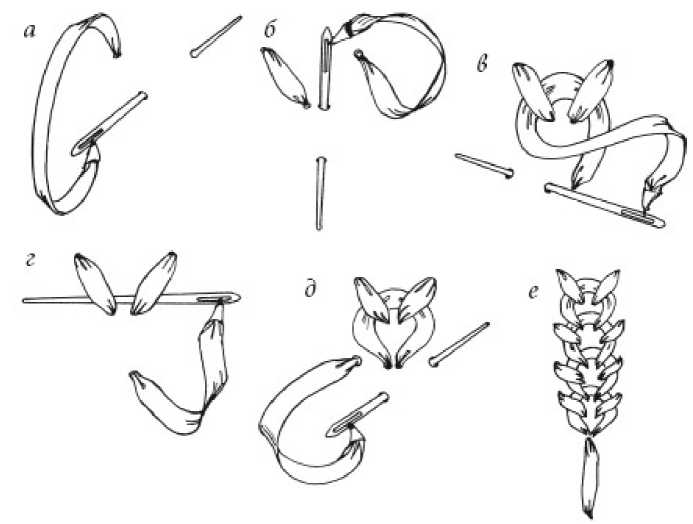
Fig. 34. Stitch Kolosok
CRETAN STITCH
Apply with pencil or tailor's chalk the outline of the picture. A needle with a ribbon displayed on the front side in the beginning of the picture and make a stitch along the contour of the pattern, not pulling the tape. Withdraw the needle slightly to the right, directing it in the middle of the pattern (Fig. 35A). Then make the puncture on the other side of the circuit pattern and bring the needle a little to the left, guiding him into the middle of the pattern. The ribbon under the needle and make a stitch (Fig. 35B).
Then perform another stitch in the same as the first one, on the left side (figure 35B). The next stitch to implement the same technology as the second on the right side (Fig. 35 g). To embroider so the entire drawing (Fig. 35D).

Fig. 35. Cretan stitch
STITCH ZIGZAG
Pull the needle with the tape at the beginning of the pattern on the front side. And to make the puncture on the wrong side to the right and a little below the place of exit of the tape. Bring the needle and ribbon on the front side near the point of its release (Fig. 36A). Make a stitch up and to the right and bring the needle with the ribbon slightly to the left. Pull the tape (Fig. 35B). Then make a straight stitch to the right and bring the needle near the beginning of the last stitch (Fig. 36V). To run a stitch down and to the right and withdraw the needle slightly to the left. Pull the tape (Fig. 36 g). To make this stitch in the same way as the first (figure 36D). Then complete the stitch in the upper part of the pattern on the same technology that the second stitch (Fig. 36E).
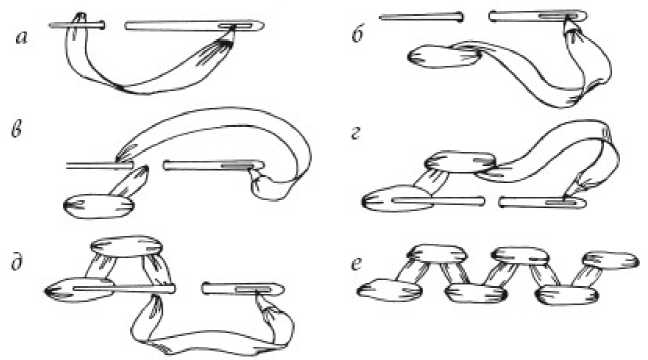
Fig. 36. Stitch Zigzag
This stitch is usually embroider cuff blouses, neck shirts. Also, they fill the empty space and perform the curbs.
STITCH HERRINGBONE
To draw on the fabric the outline of the picture. Pull the needle with the ribbon, digressing a little from the beginning of the pattern in the middle, and make a straight stitch to the beginning of the pattern (Fig. 37A). Then withdraw the needle with the ribbon to the other side of the picture, to perform a stitch, finishing a little below the beginning of the first stitch (Fig. 37B). Then pull the needle with the ribbon slightly to the left and below the point of the last stitch (Fig. 37B). The following stitches are run exactly the same as the first two (Fig. 37 g).
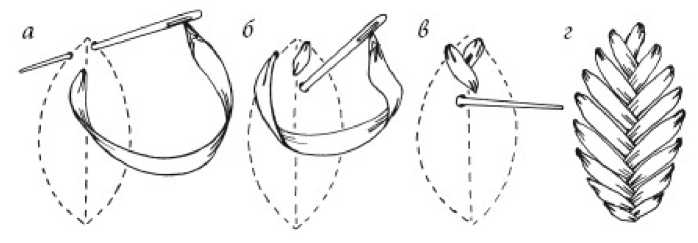
Fig. 37. Stitch Herringbone
The needle with the ribbon should be displayed on the front side at the beginning of the pattern. To needle a little to the left and bring the needle below the exit point of the tape. To form a loop, placing the ribbon under the needle point. The needle thread under the band close to the place of its first release and pull (Fig. 38A). Then make a puncture to the right made the loop and repeat all the steps of performing the first loop (Fig. 38b). Thus, to make all loops in a circle.
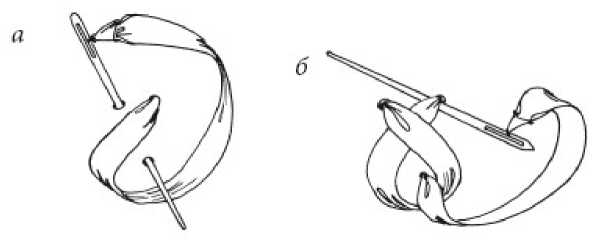
Fig. 38. Outlet chain