


")
 How to embroider:
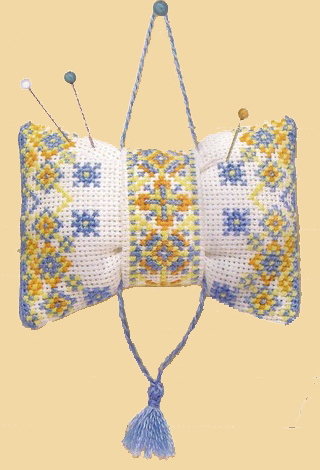
Strictly observe the distance between the parts of embroidery (28 cells)! 1. Let's get to work with, determine the center of the canvas. To do this, put it on the center of the embroidery (shown by arrows). 2. Embroider crosses wool threads, folded in half (i.e., sew a 2 thread). 3. All stitches run in one direction, for example, bottom with a slope to the right and the top tilted to the left. Then work will look more carefully and professionally (see Fig. 1). 3. Don't do the embroidery knots. The thread can be mounted on the reverse side of the fabric with a few stitches. 4. The work performed needs to be ironed iron on the reverse side. 5. Cut parts 1 and 2, leaving allowances of approximately 2 cm. Cross-stitch. Pincushion - part 1: 1. Fold the piece in half, face side inside, sew the stitches hand-stitch "back needle" or on a typewriter. Don't forget to leave an opening for stuffing (marked on the template touches of red). 2. Remove the extra canvas, stepping back from the weld about 7 mm. where the hole, leave a seam allowance of about 2 cm. 3. Turn on the front side of the pincushion. Fix all the corners and seams. 4. Tamp synthetic padding work or hollofayber (can the old fashioned way to take the wool), sew the hole.
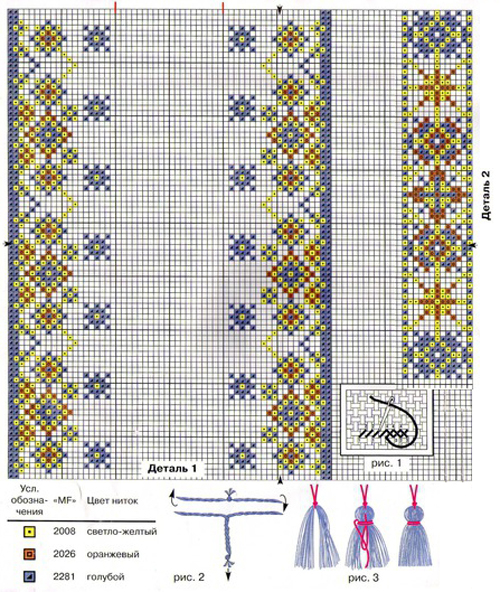 Cross-stitch. Pincushion - part 2: 1. Fold the piece in half inside out. 2. Stitch detail on the short side to make a ring, flatten the seam, fold the allowances on the wrong side and priutyuzhte. 3. Pass the main part of the pin cushion (filled with polyester batting) in the resulting ring. 4. Twist the rope (see Fig. 2). Cut 6 blue strands, length 1 m each. Divide them into two groups of 3 strands. Tie the thick filaments of the resulting node, you get a thick thread with a length of 2 meters. Curl it tightly in opposite directions. He let go of the ends of the threads thus pull the knot and gently fold it in half. Get twisting. 5. Cut the rope part length of approximately 15 cm On the middle of this cut make a brush out of the 20 threads of blue color (see Fig. 3). Align the ends of the brush. 6. Pass the resulting string on the lower side of the bow under item 2 and tie. The rest of the rope slide from the top (see photo).