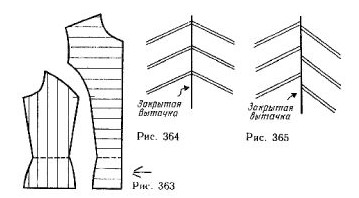
Bodice with relief. It is better to have strips in both parts of the bodice in different directions, since the vertical arrangement of the strips on both sides along the longitudinal seam they are ugly.
Horizontal stripes in the middle front and vertical at its sides (figure 363) visually reduce the volume of the figure.
If the tuck on the bodice are used to create a certain direction of the stripes, you need to place it so that it was less noticeable . Figure 364 shows the correct arrangement of the strips through the tuck, and the figure 365 is incorrect. For the convenience of the location of the strips in this case do not install in advance the start point of the Darts.

For matching stripes in the upper part of the crown of a sleeve with stripes on the back and the shelf don't cut the sleeves until the end of the fitting, leaving enough for them tissue. After trimming the strips along the line of the shoulder cut clip in the armhole in the right direction of the stripes against the stripes of the bodice. Given this direction will have plenty of sleeves.
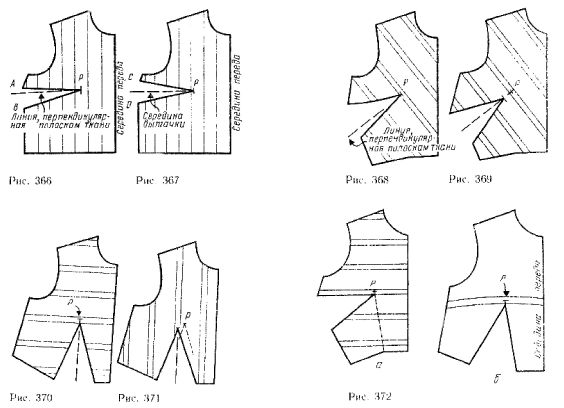
Video blouse. Put on a sheet of paper drawing of the front straight blouse; tuck the top of the slide in accordance with the model, without specifying its exact location from the line side of the slice (figure 366).

Swipe on the curve the direction of the strips of fabric. Slightly tilt tuck in one direction or another (AV — solution tuck), seeking the location of the strips when closed tuck, shown in figure 364.
If the strips are ugly, at the level of the point P draw a line perpendicular to the stripes. This line should be middle of the tuck (figure 367).
Put on a sheet of paper separately tuck and mark its middle. Imposing a pattern on the tuck, align the point P and the line With tuck point at right angles to the strips. Erase previously drawn a tuck and build a new one.
Shorten the dart, close it, verify the location of the stripes and correct the line of the side cut, straightening, if necessary.
If wide strips cross the bodice in an oblique direction, return to the training patterns.
Make a template of the bodice, moving the tuck in the desired direction. Figure 368 both tuck converted to a tuck from the side of the slice.
Attach the fabric to the figure and select the direction of the strips, then secure the template on the fabric and mark on it the direction of the stripes. If the fabric has wide stripes, put the stripes exactly at the projecting point of the breast. Spend a few lines on the template, including the primary, passing through the point R. point R draw a line perpendicular to the stripes, and then two lines of Darts, placing them symmetrically on both sides of the dashed lines (figure 369).
Tuck spent thus, on the bodice with slanted stripes barely visible.
For the bodice with horizontal or vertical stripes in the middle of the tuck (tuck the front into a tuck from waist line) perpendicular to the guide (figure 370) or in parallel (figure 371) strips.
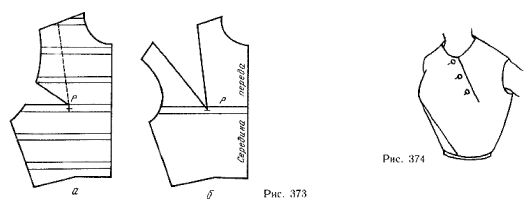
If one of the sides of the tuck is coming along strips of tissue (figure 372, 373), it is necessary first of all to choose the location of the strip (at the top or bottom line of the tuck).

To get tuck, shown in figure 372, and turn the upper tuck in the tuck of the waist line and a horizontal stripe on both sides from a point R (see figure 372 b), and then bring the resulting tuck, directing it along the bottom of the strips.
To draw the dart , as shown in figure 373, and move it from the shoulder cut, draw horizontal lines, as in the previous example (see figure 373, b), then reject the tuck by moving it along the top line of the strip.
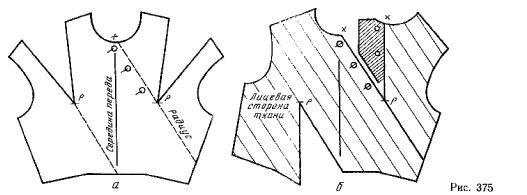
Bodice with asymmetrical pleats (figure 374). Take the curve of the front bodice as a whole (left and right parts ) and put the tucks in the shoulder seams (figure 375).

First you have to build a tuck that is located in the clasp. Mark the location of the top buttons (in the example it is on the line of mid front). Through point P draw a line indicating the edge of the zipper (line nadrezkoj x). Mark the remaining buttons so that the latter was not located too close to the point of p. Cut pattern along the edge of the fastener, not reaching 1 cm to the point P, and move upper in a tuck tuck from the neck. Continue the line of the zipper down to mark the direction of the stripes. Parallel to this line swipe through point P a line right tuck (dashed line).
Cut the pattern along quite often lose the line and move it right a tuck (figure 375, b). At first the tuck, draw the seam allowance on the clasp (the hatched area). Mark it buttons.


