


")
Bodice with a pleated yoke and Assembly (figure 406). The two parts of the bodice bands of the last fold (figure 407). 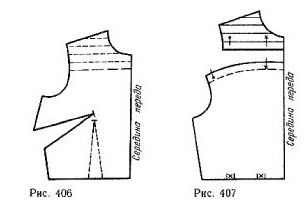
Turn the upper tuck in tuck from the side of the slice. Swipe fold lines and specify the location of assemblies. Draw the lower part of the bodice, put a tuck in the upper section.
Supressiruet a sheet of paper with the width equal to the width of the yoke plus the seam. The last fold put on the lower part of the bodice (figure 408). Put this item on the auxiliary pattern and transfer it to the contours of the yoke. 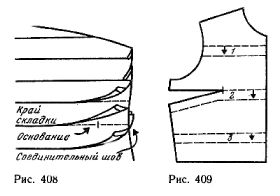
Bodice with horizontal pleats spaced intervals (figure 409). This bodice is only suitable for lean figures. It is better to run the model on the basis of a bodice with a reduced amount of solution tuck (see picture 360 article strapless Bodice with a reduced top tuck).
Swipe fold lines (for example: the width of the folds is equal to 2.5 cm). As with the implementation of the bodice fabric with a stripe pattern, it is advisable to put this one out of the folds of the most protruding points of the chest (see figure 409). Folds can be directed up or down.
A tuck position at the top or the bottom fold line. In figure 409 tuck located along the upper fold line 2, and the pleats are directed downwards (see arrows). In figure 410 tuck along the bottom fold line 2.
Cut the auxiliary pattern along the base line average of the folds and cut out the tuck on the upper part of the bodice. Lengthen both sides of the bodice into two the width of each fold, as shown in figure 411. 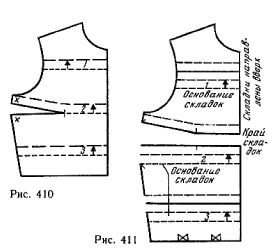
Lay all the folds and put the resulting template on the secondary to check the line (see figure 410, short lines indicate the base line of the folds, long strokes — edge folds).
When creating pleats on the fabric the lower part of the bodice should be connected to the upper after the pleats autoimune 2 to obtain a smoother seam. The pattern can be cut along each crease to find details separately and connect the same way as on the crease 2.
Select your language