


")
In the drawing the classic kimono sleeves (figure 513) of the total width of the sleeve, subtract the width you want to the bottom (for example, 34-26=8 cm). Divide the interval into half (8:2=4 cm) and place the resulting value is from the line of the upper edge of the hem (from notch 1 to notch 2).
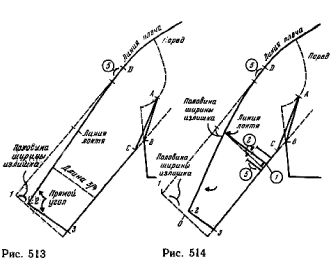
Through point 2 the inclined guide, which is connected with the line of the upper edge of sleeve 5 cm below the notch D (solid line).
Then do the same with the drawing of the back.
Starting from the notch D move into a new line of the upper edge of the sleeves exact sleeve length (D1= D2). Draw a line to the bottom of the sleeve between nasecki 2 and 3 at right angles to the line of the upper edge. To shorten the sleeve, hold the bottom line is held parallel to the line at the desired distance from it.
The narrow sleeve of the kimono (figure 514) mainly used for dresses.
Of the total width of the sleeve, subtract the desired width of the bottom (for example: if the girth of the wrist is 16 cm, 34-16=18 cm).
Divide the segment in half (for example, 18:2=9 cm) and set this value to the bottom line of the front sleeve from notch 1 to notch O.
Do the same to obtain the desired width at the level of the elbow (e.g., 34-29=5 cm — over). Divide the excess in half (e.g., 5:2=2.5 cm) and set this value through the elbow.
Retreating from the notch D 5 cm down, draw a line the upper edge of the sleeve, as shown in figure 514. Line the bottom of the sleeve is slightly curved (see arrow) that is necessary for a better fit sleeve. From the notch D in the lines aside the length of sleeve to elbow and the length of the sleeve. Put nadziejko 2.
Draw a line to the bottom of the sleeve from the notch 2 to the notch 3 is perpendicular to the line of the upper edge.
Move on to drawing the back line D2 after the align key line D1. Then move the template and move nadziejko 3 in the line of the bottom of the sleeves. Draw a line to the bottom of the sleeve backless connecting the notch 2 and 3. Tuck bend line of the elbow is optional.
From the notch, through the elbow guide the first dashed line that is perpendicular to the main lines. Then, aside from the point up the line of the cut 1cm, draw a line elbow (solid line).
On either side of this line, which notes the average tuck, draw two parallel lines at a distance of 2 cm from it with a length of 5 cm.
These lines will astrocyte from the underside of the tuck (or tucks), followed by 2 cm on the back half.
For short sleeve kimono drawing is performed on copies of the templates attached to the bodice, and kimono. Place nadziejko 1 (figure 515) at a distance of 5 cm from the notch And the line cut AC. From the notch 1 draw a line to the bottom of the sleeve between nasecki 1 and 2 perpendicular to the line of the upper edge of the sleeve, i.e. parallel to the line DA.
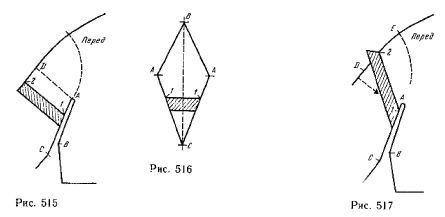
Provide allowance for hemming the sleeves. Draw a line parallel to the seam allowance of the hem at a distance of 3 cm (shaded area).
Gusset set aside a segment A1 taken from figure 515, and draw a straight line of bending (figure 516).
Line the bottom of the short sleeve is below the above - cleavers And 5 cm, and the sleeve can be shortened without a change in the drawing of the sleeve. By reducing the length of sleeves should leave the distance between a point And not less than 2.5 cm.
If after shortening the sleeves up to the specified limit it is still too long on top, make the following changes to the drawing.
Put a length of 2.5 cm, ranging from over - And broken rice (figure 517), and put nadziejko 1. Shoulder from the notch E put on the line of the upper edge of the sleeve the desired length of the sleeve (for example, 8 cm); Put nadziejko 2. Connect the notch 1 and 2 by a straight line, then draw a parallel to the line of bending.
Fold the paper along line 1-2 so that it was possible to correctly mark the width of the ACC.
Shorten the gusset by laying on it the value of A1 as explained above.