


")
In the middle of the line AA perpendicular swipe. Measure the line cut As I a In figure 507 and set them aside from point A, to form a rhombus, as shown in figure 508. Label the points and the notch of the notch.
The corners of the gusset points And slightly zakruglenie. To do this, expand gusset by 0.25 cm at the level of each point. Rounded corners connect the straight lines with dots.

Edit the drawing. Below are the features of the drawing when the drawing changes.
The extension sleeve on the top slice perform, if you want to make the sleeve wider with a very full hand.
The remaining width of the sleeves divide in half and at a distance equal to the resulting value, down from point 10 draw a line parallel to the upper edge of the sleeve (figure 509).
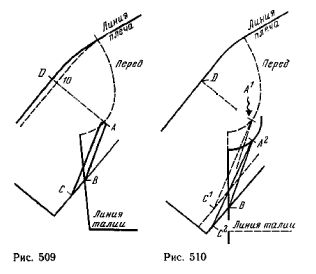
Above the point 10 of the shoulder line guide in the form of a smooth curve, as shown in figure 509. The same thing will do the drawing of the back.
The extension sleeve on the lower slice is the most common phenomenon in the garment straight cut. This nadziejko And who is always on the line of the armhole, place the below in accordance with the deepening of the openings at the bottom.
Before you change the drawing so think about whether you can deepen the armhole. Grab a copy of the drawing basics straight jacket casual kimono and limit the length of the sleeve line of the elbow. Spend a dashed line openings (figure 510), the line of the cut sleeves and a-line cuts (the notch A1 and C1).
Move the drawing up, combining the lines of the side sections, while the line of the cut sleeves are not to be remote from the dashed lines on half of the added width (e.g., 3 cm for the front). The floating line should be parallel to the bar. Figure 510 the solid lines show the drawing after the expansion (nadechka A2).
For the drawing back, do the same thing for the front after applying a new notch V.
Saugeye sleeves down is accomplished by lowering the plot line of the upper edge of the sleeve from the notch D. the method is used for very short or very adjacent sleeves.
Grab a copy of the drawing adjacent the front of the bodice-fitting kimono, limiting the length of the sleeve line of the elbow. Spend a dashed line openings, line the bottom of the cut sleeves and a cut line (figure 511).

This copy of slide down, aligning the lines of the side sections, while nadechka A2 will not reach the level of articulation of the arms with the torso. Move in solid lines the lines of the cut of sleeves, openings, notches, and the notch (see figure 511). Do the same on the drawing back after she takes the position of the notch B1 with a drawing of the front.
The change in the tilt of the sleeve is used only when the expansion sleeve without changing its convexity and without moving the notch And down. This change of slope is used, if the top of the front tuck is absent or very small.
The drawing of the front of the bodice move nadziejko And (for comparison the dashed lines indicate lines of the upper and lower sections of the sleeves drawing the basics).
Put on a sheet of paper (figure 512) in front of the bodice adjoining casual kimono. Spend a dashed line from the notch 5 to notch 6. The line length is 20 cm Mark nadziejko located at the distance of 1.5 cm from the notch 5. From the notch 6, we drop a perpendicular of length equal to the length of the line 5-6 (see arrow in figure 512). Put up 1.5 cm from the last notch and mark the point through which pass the line of the upper edge of the sleeve.
After the drawing front and back, check the width of the sleeve. If it is insufficient, the sleeve extend one of the methods specified above.