


")
To tell the hand movement, the sleeve-fitting kimono has in the underarms additional part, called a gusset.
Construction drawing basics kimono. The construction of such a drawing is to connect the drawings of the front and back, with drawing of the sleeve corresponding to this model. In this case it is more convenient to use patterns the basics of the bodice and sleeves in full size.
On a large sheet of paper put a separate back and front of the base patterns, leaving the side at 45 cm and below, starting from the waist line, 30 cm On the back do not change anything (figure 500).

On the front top tuck pre-put in mouth (1). Figures, labeled in the illustration show the order of execution of the operation. For clothing straight cut lines of the side cuts should be carried out after the main build.
For the distribution of the width of the openings, which depends on the accuracy of the position of the gussets on the front and the back, draw a horizontal line at the depth of the armhole (2).
On the front and the back, draw a vertical line, tangential to the line of openings (3). Measure the resulting width of the front and back between the lines 3 (for example, 12.2 cm). The resulting value is split in half and put nadziejko 4 (for example, 12,2:2=6.1 cm).
From the notch 4 of the new guide lines of the side sections, without changing the width of the detail at the waist.
It is desirable that the line of the side cut of the back was tilted more than the line of the front (solid lines from the notch 4). If necessary, adjust the width of the waist to get larger the slope lines of the side of the cut backs. For clothing straight cut lines of the side sections move in parallel.
The width of the openings between the 3 lines should be one-third of the measurements of the circumference of the hand at the armholes plus allowance depending on the types of clothes: dress and attached jacket — 2 cm; for jacket straight cut — 4 cm; coat straight cut — 6 see accessory Guide drawing a line in the sleeve of the front (figure 501). For this purpose, starting from the notch 5, draw a horizontal line with a length of 20 see end note 6 natsukoi. From the end of the horizontal line drop a perpendicular of length 23 cm, put nadziejko 7. Horizontally from the notch 5 to the left will set aside 1.5 cm Obtained point connect with nadrezkoj 7 the dashed inclined line 8. Distance between nasecki 6 and 7 non-permanent. It depends on the slope of the line kimono sleeves.
To construct a line of gussets you need to determine the width of the gusset. It is determined by the girth of arm and the width of the openings. For the dress and attached jacket, the width of the gusset is equal to 1/3 of the circumference of the hand at the armholes; jacket straight cut — 1/3 of the circumference of the hand plus 1 cm; coat straight cut — 1/3 of the circumference of the hand plus 2.
Given that the hand near the openings has the largest thickness (the arm is more oval shape than round), it will be clear that the calculation based on its diameter, not exaggerated. This dependence extends to clothing (dresses, jackets, coats), with a standard of measurement.
In other cases, the width of the gusset is equal to 1/3 of the circumference of the hand plus 1/3 of the width added to the base product.
The resulting width of the gussets divide in half (for example, if the circumference of the hand, equal to 29 cm, 29:3=9.7 cm; 9,7:2=4.8 cm). From the notch 4 is put horizontally 4.8 cm and put nadziejko 9. Using the resulting nadziejko draw a vertical line to the line of openings, the intersection of which indicate nadrezkoj A.
If the line of the armhole on the drawing basics are too high or too low, the same disadvantage will be the sleeve of a kimono.
If the distribution width of the openings was done correctly, nadechka And will be at a certain distance from the line 3. For the dress and attached jacket, this distance is at least 1 sm; jacket — not less than 1.5 cm; coat straight cut — not less than 2 cm.
To build the line of the cut sleeves of the front (figure 502) draw a line perpendicular to the line of the upper edge of the sleeve, passing through nadziejko and continuing downward (away from the notch 10 to notch 11). Distance from the notch And the notch 11 is the distance between nasecki 4 and 9 (see figure 501).
Measure the width of the sleeve from the notch 10 (see figure 502) until the notch 11 and move it a little further, to draw the bottom line of the sleeve parallel to the upper edge. The intersection of the lines of the cut sleeve and side cut check nadrezkoj V. From the notch In nadechka And draw the first line of the incision.
From the notch And guide the second incision line, passing at a distance of 1 cm from the notch, measured perpendicularly to the line AB. The intersection of a line drawn with the line of the cut sleeve label by natsukoi C. Notch and mark With clear lines and don't forget to transfer them to fabric.
To construct a line of the upper edge of the guide sleeve backless angled line like on the front (figure 503).
The slope of this line should be the same as on the front.
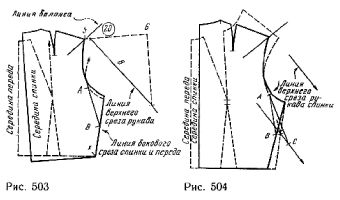
From the highest point of the armhole of the backrest (nadechka 5) draw the balance line, perpendicular to the line of the upper edge of the sleeve.
To construct a line of the gussets, fold the pattern back from the transparent sheet and the pattern of the front is wrong side inwards and align the lines of the side sections (nadechka x). Figure 503 dashed lines given a portion of the front, visible when combining patterns due to the transparency of the paper.
Move into the back line of the gusset, noting the notch A and B. If the line of the side cut of the back is very tilted in relation to the line side of the slice forehand and nadechka And is located above the line of openings by more than a few millimeters, you have to correct the slope of the line side of the slice, starting from the notch (on the front and the back), then hold the gussets on the front. To do this, place the tip of the pencil on nadziejko and turn the pattern back to until the middle of the line will not be parallel (figure 504). Move into the back line of the cut sleeves and gussets AC.
If the lines of the upper sections of the sleeve front and back built correctly, they should be parallel.
Flip chipped with a pin the sheets of paper to appear at the top (figure 505). Using the transparency paper, move from back to front of the balance line (the notch And combined). Split the sheets of paper to finish drawing the drawing front.
Translate on a separate sheet of paper part of the bodice, halfway between the point P and the line of the shoulder (see figure 500, dashed lines). Put this copy under the curve and aligning the point P to rotate until the balance line on the curve touches the highest point of the armhole on the copy.
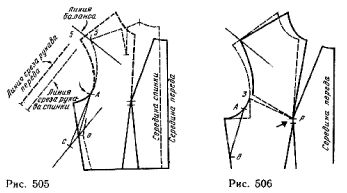
How many sheets of paper in that position. Erase prior the dashed lines on the patterns (figure 506), and replace them with those seen in copies (solid lines). Thus the solution of the upper tuck translated to the neckline, reduced by the amount left in the armhole (for example, 1 cm). This tuck does not affect the fit of the bodice and gives it some softness.
Solution vanishing at rotation curves tuck should not exceed 2 cm, the Excess can be for two reasons: either the back of the bodice is much longer than the front bodice, or the solution of the upper tuck is very high. In both cases, nadechka 5 on the front far left of the line of balance, drawn on the back. Thus it is necessary to redo the back (for example, to increase the solution of the shoulder tuck to move to the left line of the balance sheet) or write bodice with a reduced fit.
It should be borne in mind that if the upper tuck is a significant solution, due to the rotation of patterns it can disappear altogether.
Finally, the line of the upper edge of the guide sleeve, as shown in figure 507. First, draw a horizontal line with a length of 20 cm new from the notch 5 to notch 6. Note new nadziejko at a distance of 1.5 cm from the notch 5. Then, starting from this last the notch, draw a line the upper edge of the sleeve.
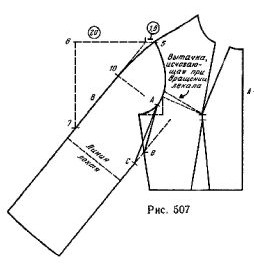
To construct a line of the bottom of the sleeves will continue to line the upper and lower sections to the desired length and normal to these lines draw a straight line hem. Draw a line elbow at the level of measurement of length to elbow minus 1 cm.
For shoulder pads line shoulder cut guide with some bulge and lifting his nadziejko 5 to 0.25, see
If all construction was done correctly, the sleeve width will be equal to: for the dress — the girth of the hand plus 4-5 cm; the attached jacket — to girth hands, plus a 5-6 cm Gussets adjacent the jacket and dress are the same, but the jacket shoulder bodice and exaggerated armhole deepened, creating extension sleeves; jackets and coats straight cut sleeve width equal to the circumference of the hand plus 6-7 see
To place a gusset between the sections of the sleeve, cut the fabric from the notch And the two lines cut and spread slices. Have the notch And slices of lightly zakruglenie. The notch In and connect straight lines.