


")
Skirt with draping on the line of the Darts. Three little pseudogene pleats emerging from an inclined, slightly curved tucks (see figure 447), creating a draped effect. 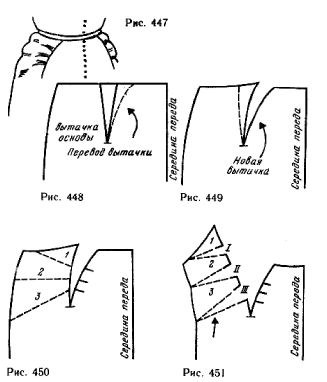
On the mold front skirt (figure 448) draw a dashed line tuck right direction so that her horses coincided with the end of the new tuck. Close the tuck Foundation and put it in a new direction, as shown in figure 449.
Close the new dart and cut the pattern along the line of Darts. Place the pattern on the figure and mark the beginning of a little folds (put the notch on both lines tuck). Determine the direction of the folds and connect them with lines (figure 450). The folds you can move the figure in any direction.
Number of the patterns between the lines of the folds, cut and move parts from one another to a depth necessary for the formation of folds (figure 451). The depth of the folds depends on the thickness of fabric, the length of the folds and the distance between them. For the skirt of thin wool fabric, the minimum depth of the folds shown in figure 451 digit III equal to 3 cm, figure II — 2.5 cm and figure I — 2 see
Specify the direction in which the folds are laid down (see arrow in figure 451). Lay pleats, pin them and sew a tuck.
To replace folds assemblies, you need to push the details and connect them to the ends of a smooth line. When performing Assembly on the details of light fabric are usually pushing items much more than simple folds.
Skirt with asymmetrical drape. The drawing of the skirt, shown in figure 452, prepare a mold of the front skirt entirely. 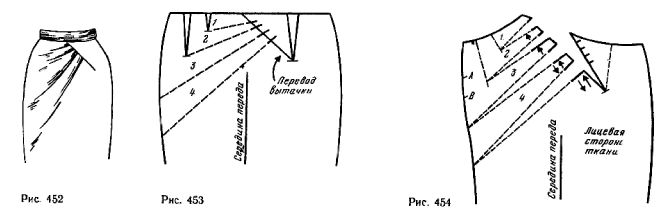
If the drape of the skirt extends below the hip line, for the elegance should to make narrower the skirt at the bottom (figure 453). If the physique does not allow to make narrower the skirt (thigh length or not cool enough), from draperies to be abandoned.
Spend new tucks and folds of draperies.
Do not spend these lines, very oblique: the long folds of his weight yourself increase this slope at the figure.
In the direction of the folds and on the new line of tuck, spread the solution tucks fit. Distribute the tuck from the right side, as shown in figure 453. Close the Darts, cut the pattern along the line of translation of the left tuck and fold and slide parts for receiving folds of the required width (figure 454).
The top two folds obtained by two small Darts. If these Darts have a solution for the lack of pleats, the pattern is cut in the direction of these folds to nasechek A and b and pushing the parts at the desired distance. The top folds usually lay down. The bottom two you can lay up and down.
If tapered, the skirt has a length to the ankle, make a few folds up or cuts back.
Skirt with draping on the Basque line. Shift yoke gently overlaid on deep wrinkles (figure 455). 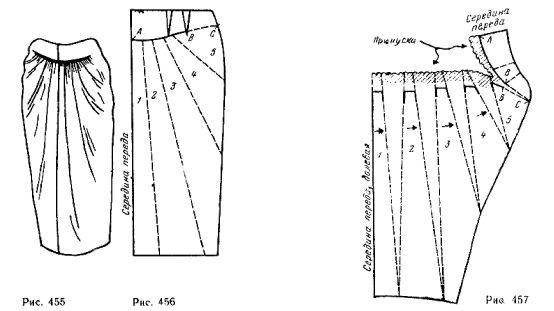
On the mold front skirt (tapered bottom), construct the yoke (figure 456, the solid line from A to B).
At the end of the line yoke place the tuck basics (radseck). If the tuck is too deep in great length (as is the case in the example), and spread it, as shown in figure 456. Continue the line of the yoke and put nadziejko S.
Place folds, respectively; the model, giving a little tilt to those folds that end at the line side of the slice. Number the strips and mark the notch.
For the skirt of such a model is needed the lining is made of silk fabric. To cut out the lining, use pattern, shown in figure 456. Cut out the pattern. Close tuck. Spread of the patterns. The yoke cut to the point C. Item 5 do not move more than 1-2 cm at the notch.
The depth of each pleat can reach 7-8 cm Should be avoided piles folds.
Reproduce on fabric the contours of the parts. Specify the direction of the pleats, mark the depth, consider the seam (figure 457).
Due to the sliding of parts of the patterns line the bottom of the skirts have the shape of an arc. Such a slice cannot be bend and hem as usual. For the treatment of NCDs such skirts should spare a facing of a width of 6-8 cm and oblachat it cut of the bottom.
If you allow the width of the fabric skirt should carve out a solid middle of the front. At the narrow fabric in the middle of the front to make a seam.
Lay right folds and to avoid excessive thickness, zautyuzhte them at the connection level with the yoke.
The skirt is draped free (figure 458). Compare this model with the model bodice, shown in figure 433 the article the strapless Bodice with draping. 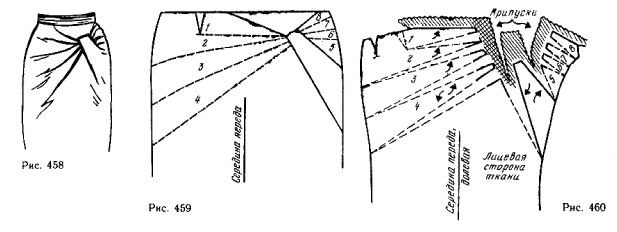
In the drawing skirts, tapered-leg, draw-the-line models. Pat, rising obliquely from the left side of the cut, holding two groups of soft folds.
Note the placement of the folds of the drapery, with what lines 1 and 2 start from the same point. The edge of the drapery along the folds 1, 8, a bit behind, as the edge of the pocket (figure 459).
Cut the pattern along the lines of the folds, close the tuck of the waist line on the right side of the skirt and make the necessary expansion of the folds (figure 460): folds 1-4 — 4 cm, folds 5-8 — 2,5 cm Extension possible, if desired, to increase. If the tuck of the waist line is not fully closed, move the remaining part closer to the side cut.
Draw the contours of all the details, trace the folds and add a seam (hatched areas).
The arrows indicate how to lay the pleats (skirts usually last fold is directed downwards and the rest upwards).
Patu securing the group folds perform on the lining (see picture in article 433 strapless Bodice with drape) with allowance for bending along the entire length of the part.
To complete the drapery first, connect the Pat with lining, and then attach to the lining of the end of the opening on the wrong side of the folds.
Flared skirt with drape. The drawing of this skirt (figure 461) first of all, redo the Foundation skirts in a full skirt. Then attach the pattern to the figure and draw a model line (figure 462). 
Cut the template, open the details on the necessary amount of the solution of the two folds (figure 463). Up around secure the PATA to provide the seam.
A draped skirt in a group of crayons" assemblies (figure 464). Select the desired size skirts ready and add to the value of the extension assemblies.
Mark on the drawing the location of the assemblies, as shown in figure 465, and draw a circle with a diameter of 6 cm.
To build on the fabric, cut inside the scribed circles, circles with a diameter of 1 cm, sewn sections and on the face of the fabric gather at a string of assemblies of long stitches going from one hole to another. Tighten as tight as you can and thread, tuck the seam inside out and fasten the thread.
Select your language