


")
There are parallel and non-parallel folds, which in turn are subdivided into unilateral and reciprocal.
Unilateral crease can be put in one way or another, however, if formed by a continuous series of unilateral folds, they must be laid to the left, towards the buckle (figure 157). Inverted pleats are formed by two one-sided folds, pointing to one another (figure 158). Parallel folds, shown in figure 159, laid in different directions from the middle. 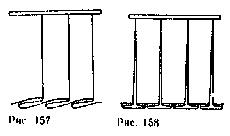
Take a sheet of paper the size 17X40 cm, Determine the width of each fold and mark both edges of the crease lines parallel to the line of mid front (figure 160). 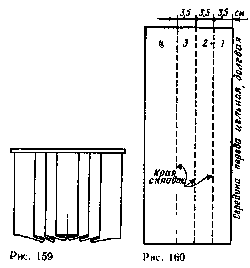
Take another sheet of paper, equal in length to the length of the base patterns, and width — to the width of the patterns plus double the width of the folds. Draw a vertical line the middle of the front of the base patterns (figure 161). Then slide the top horizontal line of the waist and bottom hem line. 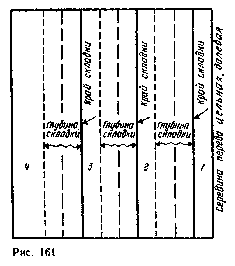
Parallel to the line of mid front at a distance from it, equal in this case 3.5 cm, mark the edge of the first pleat. Indicate with an arrow the direction in which it is necessary to lay the crease. From this line mark double the width of the strip 1 to obtain the depth of the folds (two times 3.5 cm, thin dashed lines). Laid fold consists of three layers of fabric.
As well label the rest of the folds and number them. Clearly mark the depth of each fold (the wavy lines with arrows) and lay them as it is done on the fabric (see figure 159).
Place the pattern with pleats on the auxiliary curve (see figure 160), combining the surface of the folds 1, 2 and 3 with the corresponding stripes. Put the additional a part of patterns (stripe 4) and correct, if necessary, the top and bottom lines. The pattern is finished (see figure 161). It can be used for cutting tissue.
If the pleats on the skirt are of different length, for example, the skirt with yoke (see figure 147), it is enough to draw on the patterns of folds maximum length and then to move to closed folds the real line yoke with the auxiliary patterns.
Counter-parallel to the folds shown in figure 162. They differ from the unilateral only in the way of laying.
Put on a sheet of paper pattern, shown in figure 161. Number the strips (1, 2, and 3, 4). Then according to the figure 162 label each line and put arrows and crosses in the right places. 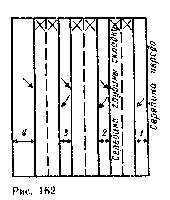
Fold the paper on the outer edge of the first fold and place this fold along with a line half the depth of the folds. Then fold the paper along the right edge of strips 2 and align the fold with the edge of the strip 1, i.e. put a bend on the same dashed line half the depth of the folds. Finally, fold in the left edge of the strip 2 and place it to the left on the second dashed line. Position on the same line the right edge of the strip 3, etc.
The resulting pattern should be combined with the auxiliary (see figure 160).
On a large sheet of paper draw a straight line mid-front, secure it detail 1.
Non-parallel folds are folds that have one end of greater width than the other (figure 163). 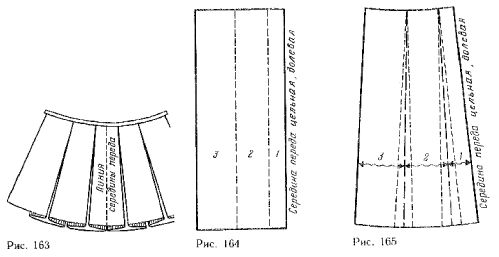
Fulfillment non-parallel folds includes the performance of the folds and tails.
Define the width of the skirt at the waist line needed for the folds. This width will remain constant. Set aside the segments equal to the width of the folds, starting from the middle of the front (figure 164). Then draw two parallel lines along the patterns (for example, draw the first line at a distance of 3 cm from the edge , and the second at a distance of 6 cm from the first).
Cut the pattern into strips along the drawn lines. Put the strips on another sheet of paper, connecting the sides and push down to desired width. To make the folds lay right, the amount of expansion should be taken equal to half the width of the folds at the waist (for a skirt, length 70 cm.).
For a single inverted pleat, which is a continuation of the relief from the shoulder cut, lay the coattails of a width of 6-8 cm, with an average skirt length 70 cm
Perform the required extension (for example 3 cm, figure 165). In the middle of each tail swipe dashed line (new the edge of each pleat). Number and cut pattern into parts 1, 2, and 3 in thick dashed lines.
The depth of the flared unilateral and counter-folds and parallel folds, should be twice their width.
Take the strip 2 and move it twice to the left of the strip 1. Mark a large cross in the depth of the folds, as shown in figure 166. Bring again the strip 2, but this time she will represent the surface of the second folds.
Arrow wavy lines indicate the direction of laying the folds. 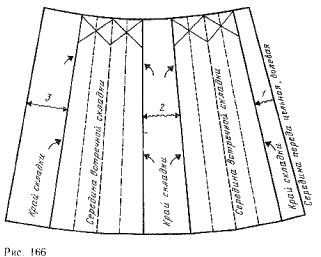
Using band 2, mark both halves of the next inverted pleats (one for the left-hand edge of part 2, and the other for the edge that will be placed nearby). A strip of 3 cannot be used to build the depth of the last folds. It represents the remaining outer part, not the surface of the folds.
To check the patterns lay the folds and compare it with the auxiliary template (see figure 165). Figure 166 thin dashed lines represent the inner folds of each half the depth of the folds.
If there is no shear folds lines and just outlined the depth of the folds, the folds need to come together as a butt joint on the reverse and on the front side. Prune, if necessary, the bumps on the lines of the waist and bottom, leaving the folds closed.
Unilateral non-parallel pleats lay in the direction of the clasp.
Turn the pattern shown in figure 166, twice, to get the whole front panel. Circle line depth and width of the folds and lay all the folds in the direction of the clasp. The depth of the folds would have to be deferred, which the inner crease of each fold should touch the edge of the next crease, as when performing parallel folds
Select your language