


")
On a rectangular strip of cloth to build is very simple, knowing the width of the fabric. If the model has more than a sophisticated form-fitting (figure 147), to extend the basic template need without breaking the form.
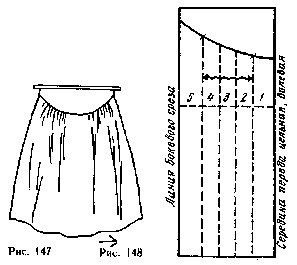
Take a sheet of paper the size 17X40 cm and mark lines in accordance with the model shown in figure 147 (figure 148). Line guide yoke below the horizontal line 2 cm at the line side of the slice and 9 cm along the line of mid front (front cloth). Through the middle of the front this line must not have an acute angle.
Mark the area for assemblies, labeling his nasecki at a distance of 4 cm from the mid line of the front and 13 cm from the line side of the slice. Divide collect into an Assembly area (between nasecki) several lines parallel to the line of mid front (three strips 2, 3 and 4 with a width of 3 cm each). The number of strips depends on the curvature of the coquette: the more curvature, the more stripes.
Draw a line perpendicular to the direction of the assemblies and the line of mid front (horizontal dashed line). Cut the yoke and cut the pattern into strips by vertical dashed lines.
On a new, more wide, the paper guide the first straight line indicating the line of mid front and fasten it on the strip 1. Swipe perpendicular to the line of mid front at the level indicated on the strip 1 (figure 149).
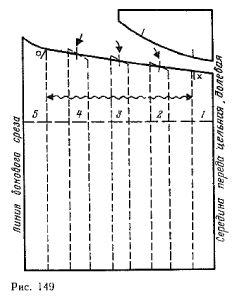
For the line again fold the pattern as it was before cutting. Slide the strip 5 from the strip 1 by a distance designed to build (the wavy lines with arrows). Then place the remaining strips between the strips 1 and 5. Transfer this pattern to the contours of every detail. Put the notch.
At the bottom, draw a horizontal line connecting the line side of the slice and the middle of the front. Swipe the top line assembled in the Assembly portion (from x to o). This line should pass through the middle of the upper edge of each strip (vertical bars indicated by the arrows).
When the area of tissue between nadechka, will be collected at Assembly, the upper section will take its original shape, i.e. it will correspond to the low cross sections of the yoke. When cutting parts the patterns necessary for connecting the sections to give a seam allowance.