If the bodice of the product is too short or long on the front or the back, the waist, held horizontally on the layout is horizontal on the figure. This imbalance corrected by changing the height of the bodice.
Figure 32 shows a normal figure, figure 33— a stoop-shouldered, with a layout that has a longer back and short front. Figure 34 shows parageusia figure; the upper part is sloped back, and the breast protrudes forward. In this case, longer front and shorter back of the layout (see the dashed line showing in figure 33 and figure 34, the normal position of the body).
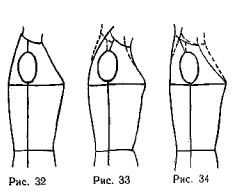
To better examine the errors arising due to inaccurate sizing, imagine the same bodice worn consistently on these figures.
Assume that the figure measured exactly. The bodice is placed on her (see figure 32), sits well, the balance of the product is not broken. Put the same back on another unit (see figure 33). In connection with the structural features of the neck and arms it can take two positions: 1) neck backless lies at the base of the neck and back, while the neckline of the front presses on the throat;
2) neck backless lies at the base of the neck and the waist line of the back is raised up.
The same bodice, worn on the figure (see figure 34) with a too straight neck, which pulls the neck back, is the wrong position. The curvature of the waistline at middle of the front indicates that the front bodice is short. Lowering the waist line of the back, slack at the level of the line width of the back indicate that the bodice is long. If measurements were taken correctly, the lines from the chest line to the shoulder line in all three cases would be different.
In figure 35 the solid lines show the curve corresponding to the shape shown in figure 32, dashed lines — the figure shown in figure 33, dashed lines of the figure shown in figure 34.
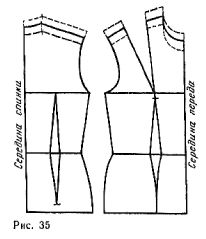
If the disturbed balance between back and front, it is necessary to unpick the shoulder seams, to position the waist horizontally, again chipped shoulder seams and fix the neckline.
If one part of the bodice has a surplus length and the second width, the fitting can be simplified, stabbing the excess fabric into a crease across the bodice between the openings (figure 36 and 37). Correction patterns, it is sufficient to measure the depth of the mortgaged folds and reduce the length of the patterns on this value.

Very protruding blades attached to the back stoop, which is emphasized by the settling of the crown of the sleeve of the back side (see x on figure 38). To remedy such openings, fabricate and place under this section of special openings Podlachia. The size and position depend on the shape.
Properly executed Podlachia allows you to smooth out the significant bulge back and to keep good form sleeves.
The neck, too thin in the front and a normal fullness in the back, causing a backlog of bodice at neckline. In this case, the slack of the neck at the mid front, you can take in a small tuck, as shown in figure 39. But this fix is hard to bear for pattern. Strut shoulder seams, smooth hand fabric of the front bodice at the base of the neck, as shoulder seams. Mark on the fabric the exact position of the neck, passing through the base of the neck.
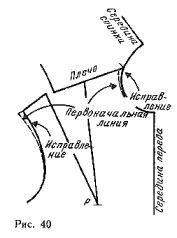
On Fig, 40 shows the movement of the neckline of the front towards the neckline of the back and the necessary correction for the width of the shoulder at the armhole of the front.
With a large fullness of the neck, and sometimes convexity of the clavicle at the base of the neck tight bodice at neckline in front. To remedy the defect strut shoulder seams and move the fabric from the armhole to the neck and, if necessary, cut it. How shoulder seams and fix the neckline, which is more open than at the beginning. The line of openings should also be correct.
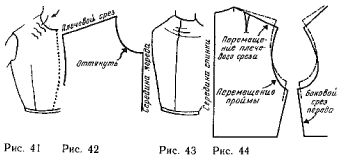
If the neck is too curved on the side of the front neckline of the bodice stretches. In figure 41 the small curved line with an arrow shows the location of the thickening of the neck, because of which the boundary between the neck and chest. Wavy lines in the picture show place of tension. It is useless to move the shoulder slice, if the slice and the middle of the front are positioned correctly. To remedy the defect and pull the fabric and iron in place of the tension it (is easy to perform, because this portion of the neck is cut in the oblique direction yarns of the fabric).
To outline the neckline, take an equity strip of cloth with a width of 3-4 cm and curve it around the neck, to see the actual position of the collar. Then on the bottom edge of the strips mark the line of the base of the neck with chalk or pins. Without removing the bodice pieces, measure half the length of the neck of the front on the planned line.
To make the necessary change to the template, sufficient to indicate the magnitude of the pulling (figure 42).
Obtained by measuring the magnitude of the pulling means that all of the slices of the neck, clipped to the base of the neck for that piece should be delayed for this length. Line vrachevanie collars should be increased considering pulling the neck.
If the shoulders are very high (above normal) across the back at the line width of the backrest are formed pleats (figure 43). To remedy the defect strut shoulder seam and redo it, reducing the slope of the shoulder cut. Corrects the angle of the shoulder cut entails a change of the length of the armscye curve.
If the length of the armscye curve were correct, enough to change its position on the curve by moving as a whole up or down (figure 44).
If the slope of the shoulder cut below the normal, and the lower part of the armhole should be as below (figure 45).
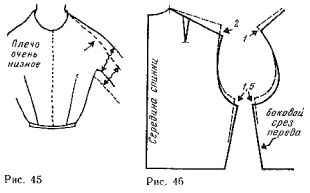
If the height of the shoulder cut on the back and the front need to change unequal, find the perimeter of the openings, lowering (or raising) her for half of the change in the height of the shoulder cut. Line the depth of the armhole should change by the same amount on the front and the back, to preserve the balance of the product. In figure 46, the line of the shoulder cut of the back is lowered 2 cm and the front is 1 cm In total length of openings decreased by 3 cm Line depth of the armhole should be lowered to 1.5 cm.
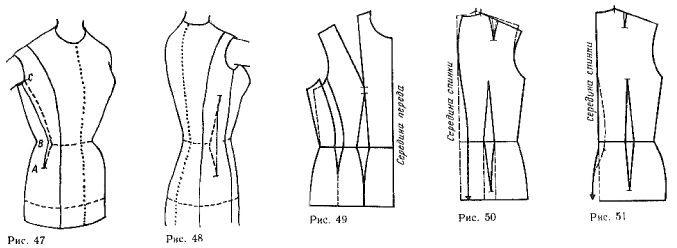
For the product at the figure with a large bulge at the thighs front at a distance of 8-10 cm down the waist line between the tuck at the waist front side seam should lay tuck, shown in figure 47.
If the bodice does not have excess width at the waist, you need to rip the tuck at the waist and side seam, otherwise this place will be a bias fabric.
If the bulge of the hips is significant, to ensure a tight fit of the fabric on the waist by increasing the solution Darts at the waist and side-seam impossible wrinkles. Lay the tuck, starting from the greatest bulge of the hips in the direction of the waist from point A to point In and re-tuck at the waist line and side seam on the same plot. Also lay the tuck on the back (figure 48).
On the front of the bodice quite often make the crease going in the armhole (see figure 47). The depth of the folds from the point C to the point equal to the solution Darts at the waist. Figure 49 shows the curve with this tuck.
Such a dart can be designed in any adjacent clothing, neotrazimoi waist.
If the blades hunched back are more than buttocks, you need to make changes to the drawing of the back, shown in figure 50. Starting from the line width of the back, line middle of back bends from the waist as tuck and then goes vertically.
Sometimes it is necessary to correct the tuck (or relief) made between the middle of the back and side seam. For this purpose, starting from the waist line, hold down the new line of tuck (see dashed lines). In the upper part of the backrest should provide a tuck in the middle back of the line width of the back of the neck and deep tucks from the shoulder seam; this should lower the line of the shoulder cut by the same amount. Then you need to lengthen the shoulder slice to keep it the original length.
If the buttocks are slightly and the back has the slouch, the fabric lays on the figure is fine. In this case, it is sufficient to lay in the middle of the back tuck by the waist line.
Strongly protruding buttocks cause the formation of oblique folds, which are corrected to have a supply of fabric in the middle back. Perekareva seam mid-back, extend the back at the bottom, as shown in figure 51.


