


")
Fitting and adjustment of layout follow this sequence:
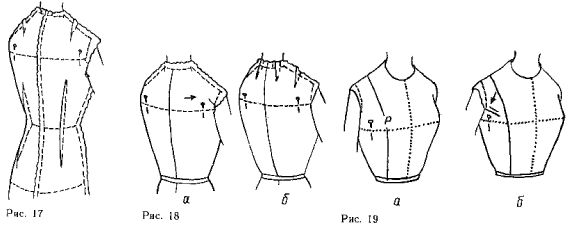
1. Put the layout on the shape seams to the outside (figure 17). Cleave the layout through the middle of the back .
2. Correctly place the neck of the back . Pin the back of a layout pin to the straps of the bra at the level of the line width of the back. Spread the layout in the figure.
3. If this creates slack in the fabric at the top of the armhole of the backrest (see arrow in figure 18, a ), should deepen the shoulder tuck. Strut for that shoulder seam, turn the excess fabric up and take it in the shoulder tuck. If the back is a little stooped, the depth of tuck may be equal to 2-3 cm . In some cases, eliminate the slack, taking the fabric at the end of the shoulder cut.
4. If the back near the neck has a bulge, do a little tuck from the neck of the back , as shown in figure 18, b. In this case, the width of the neck will change. Chip all the pins along the shoulder seam and making the necessary movement, align the line of the shoulder cut of the back line with her shoulder cut front. If tuck is deep enough (more than 0.6-0.7 cm ), curved lines in accordance with the shape of the site. The layout should fit to the shape freely without tension and slack. This is achieved by using tucks. One or more properly placed Darts do not emphasize, but on the contrary, hide excessively protruding parts of the shape.
To properly place on the layout, tuck, you have to abide by the following terms: horizontal line , which is on the convex parts of the shapes (the width of the back, chest, thighs) should be placed on the figure horizontally and the line of mid front and back vertically; the position of the Darts must correspond to the position of the convex segments of a shape.
5. If the layout at the neckline of the front behind the neck, or stretched, you need to move the fabric on the shoulder, or pushing it closer to the neck. Checking the fit of the layout on the neck of the front, fasten it at the neckline of the back with pins. If the depth of the neck is insufficient, set a new the neckline with pins or chalk.
6. Check is whether the line of the chest is strictly on the most protruding points of the chest (figure 19 ). If not, mark its new position.
7. Secure with pins the line of the chest horizontally to the side before hand.
8. If the distance between the most protruding points of the chest was measured correctly, when considering the FAS distance between the ends of the Darts should correspond to the width of the front shape, since the lateral part of the layout will be invisible.
If the ends of the Darts are too close together, the terrain is formed by the top pleats and Darts at the waist, chest will give excessive heaviness, emphasizing the lateral part of the front.
If the ends of the Darts are too apart, they do not provide a good fit of the front bodice. The new position of point P select pin.
9. The arrow on figure 19, b indicates the slack, which is formed at the armhole when there is insufficient depth of tuck.
When fitting the product to some figures there is a difficulty: it is possible to confuse slack with the slack of the fabric between it and figure is empty space. If the fabric forms a slack, should deepen the tuck. The sagging of tissue caused due to depressions in the figure, due to the fact that the shoulders are tilted forward. Strut the end of the shoulder cut top tuck. Then turn the excess fabric up, carefully smoothing out the fabric on the side from the chest to the shoulder. In figure 20 the direction of the arrows indicates the direction of fabric travel .
In order to avoid stretching of the shoulder sections, you need to fix the tissue between the second line of the tuck and cut the openings.
Clear the layout. Put the part that requires fixing on the table, gently unfold it and stick to it with a hot iron inextensible strip from any synthetic material or sew a narrow strip of thin fabric, cut out the common thread.
With a slight increase of the solution tucks the stock of fabric at the armhole becomes insufficient. In this case, you need to tack a piece of fabric to obtain the necessary allowances. To accomplish it better on the table not to deform the tissue.
In some cases, the depth of the top tuck can be very large. Don't think you made a mistake. This is true for shapes with highly developed shoulders and developed chest glands. Straightened the fabric at the arm openings, fix the tuck (Fig .20, the dashed line shows the new position of the line and tuck) and re-cleave the shoulder seams.
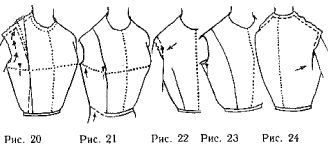
10. If the solution of the upper tuck is too large, the arm strongly stretches , the bodice on the chest around the side of the slice is lifted and will mess up the layout at the waist (figure 21, arrows). In addition, there is excess tissue around the apex of the chest. Strut shoulder cut and tuck, freely position the fabric along the line of openings and how tuck, reducing it to the solution. However the shoulder cuts.
And as a result of changing the upper tuck changes the line of openings . Lower your hand along the figures and, starting with the front push pin in the layout in the place of articulation of the arms with the torso at the level of the line width of the chest (see Fig . 5 b, as well as the arrow in figure 22 ) .
The line of the armhole front and back label pins, killing them to the line of the shoulder cut. Instead, you can pin the sleeve to the armhole and use it to mark a line of the armhole.
12. Trim the fabric at the armhole so that it is comfortable fit without creases. To correctly determine the depth of the openings is possible, when the hand is located along the shape or slightly raised.
First, determine whether sufficient width of the openings. If the layout is taking on a normal shape, when a sufficient width of the openings to stab a pleat depth of 4 cm (see pin in figure 23). Then remove pins, hammer in hand and, standing on the back of the customer, both hands take up the slack of the fabric to the back to form soft folds, starting from the line width of the backrest (figure 24).
The average allowance to the width of the bodice is 8 cm, but sometimes significantly increase that depends on the completeness of the figures on the area of the openings. Sometimes the required allowance on the line of the bust, equal to 12-14 cm When it is necessary to unpick the side seam, to release the stock, and then chop off the seam with pins
13. When fitting Darts at the waist line it is necessary that the bodice is a tight fit figure on the chest. Check the position of the two pins pinned on the sides of the bodice at the chest line (see figure 19 ).
If the solution of the Darts matches this shape, the fabric falls flat from the point R to the hip line and the additional line drawn on the fabric is perfectly vertical. Compare the silhouettes in figure 25 and 26.
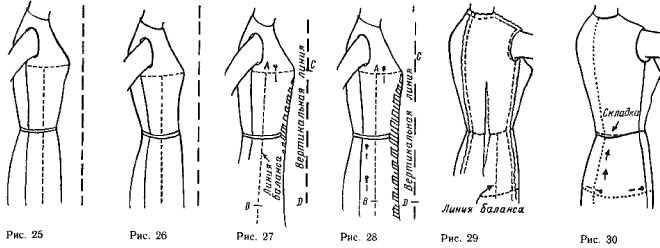
Figure 25 shows a silhouette with a normal posture and a good balancing product. Figure 26 depicts a silhouette of the upper part of which occupies the same position, as shown in figure 25, and the lower part (at the level of the hips) comes forward. For such a figure to fit Darts at the waist easy, but they are heavier waist, smoothing out the cavity, which is usually the case in the figure below the chest.
If the belly is tucked up, the solution tucks on the waist line may be insufficient. The balance line, held on the fabric will be inclined at the bottom part of the product in the back side, and there will be slanting folds to the most protruding points of the chest, as shown in figure 27. The balance line AB is not parallel to the vertical line CD. The shaded part of the figure shows how it is necessary to increase the solution Darts at the waist. If necessary, strut side seam, and placing the line AB vertically, cleave it with pins (figure 28). This should disappear all wrinkles caused by incorrect balance of the side of the bodice. To place the line vertically, you need to be just in front of her.
The lower portion of the tuck at the waist now has the appearance of folds and continues to the bottom (see the hatched area in figure 28).
To check the work done, it is necessary to correct both tuck. The magnitude of the reduction volume caused by the formation of folds for the product on the normal shape of the body is 1-2 cm, but sometimes it reaches 3-5 see If the solution tuck is too large, creases are directed from the tuck to the bottom of the armhole.
Strut tuck, will position the balance line vertically cleave and tuck, reducing it to the solution.
14. If a ripped side seam, baste it again so that the fabric is a tight fit figure, but has not been stretched (sometimes you can tattoo on both sides, to ensure the accuracy of the fit).
It is not always necessary extension of the layout on the hip line in the same amount as the reduced front bodice due to the increase in the depth of the bottom of the tuck at the waist line. So, if in a tuck taken 2 cm, enough to expand the layout along the side seam at the level of the hip line by 1 cm
15. Using the balance line, held on the fabric, check the fit of the back, which mainly is created by the Darts drawn on the basic pattern. For better fit most tuck subsequently divided into several smaller Darts. So, you often need to do two tuck half of the figure. Tuck scheduled on the layout opposite the outermost points of the figure. If tuck located incorrectly or has insufficient depth, formation of creases and slack tissue. To remedy the defect need to rip the tuck, place the fabric on the figure, focusing on the auxiliary line balance, and to lay the tucks where they are planned.
If the balance line is not vertical, then the depth of the tuck is not correct. The correct position is shown in figure 29. If the balance is disturbed, strut tuck and, if necessary, the side seam. Mark the balance line vertically and, if necessary, make two Darts instead of one. Maybe the first tuck, more direct, should be a little move to the middle of the back, and the second, slightly curved, the convexity of the thigh on the side.
16. To clarify the position of the waist line, tie a ribbon at the waist. If you need to fix this line, put the pins at the bottom edge of tape from mid front to mid back on one side of the layout.
17. The hips should remain horizontal. If not, prick a pin in a horizontal position (figure 30). If above the line of the hips from the middle of the back there is a surplus of fabric, move it up and put in a small horizontal pleat at the waist line.
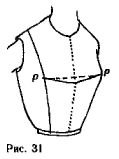
18. Horizontal tuck on the chest is required if you want to do the bodice with exaggerated bust and wide neck. Lay the tuck across the bodice between the most protruding points of the chest PP for snug fit fabric in this location (figure 31).
The fit layout is finished. It remains to transfer the fixes to the templates. This can be done after studying the following section.