


")
On the side opposite to that where the pin that holds the two layers of fabric, pinned it on the pin in front of each available, not capturing the second layer of fabric. If the figure is asymmetrical, corrections must be made in both halves of the layout.
After this, delete the thread smachivaniya without removing the pins. Take a copy of the underlying patterns, and make the correction. Then transfer these corrections to the basic pattern and erase unnecessary lines. The upper tuck. In figure 52 the fixes shown with thick dashed lines. Apply before base patterns on the front of the layout, carefully combining point P, the first line of upper tuck, a-line cut of the shoulder, armhole and part of the line side of the cut, how their pins. Move the patch to the template, marking them with a pencil. Then check the drawing, tracing and drawing all necessary lines. This work is usually done after transferring all the corrections, but to facilitate the understanding of each hotfix, the site contains detailed explanatory drawings.
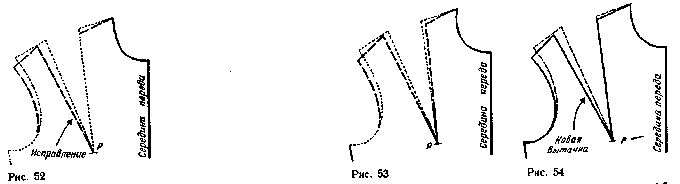
Figure 53 shows an incorrect translation fixes tuck. Instead of repairing darting from one side (from armhole) changes on both sides of the tuck. Swipe both lines of Darts on the line from point R to the line of the shoulder cut (figure 54).
In figure 55 the two convex dashed line shows the change both lines top tuck. This is due to the fact that usually under the breast (with the exception of the figures with underdeveloped breast glands) there is a small cavity that requires a change in this place lines of Darts. Do not wash the dashed lines, they can be useful further if you wish to make the bodice more fitting. In these cases, it is necessary to increase the measure of the width of the chest. Then close the tuck (figure 56) and draw the shoulder line I. the arm openings.
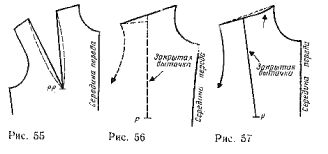
Shoulder cut. In figure 56, the dashed line shows the curvature of the line of the shoulder, caused a decrease in the length of the line Darts from the armhole. Shoulder line should be held straight.
If reducing the length of the line Darts formed from the side of the neck front or back (due to deflection of the shoulder from bra straps), it should be slightly curved line of the shoulder cut. Figure 57 shows an example when the recess on the figure is closer to the neck (arrow). This is due to the peculiar structure of the shoulder, and it should be considered to ensure good fit the bodice. Draw a line the shoulder of the cut, widening it from the neck, and then extend in a straight line to the armhole.
Tuck at the waist line of the front. In the same way as you did for the top Darts, pin the base pattern on the front of the layout zakalyvaya pins along the lines of correction. Apply the correction with a pencil (figure 58, dotted lines ). Connect the dots R and b (figure 59) in a straight line.
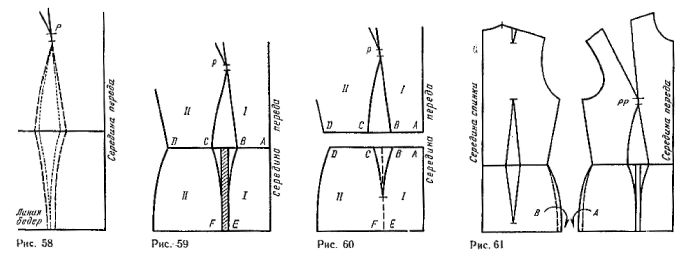
A second line of swipe Darts, slightly curved. This line is depending on the physique can also be direct. It extends from the top of the tuck ( a little below the point P) to a point on the waist line .
Down from the waist line guide line of the Darts in the form obtained by correcting, maintaining a small curvature. The distance between the lines tuck in the bottom you can limit to two straight lines parallel to the middle of the front (shaded area).
The decrease in the Darts at the waist on the front of the skirt. For products not cutting at the waist, hold both sides of the tuck at the waist line from the point P to the points C and b, then continue them until the points E and F on line and thighs. For the product, cut at the waist line (figure 60), move figure 59 on another sheet of paper and cut along the waist line.
On the bodice don't change anything — tuck at the waist leave the same. The skirt lay a fold given the girth of the hips. The decrease in the depth of tuck by the waist line of the skirt does not change the value of segment patterns at the waist, i.e. the length of segments AB and CD are the same (see figure 59 and 60).
The width of the hips. In the previous example, we did not increase the width of the skirt along the side cut, reduced by tuck (with the exception of tight-fitting skirts). Do this as follows: on the base curve to the hips front and back put the segments equal to half of the required increase (points A and b, figure 6 1 ) . Plotting points connect smooth lines with bulging waistline, as shown in the figure.
Based on the above examples you can transfer to the base template, any changes made on the layout.