Binding products start with a control sample. Provatas sample, we calculate the set and adding loops defined by the density knitting, choose a knit pattern. The drawing is arranged symmetrically to the middle of the back and front (this is important when using the vertical ornamental strips and harnesses).
Fibre gum (promazyvayut spokes are slightly thinner than those used in the main paper), go to vyvazhivanie basic pattern. The connection of the two mating types in the sample will help to determine their compatibility. When combining multiple patterns in a single product should note certain points:
the elasticity pattern (if the product is strongly stretched, to add a loop should not).
there are patterns of the same width and different in length (due to the removed loop);
To calculate the density of knitting horizontally and vertically you can make a stencil with a square neck 5 x 5 cm This stencil is applied to the associated sample and determine the number of loops (figure 416.). When calculating the density of knitting, you need to dial an even number of loops.
Consider, for example. The dense weave horizontally equal to 3 loops in 1 cm; back width - 50 cm Do the calculation and get the number of loops set for the product: 3 x p. 50 cm = 150 loops.
Sometimes rapport does not match the predicted number of loops and then they should be selected empirically (a bit to increase or decrease the estimated quantity).
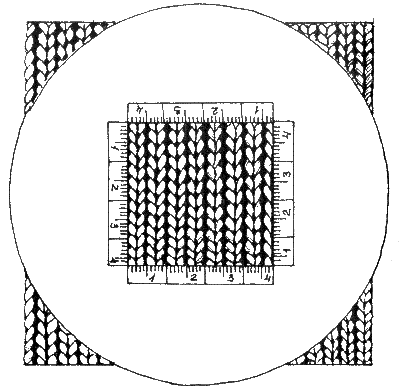
Figure 417. The stencil for calculating the density of knitting
Making the calculation of loops, go to work on the product.
Knitting start from the back, then vivasyan sleeves and only after that - shelves and small parts (collars, pockets, etc.). Front shelves vymazyvaja last. If you do not have enough yarn main color, the front part will be easier to combine with other color.
Crochet backless
If there is a rubber band, starting with the gum, if not, then knit the basic pattern of the back to the armhole (in the drawing to the point f). Next are finished armhole.
Vyvazhivanie armhole backless
Calculate vyvazhivanija the armholes of the back. Determine the number of loops in the width of the openings (cut OF) and divide it into 3 equal parts. The period OF = 4 cm x 3 loops = 12 loops. These 12 loops should be divided into 3 parts (figure 418).
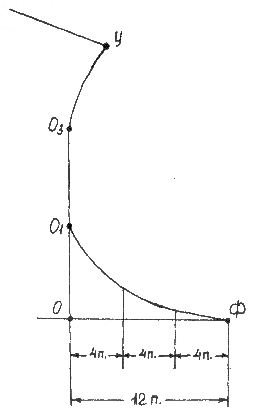
Figure 418. Drawing openings
In each part we have 4 loops, this means that in calculating vyvazhivanija of the armholes in each side need to be closed 4 times in the 1st loop. Knitting start with the 1st part. It 4 closed loop "pigtail". Further vivasyan the 2nd and 3rd part: in every front row subtracting 2 loops together at the beginning and end of the series.
Then from the point O1 knit without changing the number of loops in the ranks to the point O3. Above the point O3 are doing 2-3 additions in the 1st loop on the extension shoulder to the point d
The slope of the shoulder and neck backless
Form necks backs and the slope of the shoulder depends on the style. The number of loops in the shoulder slope always corresponds to the number of loops obavlenia.
Calculation of bauleni
Subtract loop groups (the number of loops in the groups is determined by calculation). To calculate the number of loops in the groups the decrease need the width of the shelves backless split into 3 equal parts (2 piece shoulder, 1 piece neck). Dividing the loops of each part on the number of groups (number of groups depends on the size of the product), get the number of loops in the group.
For example, the width of the shelves of the back equal to 50 turns, the number of groups for subtraction - 5. Do the calculation: (50 p.: 3 parts) : 5 groups = 3 loops. We got 3 loops in each group.
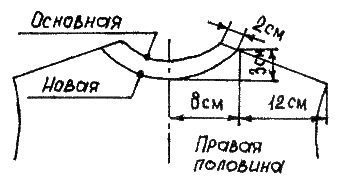
Figure 419. Drawing the neck and shoulders back
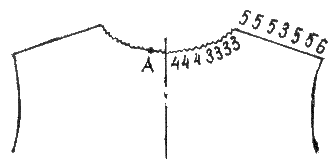
Figure 420. The distribution of loops on the neck and shoulders, backless
If in the calculation of residue remains even number of loops, their proportional shares are added to the shoulders, if the odd - distribute 2 shoulder with a difference in one loop.
Knitting spokes,and shoulder and neck backless
Note the edges and center of the neck backless color thread. Start knitting from the right shoulder. The first group of loops take the thread and knit to the center of the neck. Two groups of loops in the center of the neck as well remove the thread. From the center of the product is knit from the second skein. We are continuing our work to extreme groups of the left shoulder. Extreme loop left shoulder closed, inserting the needle outside of work. After all the loops of the shoulder on a string loop, flicking the needle and the ranks closed "pigtail".
The product turn on the reverse and are finished purl row. Then turn on the front side and after the 3rd row knit repeat from 1.
ATTENTION! When working note that knitting the neck done before-knit the shoulders (due to the removal in the first row 2 of loop groups). Don't try to knit the neck of the captured loops of the shoulder!
The calculation of the neck before and Rostock backless with round and oval cut.
We determine the number of loops that need to subtract for the formation of the neckline.
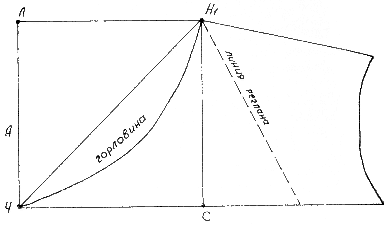
Figure 421. The drawing of the neck
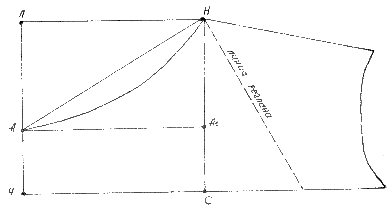
Figure 422. The drawing of the cut sprout
Determine how many loops are in the interval of emergency. Count the rows on a segment of the CCL. The designated number of loops for the subtraction. It will be equal to the number of loops in the interval the Champions League. The number of loops of CHS split into groups according to the ranks of the Champions League and the resulting subtraction curve ЧН1.
Here is an example calculation for a 30-th size.
Emergency cut equal to 5 cm or 15 loops (1 cm = 3 loops); cut the Champions League is 6 cm or 24 rows (1 cm = 4 rows).
15 loops divided into 24 series as follows: 1st row - 5 loops; 3rd row - 3 loop; 5th row: 2 hinges; 7 on 16 row - 1 th loop; 17-th to 24 - without obavlenia.
Subtraction starting on the left shelves. The left side of the subtraction produced on the front side on the front row and on the right is on the wrong side on the wrong rows.
Knitting set-in sleeves
The sleeve runs from the bottom up. To do this, we collect the loop on the calculation and vivasyan before the start of the crown (the crown is a line connecting points N, W, N, N1, O, P1, R, M1 and M).
Do the calculation loops in the narrowest (segment Д1С1) and the widest (segment RM) of the sleeve (see figure 414).
Defining the difference between the wide and narrow parts, get the number of loops required for the addition from the bottom to the narrow top wide part of the sleeve. The resulting loop divide in half and produce a uniform addition of both sides of the sleeves (for the uniform addition of calculated quantity of rows in the interval ШО1 divided by half of the above loops). The calculation of loops and rows is done according to the methods described previously.
Next, we consider the calculation of knitting the sleeves for example.
When calculating the density of knitting, in a pattern horizontally 3 loops in 1 cm vertical 4 loop (or set) to 1 cm.
From the drawing (see figure 414) Д1С1 cut (the narrowest place) - 16 cm x 3 loops = 48 loops; segment PM (the widest part) = 28 cm x 3 loops = 84 loops.
Calculate the number of loops for adding: PM - Д1С1 = 84 p. 48 p. = 36 loops.
Divide the resulting number on the two sides of the sleeves: p. 36 : 2 = 18 loops.
О1Ш defining the height (height to crown): 24 cm x 4 rows (calculated) = 96 rows determined by the frequency of adding loops on one side sleeve: 96 p.: 18. = 5,3.
The resulting number is rounded off to 5 - this means that when knitting in each 5-m (front) row must be added on the 1st loop.
ATTENTION! When calculating the frequency of addition of the result is always rounded up to an odd number. The addition is made only in the front (odd-numbered) rows.
On the example of the above calculation, consider vyvazhivanie just sleeves.
In each of the front row after edging loops make nakyd to yourself. Are finished the 1st row at the end before the edge loop make another yo. In the back row of nakhidi are finished crossed loops for the back wall. The addition to do with both sides of the sleeve until the needle will not loop 84.
In order not to stray, dropped into the pin in the row where the last addition.
The sleeve can be linked in two ways: separate left and right; 2 skeins (allows to achieve symmetry when knitting). The way binding of 2-tangles allows you to knit two sleeves at the same time.
Vyvazhivanie okata sleeves
To determine the number of loops to remove the crown, it is necessary to calculate the number of loops in the widest part of the sleeve (segment RM). After that, you need to calculate the number of rows in the segment OO1. Then, these rows divided by 3. Half hinge widest part of the sleeve is also divided by 3 and get the number of loops obavlenia on the crown. The number of stitches in each decrease in parts segment OO1 is defined either by rapport of the product (figure 423), or vymazyvaja and applying the product to the pattern (figure 424).
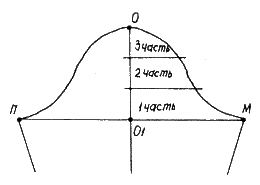
Figure 423. The scheme of distribution of the loops of the crown
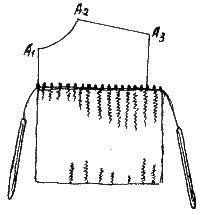
Figure 424. The attachment of the appliance to the pattern
Consider the calculation for example products 30 size:
Segment PM = 84 loops. The line segment OO1 = 11 cm x 4 loops = 44 loop (row).
Define the number of rows in 1/3 of the segment OO1. 1/3 OO1 =44 p.: 3 = 15 rows.
The designated number of loops for the subtraction in the crown: 84 p.: 2 = 42 p.
The designated number of loops for the subtraction in 1/3 OO1: p. 42 : 3 = 14 p.
Half of the loops of the 1st part divided by three, the second - on two. 14: 2 - 7.
Received 7 loops divided by 3 = 3 p + 4 p
The second half of the 1st part divided by 2 = 2 p + 2 p + 3 p
The second part is divided into the units = 14 obavlenia.
Loop 3 part divided by three. 14 loops : 3 = 4 times 3 and 2 loop residue spread in the upper ranks. Get the scheme 3, 3, 4, 4.
Vymazyvaja 1st part, diminish 4 loop and close the ranks of the "rope". Start vyvazhivanii okata. The decrease of do in each of the odd (front) row, securing the extreme loop of the crown "rope".
Front shelf
The front part of the product vivaselecta in the same way as the back, if there is no zipper. If there is a closure, the calculation is made on her entry. Closure is performed with a rubber band or other binding styles.
Bar-clasp you can knit not only along with the shelf, but separately. Placket, bound separately, can be sewn or tied to things. In this case, the gain loop fasteners from edge loops of the shelves (figure 424).
If shelves are knitted separately, then their left and right side of the dial along with the neck. They are elastic 1x1, 2x2 elastic or "rope" made of purl loops.
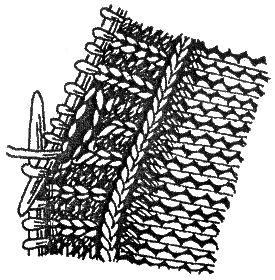
Figure 425. Attached strap with clasp
If the bar fit with the product, we collect the loop on the calculation and knit elastic band (if available). To determine the required number of loops (the pattern does not change), use in calculating an associated backrest. If you change the pattern to calculate the produce shelves again.
If the closure shelves are running simultaneously in different patterns, the height of the row in the work will be slightly increased due to the height of the associated drawing. This requires you to build the pattern in the ranks.
For example: the basic pattern above trims
Povezav the front shelf to the bar of the clasp, the clasp are finished 2 times, turn work inside out, not promazyvaya loops from the shelf, knit 2nd row to the front. Then knit left shelf in the same way. Between the vertical strap and the main pattern vivasyan auxiliary loop. It gives the possibility of vertical separation of shelves and straps and forms a vertical "groove" (figure 426).
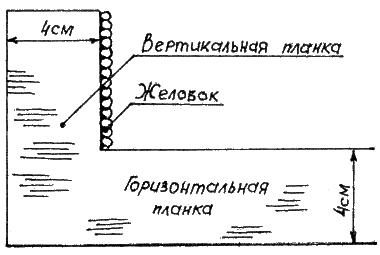
Figure 426. "The groove"
He fit the reverse loop. Turn the knitting, the loop is always removed as the edge. Next row knit in the usual way. Vymazyvaja bar "elastic", purl knit loop (number of loops must ensure that contact of the strips with a shelf inside-out loop). If the basic pattern trims the reverse surface of the auxiliary loop does not fit. Dawasa to the armhole, work continued on the calculation of the back.
The calculation of loops at the shoulder and neckline manufactured in the same way as on the back (the difference in that part of the armhole and the top part divided by 4, excluding the loops on the clasp). The number of loops of the shoulder front and back shelves are equal.
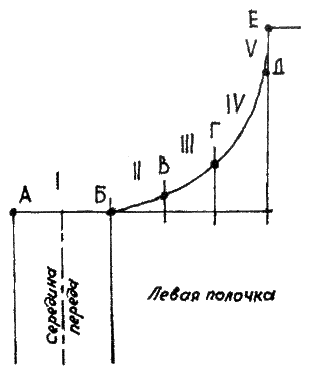
Figure 427. The scheme of dividing the front of the shelves
Buttonholes
Any closure button vymazat necessarily hinge holes. Loops are horizontal and vertical (this depends on the diameter of the buttons).
A horizontal loop. In the intended location, close 3 or more loops "pigtail". Removed leaving the last loop on the left needle, on the right, enter the number of loops equal to closed, and knit on.
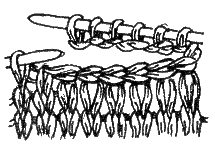
Figure 428. Horizontal loop
The vertical loop. In the intended for loop place the knitting split into two parts. Each piece are finished separately, then both parts being joined.
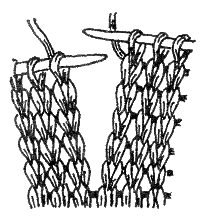
Figure 429. Vertical loop
Products are single-breasted and double-breasted. In baby knitting single breasted straps are used where loops are arranged in one row at a certain distance. The size of the loop must be smaller than the buttons, since the knitted loop is strongly stretched.
For knitting children's clothing is used the loop-hole. Make a loop with nakida and promazyvanija it after 2 loops. In the back row yo are finished. Loop on the strap feature at the center.
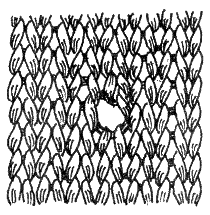
Figure 430. Loop-hole
The button should be located not less than 1.5-2 cm from the top edge of the bar. The distance between the loops on the clasp depends on the size of the product (but it should not exceed 15 cm). Width strap-clasp needs to be more buttons.
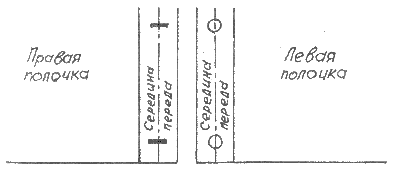
Figure 431. Scheme closure
2. USEFUL TIPS
Dispensing buttons on the strap, the first of them is placed on the waist or close, if the model with the belt. All the others - focusing on the first.
Things with thick yarn to stitch buttons on the "leg", otherwise closed, they are pressed into the bar.


