Important when knitting is the position of hands and yarns. Hands bend at the elbows and hold freely, without strain. The most comfortable position when the ball is at the bottom, so it didn't roll, it is desirable to place in any box. The working end of the thread clamp in the palm of the left hand, the thread passes through the index finger and the loop wrapped around your thumb. The threads hold in the palm, thumb and index finger is withdrawn in the side under the loop, then grab the thread with three fingers (figure 14).
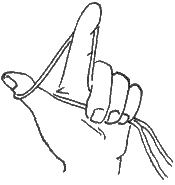
Figure 14.
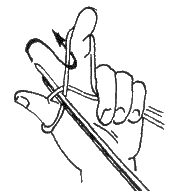
Figure 15.
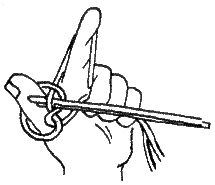
Figure 16.
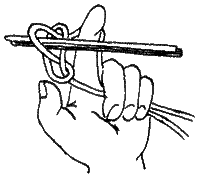
Figure 17.
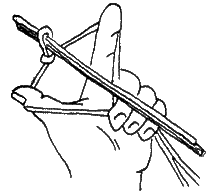
Figure 18.
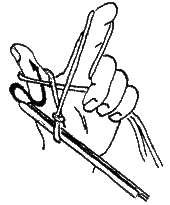
Figure 19.
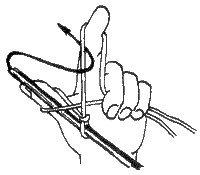
Figure 20.
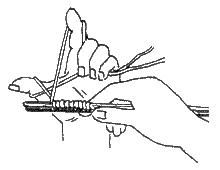
Figure 21.
Then in the loop set the initial number of two needles stacked together, their ends are introduced into the loop on your thumb, grab the thread, which lies on the index finger, and pull it into the loop on your thumb. Then knit the loop off thumb (figure 15) and tighten it with thumb and forefinger of the left hand, throwing them to the side (figures 16-18). The second and subsequent loop gain in the same order. The resulting loop is supported with the index finger of the right hand and pulled down on itself (figure 19). Enter the spokes in the loop on the thumb of the left hand underneath and catch the yarn with the index finger (figure 20). Knit loop removed from thumb of left hand and tighten with thumb and forefinger (figure 21). If the number of loops corresponds to the calculation of the product, one needle is removed. On the same needle remain dialed the desired number of loops (figure 22).
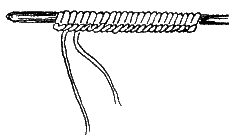
Figure 22.
In addition to the traditional set there is a set with one string. This set is used for the formation of buttonholes and edges of the product, continuing any ledge, such as a sleeve "kimono" (figure 23). Knitting with the knitting needle held in the right hand and the forefinger of the left hand throws the loop on the needle. Thus obtained the required number of loops to pounce on the left needle. For the set on the right needle with the left hand making a twisted loop (figure 24).
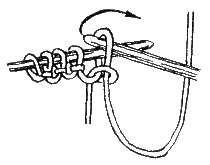
Figure 23. Set of loops with one thread on the left needle
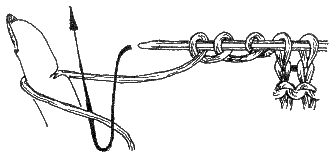
Figure 24. Set of loops with one thread on the right needle
Used in binding and decorative set. He used to enlarge the gum before going for the main knitting (figure 25).
Recruit a certain number of loops, vivasyan gum, and before proceeding to the main knitting are finished after every 5 loops an additional loop for the expansion of the product.
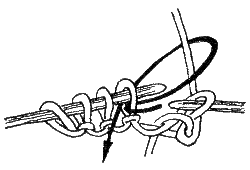
Figure 25. Decorative set
2. THE FRONT LOOP
Look closely at the loops accumulated on the needles. On the one hand they form nodules, and on the other chain, so the first number after the set will be on the wrong side. Before you start knitting the front loops, it is recommended to the preparatory purl purl row. Front-side purl rows of the preparatory series will look like the front and the opposite - purl the front. The hinge holds the front and rear walls (figure 26), and the lower arc between the hinges. The structure of the facial loop allows to carry it in 2 ways: the front and back walls.
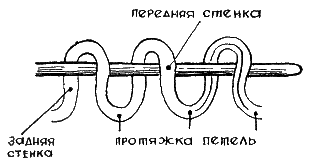
Figure 26. The structure of the loop
For the anterior wall (figures 27, 28).
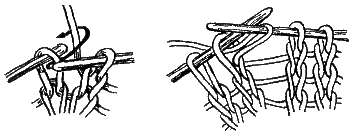
Figures 27,28. Vyvazhivanie the front loop over the front wall
This method of vyvazhivanija loop is used in garter binding. Called "REP" or "rope". It is also called "garter", as it looks the same on both sides.
The thread coming from the skein must lie on the index finger of his left hand, squeezing it between the fingers - index and middle. Before bind first, you need to remove, not promazyvaya, the extreme - edge of the loop. When knitting the front loop over the front wall, the end of the right needle is introduced from left to right in a loop on the left needle, grab the thread, located on the index finger of the left hand, and pull the loop.
Back (loop cross) (figure 29). The front loop knitted back to front and purl side of regular facial and purl loops get twisted loop. A distinctive feature of these hinges is that they are more dense and: less elastic. Used in knitting things that require more tight-knit (mittens, socks, etc.). The main disadvantage of this loop is that it lies obliquely in the product, breaking the beauty of the pattern.
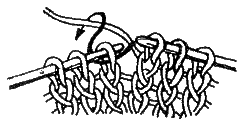
Figure 29. Vyvazhivanie the front loop behind the back wall
3. THE REVERSE LOOP
For the back wall (figures 30, 31).
Thread lying on the index finger of the right hand, as if to encircle upwards right needle and pull a loop.
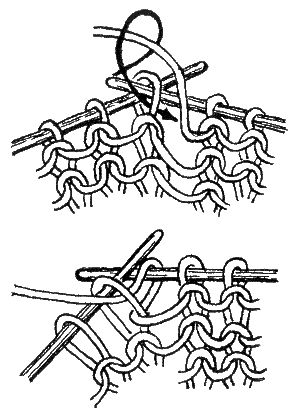
Figures 30,31. Vyvazhivanie reverse loop back
For the front wall (twisted loop, figure 32).
In this case, the end of the right needle is introduced into the loop on the left, on yourself, and take the thread in front of needle. Pull the loop.
ATTENTION! It should be remembered that the front back loop fit with inside-out loop of the first row.
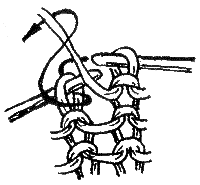
Figure 32. Vyvazhivanie the wrong hinges for the front wall
4. THE FORMATION OF SIDE EDGE
4.1. Apotherapy method
In flat products, regardless of the pattern and the number of loops, you should always gain the extra 2 - edge loop. At the beginning of the spokes of the first loop always shoot don't knit, the yarn passes from the top, ie before the start. It turns smooth apotherapy edge.
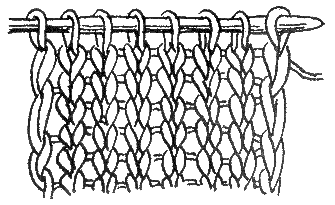
Figure 33. Apotherapy edge
4.2. Uzelkovaya method
If at the beginning of each of the first loop removed, then the thread in this case is at the bottom knitting, and the last loop knit purl. It turns smooth edge with knots.
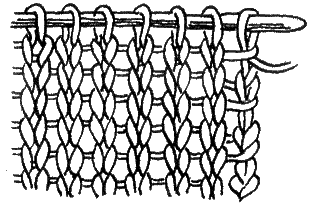
Figure 34. Edge with knots
5. USEFUL TIPS
Dialing loop the initial series, try to tighten them on the spokes, as the set of loops is two spokes, folded together. Subsequent rows should be knit looser.
The side edges are not loose, need to tighten the edge loops on the needle tighter than the rest of the loop.
The thickness of the thread, choose one to knit spokes № 2,5; 3.
Woolen yarn it is desirable to use bright colors. This will make the learning process more visual.
Work with cotton threads do not start until then, until you master the techniques of knitting wool yarn.
If you make a mistake when knitting in the row turned out a twisted loop, it is not promazyvaya, remove it on the right needle, and, turning, return on the left.


