


")
You'll need
Harsh canvas size 40 X 50 cm; fabric lining dimensions 40 X 50 cm; fine lace; the red woolen braid with a length of 20 cm with tassels; embroidery floss thread in 6 additions of red, carrot, yellow, blue, green colors; embroidery needle; diagram of the pattern in full size; embroidery; tracing paper; transfer paper; pencil, button.
Progress
The motive is embroidered on 1 side of purse one-sided satin-stitch, overlay grid, openwork "column" stitches "goat" and stalked.
1 half of the canvas, transfer the circuit pattern. Why put the motif on tracing paper. To the fabric place the transfer paper, cover with tracing paper and draw in pencil all the lines. Remove the tracing paper and carbon paper. Pull harsh fabric in the Hoop.
Simple stitches indicate all the contours of the cock. Start to embroider from the head. Gladeui-mi stitches the threads of the red color fill in the bird's head. Every stitch, start in the middle towards the edges. Place the stitches in a circle. Half eyes fill with threads of yellow colour vertical stitch, second half stitch with green thread. The nose make a slanted stitches with threads of carrot color. Place the stitches close to each other.
Scallop perform unilateral surface also with threads of carrot color. Make a stitch on the front side in the direction from the head to the side. Then make a small stitch on the underside, and run the next stitch to the head. All stitches should be of different lengths.
Cutting is one of the most beautiful types of embroidery. It is performed with white or light thread, combine with a scythe and counting stitch, using hemstitch. Used for geometric patterns in decoration of women's and men's shirts.
The neck of the cock, perform in the form of strips of carrot, green and yellow shades short cross stitches.
Embroider lower torso with red thread gladeville slanted stitches. Wing fill in the invoice grid. Yellow strands lay parallel slanting stitches. On top of them from a different angle do the other stitches. At intersections with red thread make the crosses. The contours of the upper torso mark stalked seam with red thread. Stitches lay with a slight slope. Each next stitch, start in the middle of the previous one. It needs to be equal length and placed on one side.
The upper half of the legs embroider simple stitches carrot color, radiating from a single point up to the torso. The lower part of the legs stalked embroider seam.
Tail embroider in the form of individual feathers. The edges of the feathers of the panel by gladium roll, starting each stitch from the middle in the direction
to the edge. Make the stitches different lengths, alternating short with long stitch. In the middle of the pen run mesh yellow or red thread. Stitches run diagonally. The tie at the intersections make a thread of green.
At the bottom of the bags do the chevrons blue thread. Withdraw the needle with the thread on the front side on the left side of your purse and lay 1 horizontal stitch from left to right. Then pull the needle in mid-stitch, and make a diagonal stitch down and to the right the same length. Follow the bottom horizontal stitch to the end of the diagonal stitch was in the middle. Again, make a diagonal stitch up and to the right. The next stitch should be the top horizontal. Under this scheme follow the whole series.
Stepping up from the bottom edge 1 cm and sew along the bottom edge of the wool braid. At a distance of 5 cm from the top edge, run a line of blue thread stalked seam. At a distance of 1 cm from it do the hemstitch. Why pull 4 strands of tissue. A needle with floss carrot-colored print in the lower left corner frayed and obviate the first 5 threads of the fabric. Then just obviate the same thread with the top edge frayed. Therefore, run the entire openwork.
Fold the fabric in half inside out and sew the side and bottom slices. Turn on the front side. Similarly, sew the lining. Insert the lining into the bag wrong side to wrong side. Top slices tuck inside. Enclose between them the ends of the cord and sew the 2 parts together. Sew in the middle of the top edge of the button (Fig. 85).
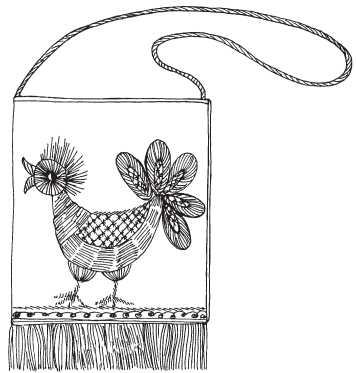
Figure 85. Baby bag "Cock"