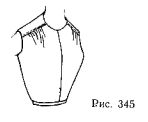
Bodice with straight yoke assemblies (figure 345). Put on a sheet of paper in front of the basic patterns, mark the length of the peplum (for example 12 cm).
 Correct the line side of the slice at the level of the waist line (see the solid line in figure 346).
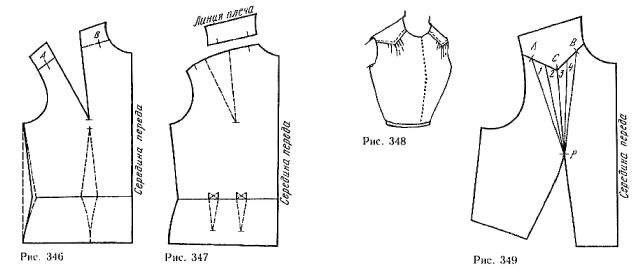
Close the top tuck and draw a straight line yoke, parallel to the line of the shoulder cut at the level approximately equal to half the height of the neck. This is a classic coquette, but it varies depending on fashion trends.
Note the short strokes and the location of the assemblies. The assemblies are typically distributed, retreating from the ends of the yoke 2-3 cm Cut the yoke and open the tuck. Swipe a slightly curved line assembled in the Assembly of the slice (figure 347).
This method of obtaining a drawing is used, if the line of the yoke perpendicular or nearly perpendicular to the first line of the tuck.
The bodice has a yoke in the form of corner assemblies (figure 348). Prepare a mold of the front, moving the top tuck in the tuck of the waist line (figure 349).
Draw a line yoke and select short strokes and the area assemblies. For symmetric yoke, place the notch at the same distance from the apex of the chest.
Divide the surface intended for assemblies, symmetrical strips 1, 2, 3 and 4, going from point R.
For ease in cutting when a strip end is too acute angle, draw a straight line through the points C and P, then the rest of the lines, bending them as shown in figure 350, and not bringing it to the point P by 0.1 cm Before cutting the pattern on the lines, put it in the place of cutting, gluing from the inside piece of the adhesive strips.
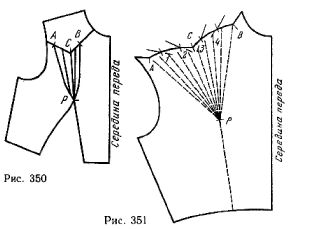
Cut the yoke (see figure 349). Cut carefully numbered strips, starting from the line CP, and close the dart.
Put the mold on a sheet of paper. Spread the strips evenly. Pin them and draw a line the upper edge of the front (figure 351).
Between the strips 2 and 3 place point C which corresponds to the angle position of the yoke. Point connect points A and b with a line through the middle of the upper sections of all stripes.
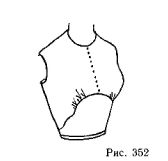
Bodice with a rounded yoke below the chest line (figure 352). Put on a sheet of paper bodice basic patterns with the tuck of the waist line.
Close the tuck of the waist line and the top and place the mold on a piece to line the yoke. Remove the mold from the figure and specify the line of the yoke, leaving the tuck of the waist line closed. Check nasecki and land Assembly locations (figure 353).
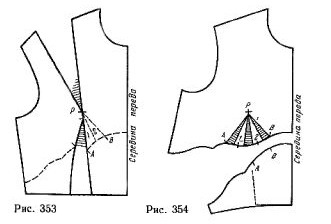
Due to the small distance between the line of the yoke and the point R surface between nasecki small. Leaving the tuck of the waist line closed, separate area reserved for assemblies, on strips 1 and 2.
Secure the tuck (from the notch And down) in a straight line, so the paper lies flat. Correct if necessary the drawing, and then cut off the yoke.
Reproduce the pattern on another sheet of paper (figure 354). Open Darts at top of the patterns, carving the entire surface of the tuck by the waist line to the point R.
Cut the pattern along the lines of the strips 1 and 2 to the point R. Close the top tuck. Swipe the bottom line of the top of the templates and transfer the notch, as shown in figure 354.
For such models maintain an adequate supply of tissue along proburivaja slice, and sometimes also around the waist, as sometimes one or the other of these parts need lengthening because of the snug bodice to the figure.


