


")
To facilitate the discharge patterns of the model, it is advisable to produce the bodice and skirt separately (with the exception of special cases), even if the model is no seam at the waist, and then link the two patterns of adhesive strip. If in advance to consider compliance with recesses and reliefs, then there is no problem.
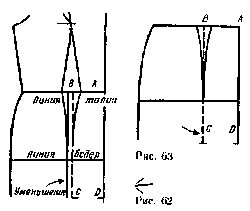
To construct the Darts in the front, move the part of the drawing of the skirt, which is contained between points A, b, C and D (figure 62), on a clean sheet of paper. Lay the pleat in direction of the arrow, placing the line of the sun on the second line (to reduce the girth). Put the rest of the skirt with figure 62 (a second line of Darts, waist and side cut) and get the real width of the skirt minus the reduction. The resulting pattern must exactly match the patterns shown in figure 63.
For building lines, side and bottom cut, take a large sheet of paper to fit the drawing of the skirt in full size. Toggle the drawing of the front cloth skirts with basic patterns (figure 64). Continue the line of the middle front from the waist to the desired length.
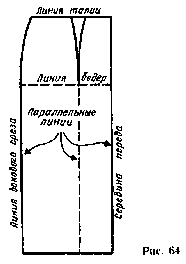
Through the obtained point swipe left horizontal line of the bottom and mark on it a segment equal to the width of the skirt at the hip line. Line of the side cut must be parallel to the line of mid front.
Turn drawing back the cloth of the skirt with the base patterns. Then continue the line in the middle and the side of the cut and guide the bottom line is, like the front cloth.
Tuck, drawn on the basic pattern, rarely do these, as they are represented in the drawing templates. Performing a single tuck on the back panel of the skirt, as a rule, does not provide a shape corresponding to the body type. Therefore, when fitting the skirts in the best shape to make two Darts. When performing Darts on the front panel takes into account primarily the aesthetic aspect (figure 65), therefore a careful adjustment of the layout is not required.
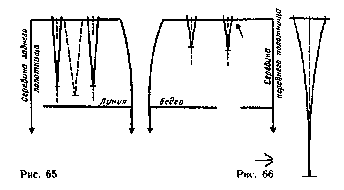
For building Darts on the rear cloth skirts divide a basic tuck into two. In the center of each tuck spend a dashed line parallel to the middle of the rear cloth skirts. The first tuck located at a distance of 6-7 cm from the middle of the cloth, the second — at a distance of 7-9 cm from the first.
On both sides of the dashed lines at the waist put the value of the solution of each tuck. The length of the Darts should be 2 or 3 cm less than the length of the main Darts. Plotting points connect smooth, slightly curved lines. If you increase the mortar tuck, and increase its length to avoid slack from its end. Conversely, if the solution tuck reduce, and then reduce its length.
For building Darts on the front cloth skirts solution main Darts spread into two or three Darts so that each had the solution is from 1.5 to 1.75 cm (if necessary, tuck could be deepened during the fitting).
Starting from the first line of the main Darts (see the arrow in figure 65), enter the new mortar tuck. Label the middle dot line, parallel to the line of mid front panel. Then divide the distance between the first dashed line and the line side of the slice in half and spend the second dashed line. On both sides set aside an amount equal to half of the solution tuck. The length of the Darts shall be equal to 7-8 cm. Line tucks on the front of the skirt needs to be bent in accordance with the figure in this place.
Tuck front cloth medium size half full size is shown in figure 66.