


")
To build a triangular neck (ri . 133) put on a sheet of paper in front of the base patterns while putting a tuck in top tuck on the waist line, as shown in figure 134. Tuck better with a little less, because with such the neckline is open all the top of the bodice. On the line of mid front specify the depth of the neck (e.g., 14 cm). In determining the maximum depth neckline take into account the position of the bra.
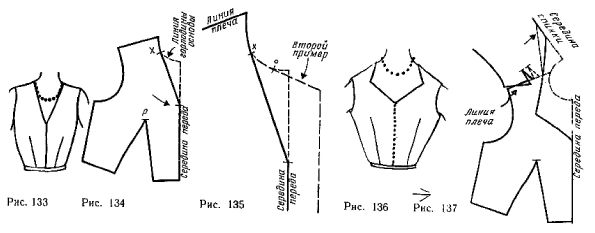
Point base of the neck of the front (point x in figure 135) swipe down in a straight line, which fades into the neckline of the basic patterns (solid line). From this point up the line of the neck of the fundamentals have not changed.
The same figure shows a second example of the construction of the line of the neck, which from the point of merges with the line of the neck base.
To build a deep neck (figure 136), completely revealing her neck, put on a sheet of paper in front of bodice basic patterns while putting a tuck in top tuck on the waist line. Cut out the pattern, leaving the edges of the seam allowance everywhere except the shoulder cut.
Put on a sheet of paper, the back of the bodice basic patterns, moving the dart on the shoulder line 1.5 cm to the armhole. Cut out the pattern, leaving everywhere the allowances.
Put the patterns back and front, connecting them along the lines of the shoulder cuts, as shown in figure 137, starting from the neck and to tuck the back (no matter that their lines intersect at the arm openings and the line of the shoulder cut of the back of a long line of the shoulder cut of the front). It only needs to construct the cutout.
Draw a line cut. This can be done in two ways. If the configuration is simple enough to impose a pattern on the figure and mark on it the neckline. If the neckline has a complex shape, then using strips of cloth attached to the straps of the bra, play the future shape of the neck, as shown in figure 138.
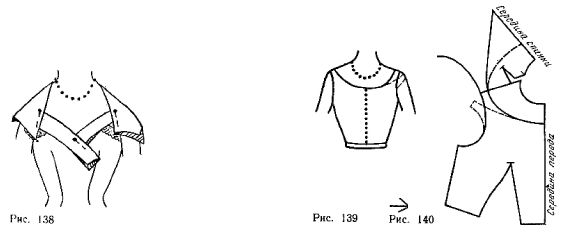
To hold the neckline on the pattern, place it on the layout and translate the resulting form (see figure 137). In this example, the neck backless sharp, naturally combined with the shape of the neckline of the front. The dashed line arrow, indicates the maximum depth of the neckline backless.
To learn how to choose and execute neckline in accordance with the figure, it should be remembered that in some forms the neckline is too are the clavicle, with another cut, even more open, it is possible to alleviate this drawback. It is necessary to pay attention to the shape of the shoulders, as not always they should be strongly open. For shapes with protruding blades, it is recommended that the edge of the neckline passes through the speakers of their points, as the contrast colour fabric and leather hides of the blade. If the neck passes above or below the most protruding parts of the blades, you should put cloth on the edge of the neck, so she was not behind the back.
To obtain the cleavage of various forms of use in the manner shown in figure 137. Do not just take a deep cutout, so that if necessary it can be corrected.
To build a wide neckline (figure 139) put on a sheet of paper, as explained above, the front and the back without moving the shoulder dart of the back. Connect the front and back lines of the shoulder sections, equating them through the openings (figure 140).
Apply on the pattern cutout of the desired shape. Figure 140 shows two neck back, he and the other combined with the cut of the neck of the front (solid and dashed lines ).
In figure 139 and 140, the dashed line shows the neckline at which the shoulder becomes completely open. With this execution model it is impossible to raise the arm