")
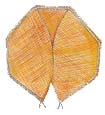
• Pelmet can consist of one, two or three sections.
• The width of the section depends on the length of the cornice. Each section of the pelmet is in the middle of a smooth plot (1/3 of the width of the part) and on both sides of it is gathered plots (1/3 width).
The calculation of the width of the pelmet
• If a pelmet consists of only one section, its width is equal to the length of the cornice.
• For lambrequin of two sections, one of which overlaps the other 1/3, the width of the section is calculated as follows: each partition consists of 3/3 = 6/3; you have to subtract 1/3 of that one section overlaps another = 5/3.
Measure the length of the cornice, divide it by 5 = 1/3 of the width of the section. This value is again multiplied by 3 = the width of one section of the pelmet.
• Three-piece for pelmets, where each section overlaps by 1/3: 2/3 9/3 minus (overlapping) = 7/3. The length of the cornice is divided by 7 and multiplied by 3 = the width of one section.
Drafting patterns section of the pelmet
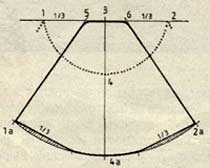
• To make the pattern section of the valance, pin to the wall a large sheet of paper, draw a horizontal line with a length equal to the calculated width of the section (in the drawing, lines 1-2), and using the fixed points 1 and 2 of the cord hangs watertite the form of a section of the pelmet (the dotted line in the drawing).
• This form is put on a sheet of paper. From the mid point of width of section (3) swipe down the vertical line and mark on it:
the height of the section (4) = point of intersection of the dotted lines and vertical
height of the paper pattern (4A) = height of the section plus the desired margin (depending on tissue density they make up 50 - 80 % of the width of the section, more for thinner fabric and less dense).
• The bottom edge of the details of paper pattern will watertite with a compass: the center at point 3, the arc through the point 4, see drawing.
• 1/2 the length of the lower edge section of the pelmet (1-4) shift on circumference of the circle from point 4A get the point 1A. In the same way defined point 2A.
• The width of the section is divided into three parts - see points 5 and 6 = smooth plot. Now connect by straight lines the points 1A and 5 2A and 6 - on these sites the fabric will then be pulled down.
• Avoid too thick draperies on both sides, along the bottom edge of the pattern to the left and right of land equal to 1/3 of the length of the lower edge, a little spremite, see drawing.
Points 5 and 6 connect the slightly rounded line. The item received cut.
Cutting
• The fabric is cut at an angle of 45 degrees.
• Three identical parts to cut out with seam 2 cm.
Job description
• On the rounded edge of each section to do a double hem with a width of 1 cm.
• The hem is better to wear special flexible metal belt. Fasten the ends.
• Three parts are folded wrong side up. The middle section is under the two side (left).
• Sew along the top edge with a seam allowance of 1 cm.
• Top items received zautyuzhit on the wrong side in the width 2 see
• From the inside of the pelmet, at a distance of 1 cm from the top edge to pristroit on both sides of the wkra curtain tape.
• Filament tape to pull to pull only 1/3 of the width of each section right and left, while the middle third remained smooth
• A valance hang-out and strengthen on the ledge with the clips at the beginning, end and between sections